DIY Accordion Paper Butterflies
Thank you to ASTROBRIGHTS® Papers for sponsoring this post , DIY Accordion Paper Butterflies With ASTROBRIGHTS®, as a part of ASTROBRIGHTS® COLORIZE campaign. All opinions are 100% my own.
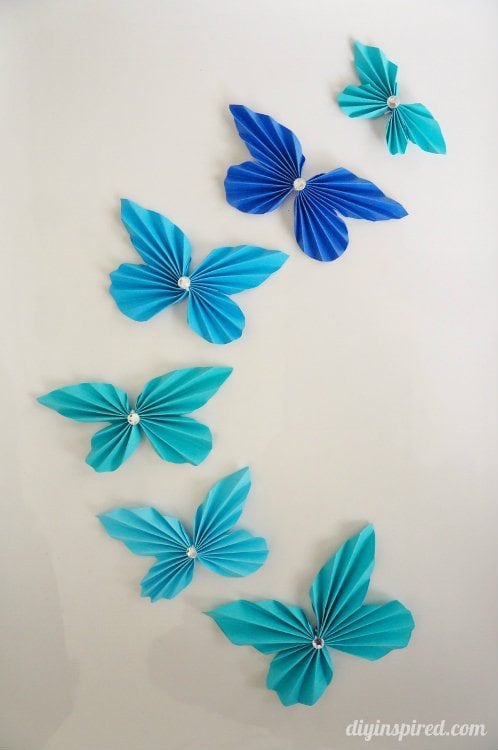
This year, for my daughter’s fifth birthday party, she chose Cinderella as the theme. She specifically told me, “No mama, not the book. I would like my party like Cinderella the movie.” She was referring to the newest 2015 release of Cinderella. This news from my four year old was SO exciting to me. I LOVE this idea. In the movie, Cinderella’s father brings her a paper butterfly from his travels. I thought of incorporating the butterflies in hues of blue throughout her party.
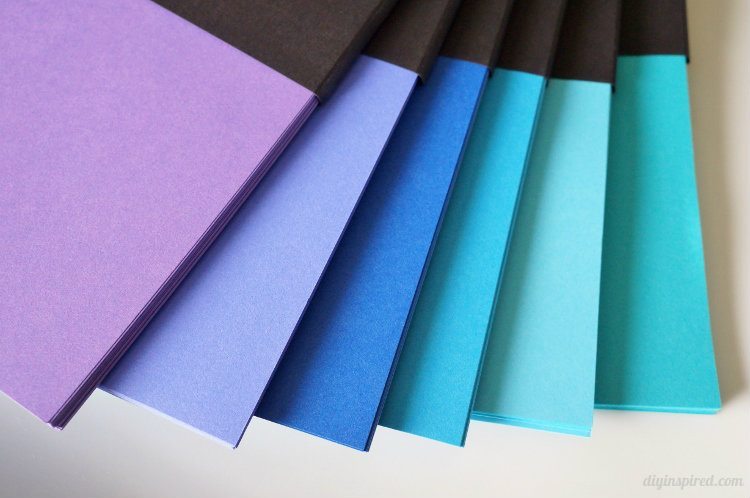
ASTROBRIGHTS® Papers is a line of vibrant color paper. It is PERFECT for this project. The colors I chose for the party are (pictured above top to bottom):
- Gravity Grape
- Venus Violet
- Blast-Off Blue
- Celestial Blue
- Lunar Blue
- Terrestrial Teal
Aren’t they gorgeous? I made these DIY Accordion Paper Butterflies, which are absolutely addicting to make by the way!
Materials:
- ASTROBRIGHTS® paper
 colors of choice
 - Circle punches (I used 2”, 2.5”, and 3”)
- Ruler
- Pencil
- Scissors
- String
- Gems or buttons
- Glue and Paper Lanterns (optional)
 colors of choice
DIY Accordion Paper Butterflies Instructions:
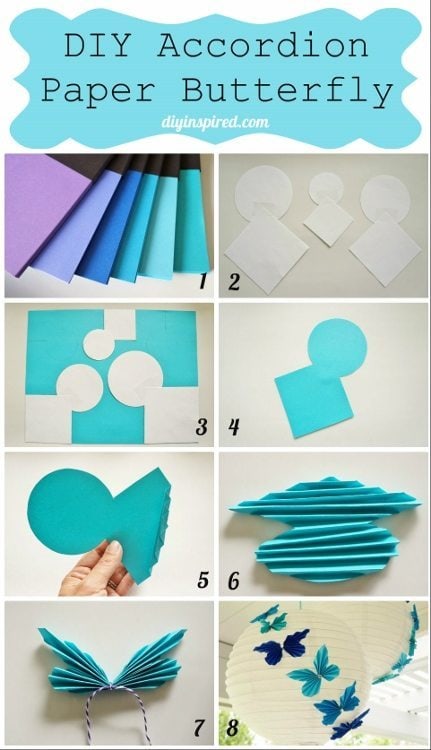
Step 1: Choose your ASTROBRIGHTS®colors. There are 25 to choose from.
Step 2: Make your template. The butterfly template is simply a circle and a square. You can make it any size you wish. I made three different ones. You want the circle and square to be the same with. For example, if you have a 3” diameter circle, you need a 3”X3” square. I used circle punches but if you don’t have those, you can trace the rim of a cup or something similar. Overlap the square and circle and tape it as shown.
Step 3: Next, trace the templates. I wanted to maximize one sheet of paper so I was able to fit one 3” template, one 2.5” template, and three 2” templates.
Step 4: Cut out each template as shown.
Step 5 (Pictures 5 and 6): Make an accordion fold with your template lengthwise.
Step 6 (Picture 7): Bend the center of the butterfly and tie it with a string in a knot. Trim the excess string and gently pull the wings open by quadrant.
One I tied and opened each butterfly; I added a rhinestone in the center. These are so fun to make I kept going and going!

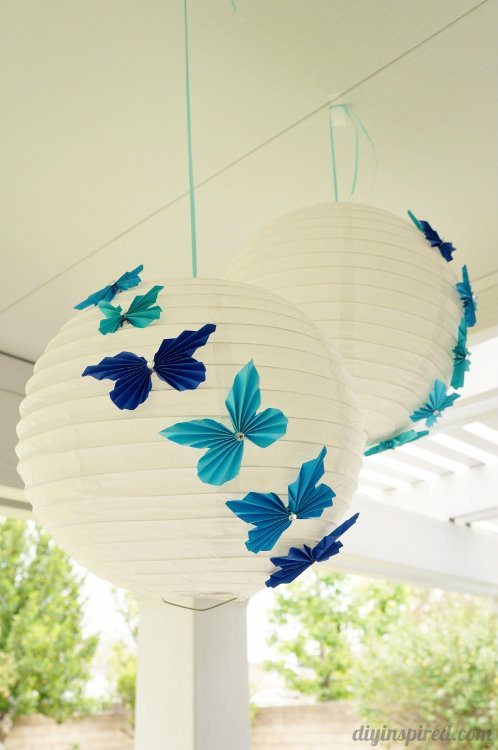
Next, I glued them onto paper lanterns to hang up outside for the birthday party.

I think I am also going to make these for the invitations we are handing out as well as on some other birthday décor. Stay tuned!
You can find more inspiration and ideas to COLORIZE your life at COLORIZE.tumblr.com and on Facebook.
Adorable lanterns! My girls would love them in the playroom or in their bedroom!
Thank you! Great idea to put them in the girl’s room!
Bright colors make me happy! Wonderful projects and your lanterns are gorgeous!
Those butterflies are so gorgeous! What a sweet project for a birthday party and you can put them in her room after.
Those colors are so beautiful! Blue is my favorite.
Thank you, Amy!
These are so pretty – what a lovely idea, I imagine once you start making these it’s hard to stop – the whole house could end up with a pretty butterfly accent!
So true, Julie! They are addicting to make! Thanks for stopping by!
I also love blue. these would make a great decoration for a summer party, perhaps even strung up like bunting. Thanks
Great idea! Thanks. Claire!
Very pretty! I love all the different shades of blue.
Thank you, Kathleen!
They are so beautiful! My daughters would love these in their rooms. They are so creative and elegant. Thanks for sharing at Inspire Me Mondays!
Thanks for having me, Brandi!
I want to m are the butterflies out of Astrobrights paper. Is this just colored paper or cord stock thickness?
Hi Liz! It’s just colored paper. So glad you like them!
nice one- i tried it myself !
Question- How did you glue on the butterflies? Did you use hot glue? Or normal school glue?
Hi Maria! Hot glue 🙂
The butterflies are so beautiful. What about using patterned paper like scrapbook paper.
I love that idea!