• Project Gallery
  • DIY
    • Recycled DIY
    • Upcycled DIY
    • Repurposed DIY
    • Refurbished DIY
    • DIY Furniture
    • Repurposed Furniture
    • Thrift Store Transformations
  • Crafts
    • Wood Crafts
    • Paper Crafts
    • Photo Crafts
    • Kids Craft Ideas
    • Doll Crafts
    • Felt Crafts
    • Stenciling
    • Gift Wrapping
    • Printables
  • Party
    • Birthday Party
    • Baby Shower
    • Bridal Shower
    • Wedding
    • Team Sports
    • Sweets and Treats
    • Cocktail Corner
  • Holidays
    • St. Patrick’s Day
    • Easter
    • Earth Day
    • Teacher Appreciation
    • Mother’s Day
    • Father’s Day
    • Fourth of July
    • Back to School
    • Halloween
    • Halloween Costumes
    • Thanksgiving
    • Elf on the Shelf
    • Christmas
    • New Years
    • Valentine’s Day
  • Home & Garden
    • Storage & Organization
    • Cleaning Tips
    • Gardening
    • Makeovers
    • Kid Stuff Makeovers
    • DIY Tips & Tricks
    • DIY Artwork
    • Curb Appeal
  • Health & Beauty
    • Health & Wellness
    • Bath & Body
  • Nav Social Menu

    • Facebook
    • Instagram
    • Pinterest
    • Twitter
    • YouTube

DIY Inspired

Repurpose, Reinvent

  • About
  • Contact
  • Advertising
  • Featured
  • Disclosure

Crafts Trash To Treasure

Recycled Book Page Wreath Tutorial

recycled-book-page-wreath-tutorial (2)

This recycled book page wreath tutorial was an oldie but goodie trash to treasure idea.  I wanted to re-share it because I thought it may have gotten lost in the mix of over 600 posts I’ve published and I thought it was a fun book page craft! I had a damaged antique book with beautiful gold leafed pages.  The book is a book of poems by Keats, however it is falling apart and some pages are missing, so I decided to upcycle it into a wreath and turn it from trash to treasure.

Here is what you need:

  • Plumbing Insulation Tube
  • Scissors
  • Duct Tape
  • Book
  • Glue Gun and Glue Sticks
  • Sharp Knife

Instructions:

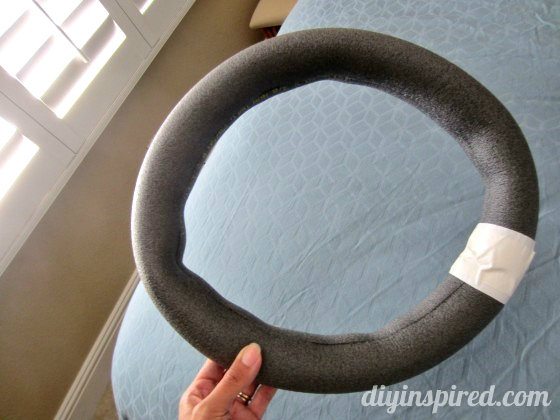
Start by cutting the plumbing insulation tube in half (one tube makes two wreaths).  Set aside one tube for another project. Carefully and gradually peel away the adhesive strip and stick the two sides together.  I say “carefully and gradually” because this sucker’s extremely sticky.  Next, tape the two ends together with duct tape. If you pinch and massage the tube, it will form into a circle and end up looking like this.

recycled-book-page-wreath-tutorial (4)

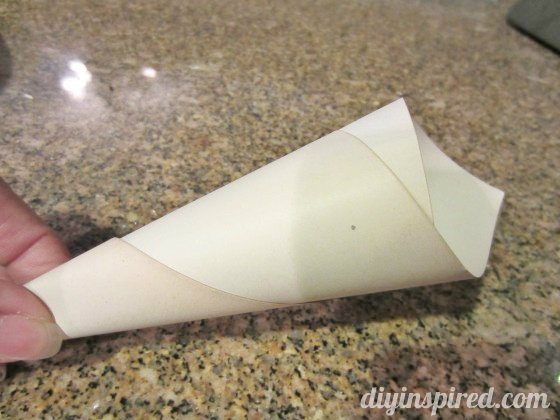
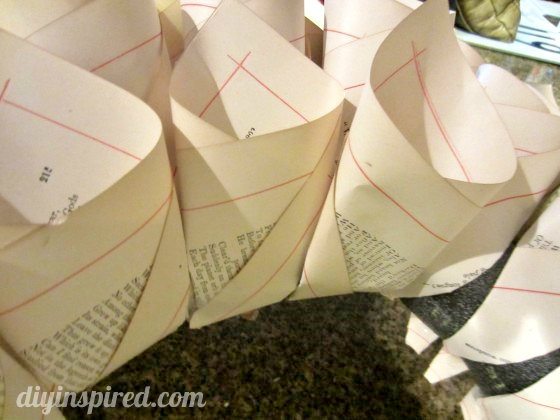
Next, cut your pages out of the book.  I found that the fastest and cleanest way is to use a sharp knife. One by one, roll each page to make a cone shape and flatten the bottom part.

recycled-book-page-wreath-tutorial (5)

recycled-book-page-wreath-tutorial (6)

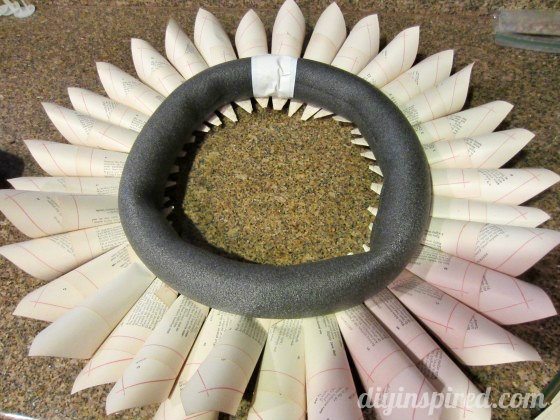
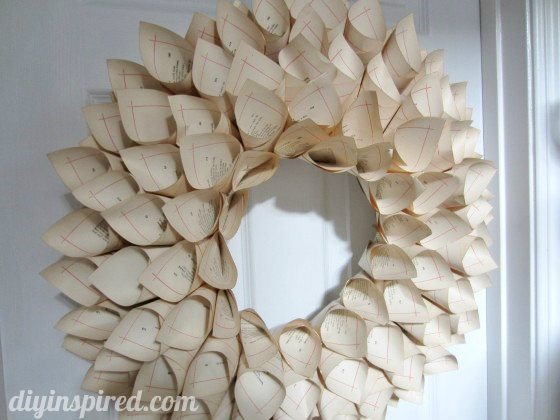
Using a hot glue gun, glue the cones onto the foam wreath. After your first layer, turn the wreath over.  You have just finished the back of the wreath. I used approximately 35 pages for the first layer. Start your second layer. For the third, fourth, and fifth layer, you will glue the cone over the ring as shown below.  After the fifth layer, “QC” your wreath and fill any open gaps with another cone.

recycled-book-page-wreath-tutorial (7)

recycled-book-page-wreath-tutorial (8)

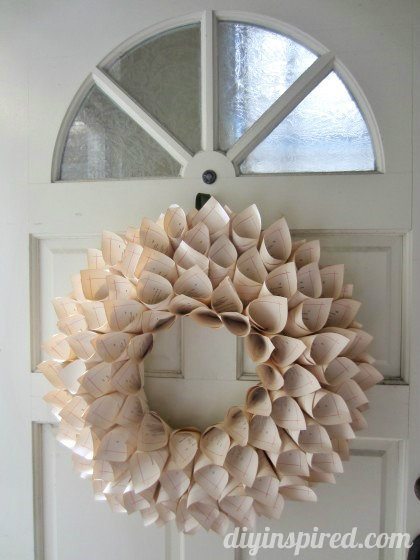
Here are some after pictures.

recycled-book-page-wreath-tutorial (2)

recycled-book-page-wreath-tutorial (1)

recycled-book-page-wreath-tutorial (3)

  • Share
  • Twitter


6 Comments

Join our Community of Crafters!

Stay updated and never miss a thing!

Disclosure and Privacy Policy
Previous Post: « Old Mirror Facelift
Next Post: 12 Homemade Gift Ideas »

Reader Interactions

Comments

  1. Tess @ Tips on Life and Love says

    October 10, 2013 at 10:43 am

    What other kind of paper would you use besides book? I would love to try to create a fall-inspired wreath.

    Reply
    • Dinah Wulf says

      October 10, 2013 at 2:00 pm

      Hi Tess! You can use any type of paper. Try different coordinating scrapbook paper in different fall colors and patterns. Each sheet will make 4 cones if you make them 6″X 6″. They will be a little larger than the ones in this wreath, but that means less cones to worry about!

      Reply
  2. Tara says

    October 10, 2013 at 11:27 am

    I love it Dinah! This would be a great way to use books that were damaged but you didn’t want to just throw them away. LOVE the finished product 🙂

    Reply
    • Dinah Wulf says

      October 10, 2013 at 2:00 pm

      Thank you Tara! I really do love this wreath!

      Reply
  3. Jessica says

    October 24, 2013 at 5:40 pm

    Fantastic! I work part-time at a used bookstore, I think I will be making this as a decoration for the inside door 🙂

    I feel like this entire website could double the size of my Pinterest…is there a such thing as a Pinterest crash due to an information overload??? Lol!

    Reply
    • Dinah Wulf says

      October 24, 2013 at 5:45 pm

      Ha! Thank you SO much Jessica!! You have no idea how much that means to me! 🙂 Hope you try it out!

      Reply

Leave a Reply Cancel reply

Your email address will not be published. Required fields are marked *

This site uses Akismet to reduce spam. Learn how your comment data is processed.

Primary Sidebar

Welcome!

DIY Inspired Profile Picture 2015Thank you for visiting! I'm Dinah and I am a full time Mother, Blogger and Writer. I'm honored to be named one of Mashable's 10 Mom Blogs Full of Inspiring Advice. {Read more about me here}

Join our Community of Crafters!

Stay updated and never miss a thing!

Disclosure and Privacy Policy

Stay updated and never miss a thing!

Footer

You might also love these

Easy Felt Flower Barrettes

DIY No Sew Felt Flowers

DIY Felt Tassel Keychains

DIY Felt Tassel Keychains

Awkward Shaped Gifts Wrapping Idea

12 Clever Gift Wrapping Ideas

Easy Gift Idea for Boyfriend

Easy DIY Photo Holder

Paper Flower Gold Hoop Wreath

30 Paper Flower Craft Tutorials

Copyright © 2021 · Divine theme by Restored 316

Copyright © 2005–2021 DIY Inspired. Installed and customized by TCN Design Studio