• Project Gallery
  • DIY
    • Recycled DIY
    • Upcycled DIY
    • Repurposed DIY
    • Refurbished DIY
    • DIY Furniture
    • Repurposed Furniture
    • Thrift Store Transformations
  • Crafts
    • Wood Crafts
    • Paper Crafts
    • Photo Crafts
    • Kids Craft Ideas
    • Doll Crafts
    • Felt Crafts
    • Stenciling
    • Gift Wrapping
    • Printables
  • Party
    • Birthday Party
    • Baby Shower
    • Bridal Shower
    • Wedding
    • Team Sports
    • Sweets and Treats
    • Cocktail Corner
  • Holidays
    • Valentine’s Day
    • St. Patrick’s Day
    • Easter
    • Earth Day
    • Teacher Appreciation
    • Mother’s Day
    • Father’s Day
    • Fourth of July
    • Back to School
    • Halloween
    • Halloween Costumes
    • Thanksgiving
    • Elf on the Shelf
    • Christmas
    • New Years
  • Home & Garden
    • Storage & Organization
    • Cleaning Tips
    • Gardening
    • Makeovers
    • Kid Stuff Makeovers
    • DIY Tips & Tricks
    • DIY Artwork
    • Curb Appeal
  • Health & Beauty
    • Health & Wellness
    • Bath & Body
  • Nav Social Menu

    • Facebook
    • Instagram
    • Pinterest
    • Twitter
    • YouTube

DIY Inspired

Repurpose, Reinvent

  • About
  • Contact
  • Advertising
  • Featured
  • Disclosure

Kids Craft Ideas

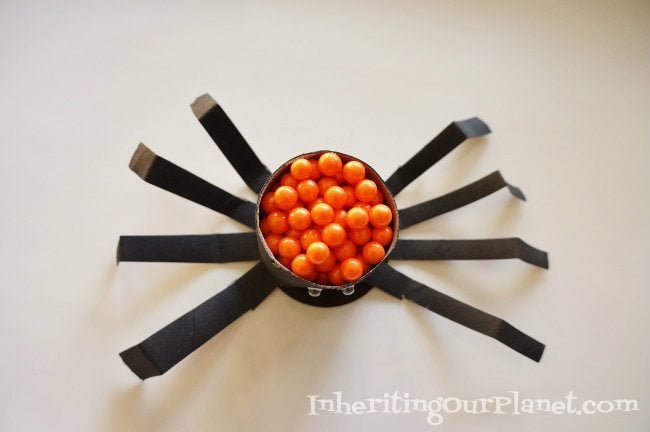
Toilet Paper Roll Spider

Toilet-Paper-Roll-Halloween-Spider

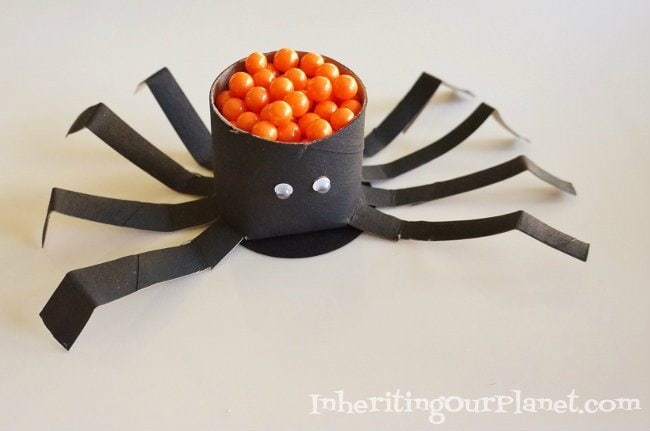
Mia and I love doing toilet paper roll crafts. The craft closet is always stocked with them. As usual, when we decide on a craft to make, whatever Mia says goes! This time, since we are so close to Halloween, we decided to make a little spider.  We left the top open so that you can put candies inside. These would make great party favors for a Halloween party. Here is how you make our toilet paper roll spider.

Materials:

  • Toilet paper roll (one per spider)
  • Black craft paint
  • Paint brush
  • Scissors
  • Circle craft punch
  • Black cardstock
  • Tape
  • Wiggly eyes

First, simply paint the outside of the spider. We left the inside unpainted because we wanted to put candies inside. If your candies are wrapped, you can also paint the inside for a more finished look. Leave a little bit of cardboard to fold inward.

Toilet-Paper-Roll-Spider


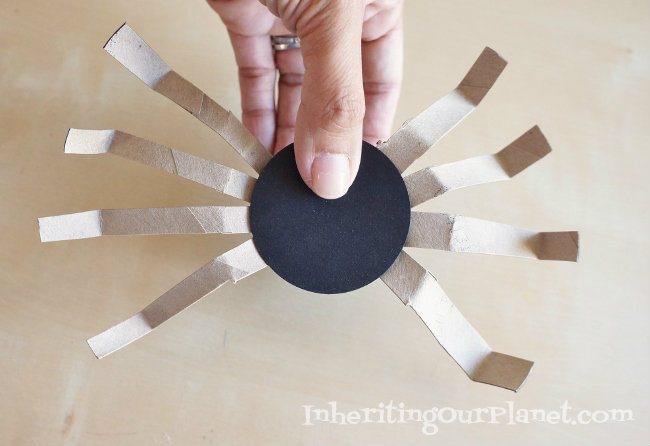
Next, cut off two sides; a rectangle approximately ¾ of the way up the roll. This will be the front and back of the spider. Cut the remaining side into eight spider legs. Bend the tips as shown.

Toilet-Paper-Roll-Spider-1


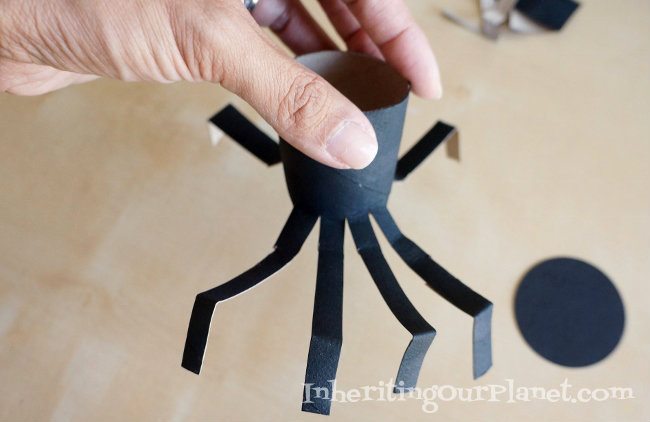
Cut a circle out of black cardstock with a circle punch. Place it on the bottom of the spider, and then tape the bottom on using the flaps from step one.

Toilet-Paper-Roll-Spider-2


Put some wiggly eyes on your spider and fill it with festive candies. You can fill them with three or four small wrapped candies or small toys or stickers and pass them out for a classroom Halloween party as well.

Toilet-Paper-Roll-Spider-Halloween-Favors

Toilet-Paper-Roll-Spider-for-Halloween

  • Share
  • Twitter


Leave a Comment

Join our Community of Crafters!

Stay updated and never miss a thing!

Disclosure and Privacy Policy
Previous Post: « Rapunzel Birthday Party Ideas
Next Post: Upcycled Metal Pumpkin Tutorial »

Reader Interactions

Leave a Reply Cancel reply

Your email address will not be published. Required fields are marked *

This site uses Akismet to reduce spam. Learn how your comment data is processed.

Primary Sidebar

Welcome!

DIY Inspired Profile Picture 2015Thank you for visiting! I'm Dinah and I am a full time Mother, Blogger and Writer. I'm honored to be named one of Mashable's 10 Mom Blogs Full of Inspiring Advice. {Read more about me here}

Join our Community of Crafters!

Stay updated and never miss a thing!

Disclosure and Privacy Policy

Stay updated and never miss a thing!

Footer

You might also love these

Recycled Jar Utensil Holder Printables

10 Mason Jar Craft Ideas

Stenciled Coat Rack for a Kid's Room

Clever Coat Hangers

Handmade Holiday Gifts for Friends

DIY Recycled Water Bottle Beads

Easy Nursery Decor Idea

Sleep Under the Stars DIY Star Wall Art

Fall Wreath in a Basket

Hanging Fall Wreath DIY

Copyright © 2021 · Divine theme by Restored 316

Copyright © 2005–2021 DIY Inspired. Installed and customized by TCN Design Studio

We use cookies to ensure that we give you the best experience on our website. If you continue to use this site we will assume that you are happy with it.OkRead more