• Project Gallery
  • DIY
    • Recycled DIY
    • Upcycled DIY
    • Repurposed DIY
    • Refurbished DIY
    • DIY Furniture
    • Repurposed Furniture
    • Thrift Store Transformations
  • Crafts
    • Wood Crafts
    • Paper Crafts
    • Photo Crafts
    • Kids Craft Ideas
    • Doll Crafts
    • Felt Crafts
    • Stenciling
    • Gift Wrapping
    • Printables
  • Party
    • Birthday Party
    • Baby Shower
    • Bridal Shower
    • Wedding
    • Team Sports
    • Sweets and Treats
    • Cocktail Corner
  • Holidays
    • St. Patrick’s Day
    • Easter
    • Earth Day
    • Teacher Appreciation
    • Mother’s Day
    • Father’s Day
    • Fourth of July
    • Back to School
    • Halloween
    • Halloween Costumes
    • Thanksgiving
    • Elf on the Shelf
    • Christmas
    • New Years
    • Valentine’s Day
  • Home & Garden
    • Storage & Organization
    • Cleaning Tips
    • Gardening
    • Makeovers
    • Kid Stuff Makeovers
    • DIY Tips & Tricks
    • DIY Artwork
    • Curb Appeal
  • Health & Beauty
    • Health & Wellness
    • Bath & Body
  • Nav Social Menu

    • Facebook
    • Instagram
    • Pinterest
    • Twitter
    • YouTube

DIY Inspired

Repurpose, Reinvent

  • About
  • Contact
  • Advertising
  • Featured
  • Disclosure

Holidays

Vintage Handkerchief Ornaments

vintage-handkerchief-ornaments (6)

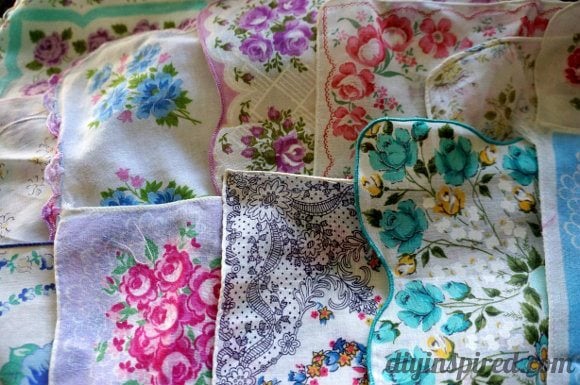
One of my most favorite things about helping with the decorations a Vintage Inspired Baby Shower was going antique shopping with my Mother-In-Law and collecting vintage handkerchiefs.  I bought so many of them because I kept finding so many beautiful colors and patterns and even shapes. Now that the baby shower is over, I have all these beautiful handkerchiefs with nothing to do with them. After some thought, I decided to make some Vintage Handkerchief Ornaments.  Now I would be able to preserve and display them in a unique way.

vintage-handkerchief-ornaments (1)

Aren’t they pretty? This post isn’t really a tutorial per se, because it’s obvious how to make them, HOWEVER I did run across some helpful tips when putting them together in these glass ornaments I got at the craft store.

vintage-handkerchief-ornaments (2)

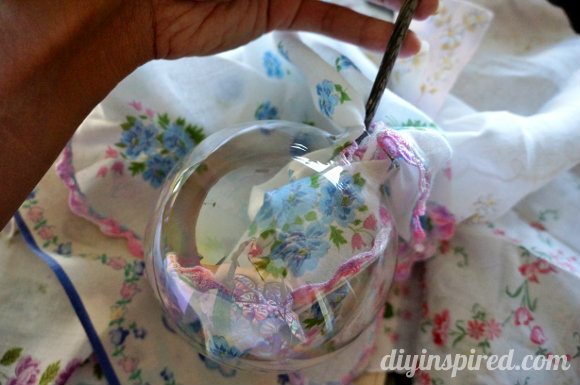
Being the Geek that I am, I was trying to figure out how to fold each handkerchief so that they would fit through a small hole, and look pretty while inside. After several trials and errors, I came upon Tip #1.

Tip #1: Don’t fold the handkerchief, it looks best when you start with a corner and stuff it in there haphazardly!

Because I tried several times at folding and stuffing I noticed that several (almost all) of these glass bulbs had sharp edges around the opening.

Tip #2: To prevent from cutting your fingers AND ripping the handkerchiefs, use a pen or chopstick to stuff the handkerchief inside the bulb.  You can also use the stick to maneuver and shape the handkerchief as you like.

vintage-handkerchief-ornaments (4)

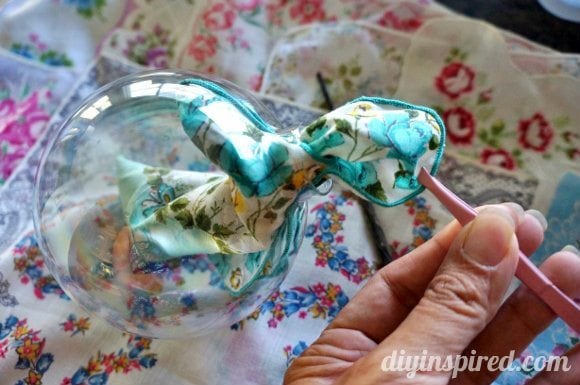
There were several times when I had to take the handkerchief out and start over.

Tip #3: Use a pair of tweezers to pull your handkerchief out if needed.  Be careful not to rip the handkerchief on those nasty sharp edges!

vintage-handkerchief-ornaments (3)

After I stuffed all my bulbs, I used the ribbon from these baby shower decorations I made to re-use as a hanger for each ornament.  I used different colors, thicknesses, and materials.

vintage-handkerchief-ornaments (5)

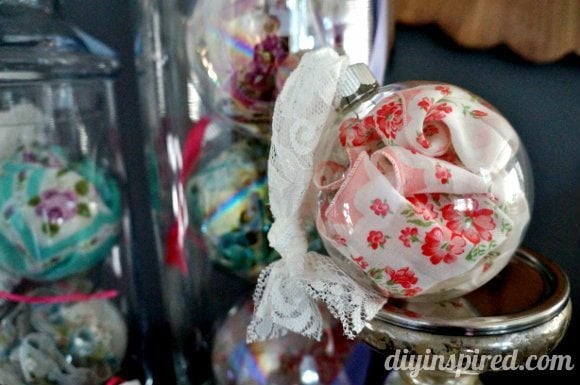
I thought they turned out quite nice and I can’t wait to put them on my tree!

vintage-handkerchief-ornaments (6)

  • Share
  • Twitter


13 Comments

Join our Community of Crafters!

Stay updated and never miss a thing!

Disclosure and Privacy Policy
Previous Post: « Fall Pumpkin Centerpiece #turkeytablescapes
Next Post: Seven Step By Step Burlap Craft Tutorials »

Reader Interactions

Comments

  1. Lisa Cash Hanson says

    November 6, 2013 at 11:46 pm

    These are really beautiful! I think I’ll have to try this for this Christmas for sure.

    Reply
    • Dinah Wulf says

      November 7, 2013 at 6:42 am

      Thank you, Lisa!

      Reply
  2. Wendy says

    December 10, 2013 at 12:45 pm

    What size glass ball did you use for the handkerchiefs? I’m going to try this for each of my brothers from our nana’s collection. I ‘m thinking if I put some tape around the sharp edge that may help.
    Thanks for the beautiful ideas.
    Wendy

    Reply
    • Dinah Wulf says

      December 10, 2013 at 1:49 pm

      Hi Wendy! Thank you! OK, don’t laugh at me but the boxes for the bulbs I used are in the container that I have covered by a table cloth that my mini Christmas tree is standing on! BUT I looked at the bulbs with the widest mouths. I ended up using a large ball and a medium one too. I hope this helps!

      Reply
  3. Pop Art Minis - Joni says

    December 22, 2013 at 6:17 am

    Beautiful!

    Reply
    • Dinah Wulf says

      December 22, 2013 at 8:11 am

      Thanks, Joni!

      Reply
  4. Jeannie Hildebrand says

    November 11, 2014 at 12:15 am

    I have hundreds of old hankies from collecting over the years so thank you for the great idea!!!

    Reply
  5. Sylvia says

    December 17, 2014 at 12:05 pm

    Thank you for All of your Christmas ornament ideas a tips!

    Reply
  6. Sylvia says

    December 17, 2014 at 12:07 pm

    Thank you for your excellent tips! Love the Christmas ornaments!

    Reply
    • Dinah Wulf says

      December 17, 2014 at 1:51 pm

      Thank you so much, Sylivia! So glad you like them!

      Reply
  7. Nancy Glaman says

    November 1, 2018 at 5:18 pm

    OMG I love this idea. My grandmother gave me a few of her handkerchief when she passed away.They are over 70 years old. I will put them in the ornament and put her name on them. Love it

    Reply
    • Dinah Wulf says

      November 2, 2018 at 8:09 am

      GREAT!! I’m so glad you liked this, Nancy. I still love taking them out and seeing them every Christmas.This is a great way to remember your grandmother.

      Reply
  8. Karen says

    April 1, 2020 at 2:02 pm

    What a great idea! They look beautiful!

    Reply

Leave a Reply Cancel reply

Your email address will not be published. Required fields are marked *

This site uses Akismet to reduce spam. Learn how your comment data is processed.

Primary Sidebar

Welcome!

DIY Inspired Profile Picture 2015Thank you for visiting! I'm Dinah and I am a full time Mother, Blogger and Writer. I'm honored to be named one of Mashable's 10 Mom Blogs Full of Inspiring Advice. {Read more about me here}

Join our Community of Crafters!

Stay updated and never miss a thing!

Disclosure and Privacy Policy

Stay updated and never miss a thing!

Footer

You might also love these

Thrift Store Tea Party Decorations

Upcycled Thrift Store Teapots

DIY Recycled Milk Jug Flowers Tutorial

Clever Trash to Treasure Earth Day Crafts

Easy Paper Butterflies Craft - DIY Inspired

How to Make Paper Butterflies

Front Door Wreath with Floating Numbers

Torched Address Wreath with Floating Numbers

Crazy Hair Day Yogurt Cup

Crazy Hair Day Ideas for Boys and Girls

Copyright © 2021 · Divine theme by Restored 316

Copyright © 2005–2021 DIY Inspired. Installed and customized by TCN Design Studio