• Project Gallery
  • DIY
    • Recycled DIY
    • Upcycled DIY
    • Repurposed DIY
    • Refurbished DIY
    • DIY Furniture
    • Repurposed Furniture
    • Thrift Store Transformations
  • Crafts
    • Wood Crafts
    • Paper Crafts
    • Photo Crafts
    • Kids Craft Ideas
    • Doll Crafts
    • Felt Crafts
    • Stenciling
    • Gift Wrapping
    • Printables
  • Party
    • Birthday Party
    • Baby Shower
    • Bridal Shower
    • Wedding
    • Team Sports
    • Sweets and Treats
    • Cocktail Corner
  • Holidays
    • St. Patrick’s Day
    • Easter
    • Earth Day
    • Teacher Appreciation
    • Mother’s Day
    • Father’s Day
    • Fourth of July
    • Back to School
    • Halloween
    • Halloween Costumes
    • Thanksgiving
    • Elf on the Shelf
    • Christmas
    • New Years
    • Valentine’s Day
  • Home & Garden
    • Storage & Organization
    • Cleaning Tips
    • Gardening
    • Makeovers
    • Kid Stuff Makeovers
    • DIY Tips & Tricks
    • DIY Artwork
    • Curb Appeal
  • Health & Beauty
    • Health & Wellness
    • Bath & Body
  • Nav Social Menu

    • Facebook
    • Instagram
    • Pinterest
    • Twitter
    • YouTube

DIY Inspired

Repurpose, Reinvent

  • About
  • Contact
  • Advertising
  • Featured
  • Disclosure

DIY Furniture

Antiquing Furniture with Chalk Paint

Antiquing Furniture with Chalk Paint was written by Loren Crane from Pandora’s Craft Box.

antiquing-furniture-chalk-paint

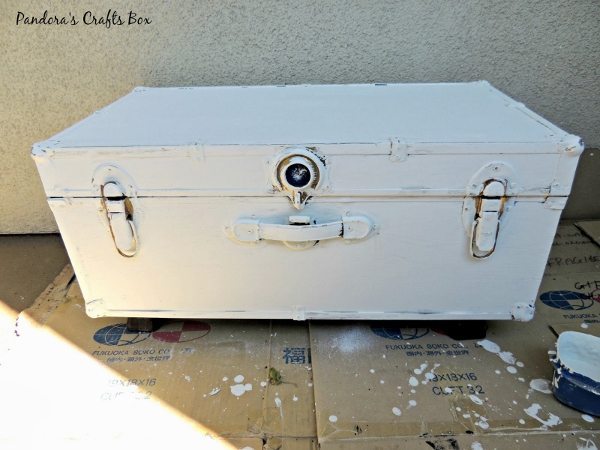
I don’t know about you but I love chalk paint. I want to use it on everything. There is fun making something new or damaged seem rustic. I am all into antiquing furniture and transforming it into something you can’t recognize anymore. Using chalk paint is easy, just requires one more step than just painting. The good thing about recovering my trunks was that I did not have to sand them down or prime them. I just went ahead and applied my home made recipe for chalk paint!

antiquing-furniture-chalk-paint (4)

Antiquing Furniture

If you want to see my recipe for chalk paint click here for more information on how you can make it.  Once you have the mixture you will need to apply a couple of coats to your furniture. I applied about two to three coat of white chalk paint to my trunk. The chalk paint dries pretty fast so you don’t have to wait too long between coats.

antiquing-furniture-chalk-paint (2)

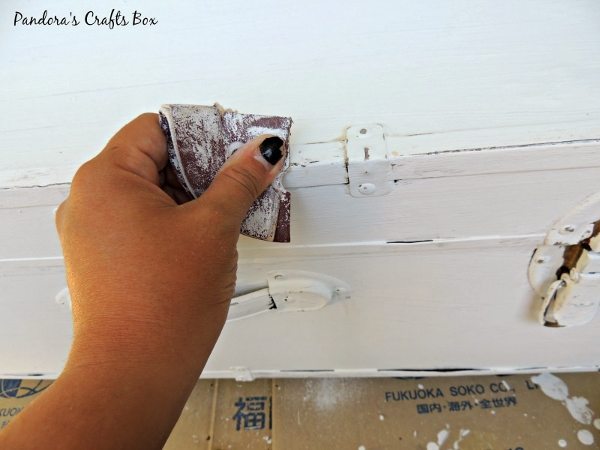
I then used sand paper to remove the chalk paint from the edges and in areas where damage would occur with time to make the furniture seem worn down.

antiquing-furniture-chalk-paint (1)

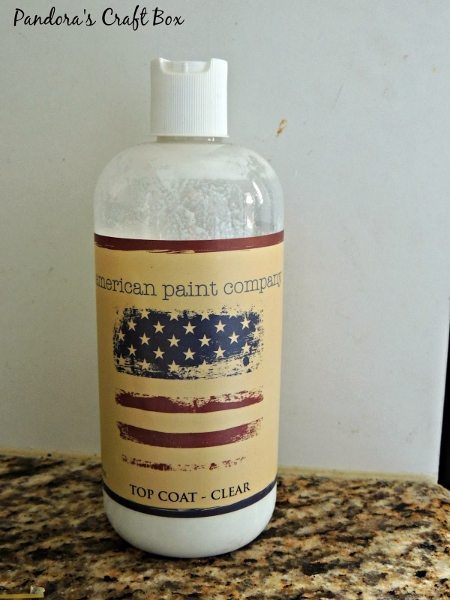
You of course don’t want to forget to seal your furniture because if you don’t the chalk paint will flake off with every touch.  You have a few choices of sealer from wax to oil sealers.  I used Americana Paint Company top coat which leaves the surface smooth once dried.

antiquing-furniture-chalk-paint (3)

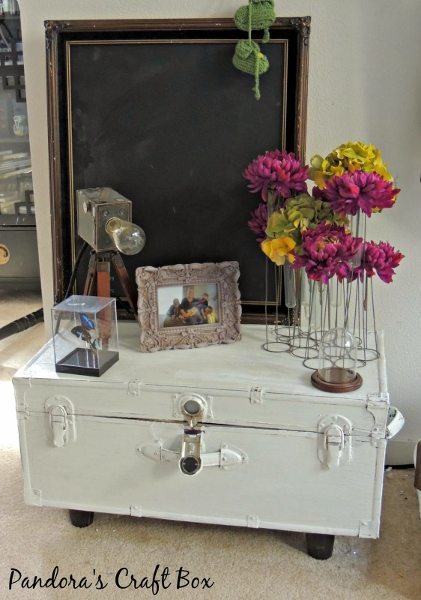
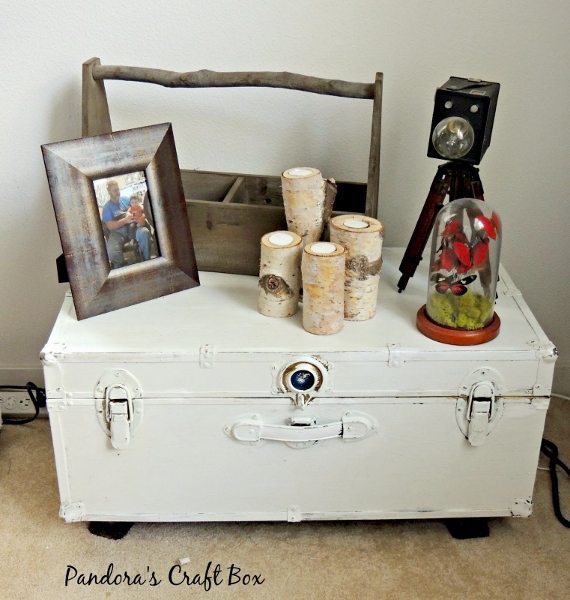
Ta-da! I love the look my trunks give to my living room now. I hope you like my tips on antiquing furniture!

antiquing-furniture-chalk-paint

Stay Crafty,

Loren

  • Share
  • Twitter


5 Comments

Join our Community of Crafters!

Stay updated and never miss a thing!

Disclosure and Privacy Policy
Previous Post: « Angry Birds Party Decoration with FREE Printables
Next Post: A List of Two Dozen Candy Sayings »

Reader Interactions

Comments

  1. pattie says

    February 11, 2014 at 10:31 am

    that is such a cool idea! I’ve never worked with this type of paint before.

    Reply
  2. Jill says

    February 11, 2014 at 12:26 pm

    I have been wanting to try chalk paint out for quite a while now. I love how the trunk turned out. I guess it’s about time I dive into the world of Chalk paint.

    Reply
  3. Linsey K says

    February 11, 2014 at 1:12 pm

    I love how this came out old looking — but not “dirty”. Nice finish on the paint, too!

    Reply
  4. Ruby DW (@RubyDW) says

    February 11, 2014 at 6:26 pm

    awesome look I love the finish!

    Reply
  5. Sharon Garofalow says

    February 12, 2014 at 8:04 am

    THat looks awesome. I’ve always wondered about milk paint. Love the antique look.

    Reply

Leave a Reply Cancel reply

Your email address will not be published. Required fields are marked *

This site uses Akismet to reduce spam. Learn how your comment data is processed.

Primary Sidebar

Welcome!

DIY Inspired Profile Picture 2015Thank you for visiting! I'm Dinah and I am a full time Mother, Blogger and Writer. I'm honored to be named one of Mashable's 10 Mom Blogs Full of Inspiring Advice. {Read more about me here}

Join our Community of Crafters!

Stay updated and never miss a thing!

Disclosure and Privacy Policy

Stay updated and never miss a thing!

Footer

You might also love these

Easy Paper Butterflies Craft - DIY Inspired

How to Make Paper Butterflies

Front Door Wreath with Floating Numbers

Torched Address Wreath with Floating Numbers

Crazy Hair Day Yogurt Cup

Crazy Hair Day Ideas for Boys and Girls

Easy Felt Flower Barrettes

DIY No Sew Felt Flowers

DIY Felt Tassel Keychains

DIY Felt Tassel Keychains

Copyright © 2021 · Divine theme by Restored 316

Copyright © 2005–2021 DIY Inspired. Installed and customized by TCN Design Studio