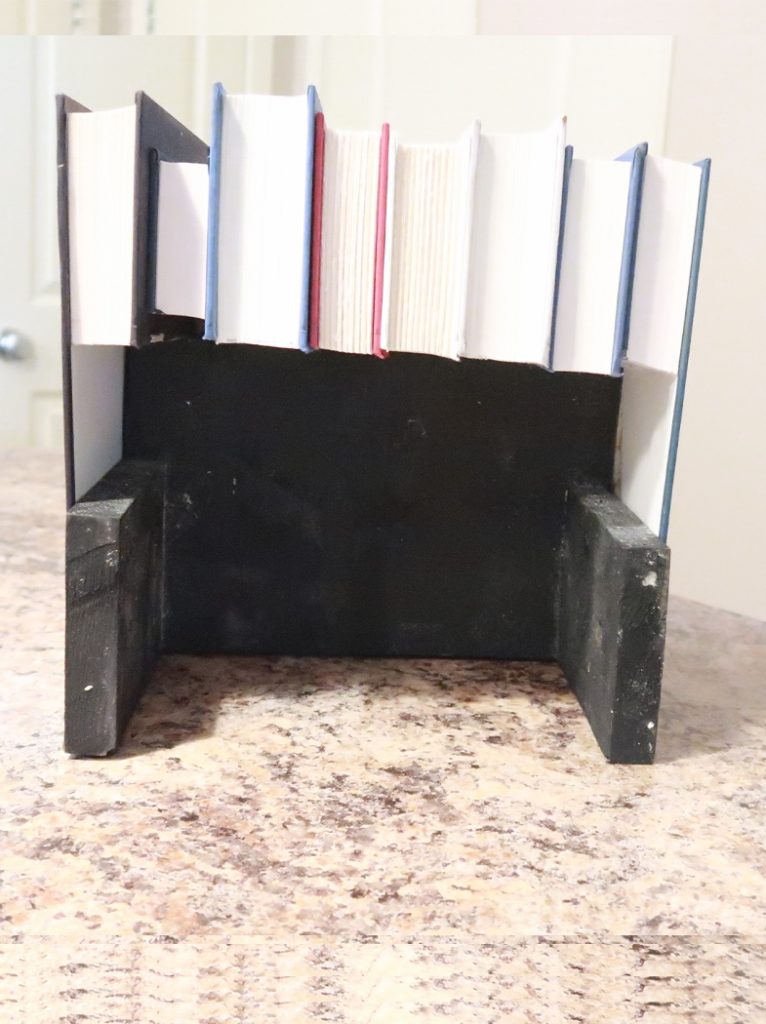
DIY Hidden Storage Box
DIY Hidden Storage Box with Recycled Books
Hi there! I’m Laci from LaciJane.com and I’m so excited to partner with Dinah at DIY Inspired for another set of projects! Today I’m showing you how I made this DIY Hidden Storage Box with Recycled Books to help hide electronics, routers, modems, and cords using books.

Watch the DIY Hidden Storage Box Video
Here’s What You Need
Time: About an Hour
Materials
- Wood (I used scrap wood)
- Books
- Screws
- Titebond wood glue
- Miter Saw/Razor (something to cut the books)
The first thing I would suggest doing is measuring the width that you need to cover (whether it’s your modem or router or whatever it may be). You will need to know the width to make your wooden “box”. You’ll also need to know the width so you will know how many books you will need.
Once you have your measurements, you will need to assemble your wood pieces together. You can either secure the box by screwing the pieces together, gluing them together, or both if you want it extra secure. If you’re worried about your screws showing, don’t be. The book spines will cover the screws.
I went the easy route and screwed the box together with scrap pieces I had laying around in the garage. I used different sizes and dimensions. The front wood piece is 5” tall and the sidepieces are 3” tall.
Selecting Your Wood
You want to the wood to be thick enough to screw together
This DIY is very top-heavy so use wood that is thick enough to be able to hold the weight of the books.
You want the front “box” wood piece to be tall enough that it can hold the weight of the book spines without tipping over.
Finding Books
Where to get cheap books? I looked at Goodwill and Dollar Tree ended up being cheaper. You can get hardback books for $1 each. The width of your box will determine how many books you will need to buy for the DIY electronic hider.
I used seven books for this DIY electronics hider.
Measure and mark your books using your wood “box” as your guide.
Stain or paint the box to your preference. While that is drying, cut your books according to the marks you made using your wood “box” as your guide.

The Two End Books
Right side- you will want to leave the front cover untouched. Left side- you will want to leave the back cover untouched.
Now that all your books are cut to size, simply glue your books onto the “box” that you made. I used Titebond wood glue and secured the books onto the “box” with wood clamps. Allow to dry for at least 12 hours.
Remove the clamps and enjoy your DIY hidden storage box. What would you hide in there?


More from Laci Jane
- DIY WALL SCONCES
- DIY CRYSTAL MOON SHELF
- REPURPOSED CHICKEN WIRE EARRING HOLDER
- DIY COAT RACK PHOTO LEDGE
- DOLLAR TREE DIY MIRROR

Love these!