• Project Gallery
  • DIY
    • Recycled DIY
    • Upcycled DIY
    • Repurposed DIY
    • Refurbished DIY
    • DIY Furniture
    • Repurposed Furniture
    • Thrift Store Transformations
  • Crafts
    • Doll Crafts
    • Kids Craft Ideas
    • Paper Crafts
    • Photo Crafts
    • Mason Jar Crafts
    • Burlap Crafts
    • Felt Crafts
    • Stenciling
    • Gift Wrapping
    • Printables
  • Party
    • Birthday Party
    • Baby Shower
    • Bridal Shower
    • Wedding
    • Team Sports
    • Sweets and Treats
    • Cocktail Corner
  • Holidays
    • Thanksgiving
    • Elf on the Shelf
    • Christmas
    • New Years
    • Valentine’s Day
    • St. Patrick’s Day
    • Easter
    • Earth Day
    • Cinco-De-Mayo
    • Teacher Appreciation
    • Mother’s Day
    • Father’s Day
    • Fourth of July
    • Back to School
    • Halloween
  • Home & Garden
    • Storage & Organization
    • Cleaning Tips
    • Gardening
    • Makeovers
    • Kid Stuff Makeovers
    • DIY Tips & Tricks
    • DIY Artwork
    • Curb Appeal
  • Health & Beauty
    • Health & Wellness
    • Bath & Body
  • Nav Social Menu

    • Facebook
    • Instagram
    • Pinterest
    • Twitter
    • YouTube

DIY Inspired

Repurpose, Reinvent

  • About
  • Contact
  • Advertising
  • Featured
  • Disclosure

Holidays

DIY Wreath Hanger Tutorial

Repurposed Wire Hanger

I was decorating the house the other day and I needed a simple way to hang a wreath on the mirror over my mantel. I had a regular wreath hanger you can buy at the store, but it was too long. It hung too far down the mirror. Like a dork, I attempted to tape it up and they fell…duh! But you know, I was decorating all day and I wanted quick fix.  So, I sat and stared at it for a minute or two. I grabbed a wire hanger and made a quick DIY wreath hanger. I just thought I would share this super easy tip with you!
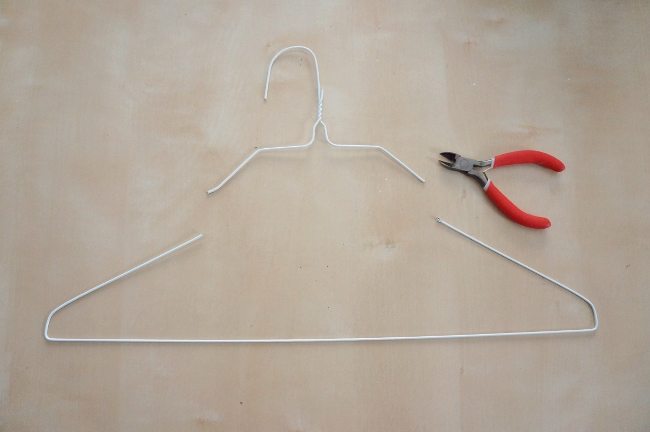
All you need is:

  • Wire hanger
  • Wire cutter


Step One:

Cut the top of the hanger as shown with a pair of wire cutters.
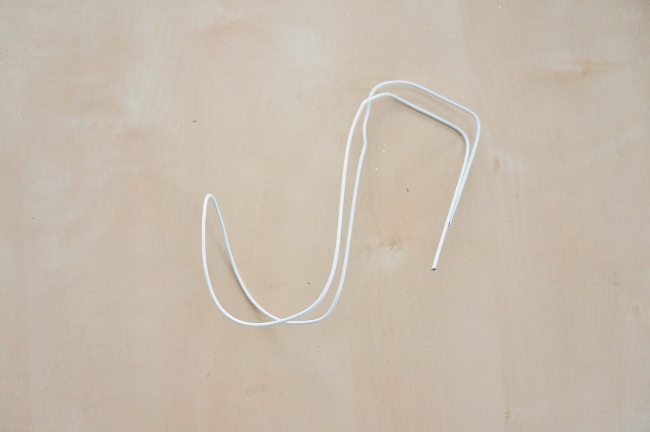
Repurposed Wire Hanger Idea

Step Two:

Straighten the hanger as best as possible into a straight line. It doesn’t have to be perfect.  Grab the middle and fold it in half.

Step three:

Make an “S” shape, squaring out the back so that the curved part is the hanger, and the ends of the hanger are the back.

Repurposed Wire Hanger (2)

Repurposed Wire Hanger (1)

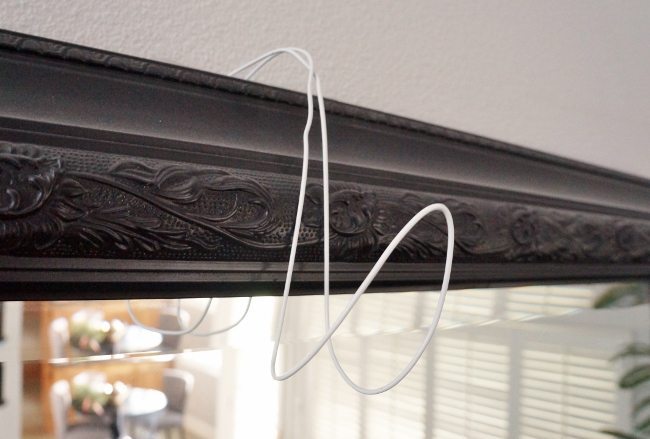
Hang your wreath! That’s it! It was so quick and easy and I didn’t have to spend a dime.

DIY Wreath Hanger Tutorial

Need some Christmas projects to inspire you?

  • DIY Snow Globe Ornaments
  • No Sew Elf on the Shelf Skirt
  • The Elf on the Shelf Tradition
  • Christmas Tree Centerpiece
  • Kids Christmas Table Setting
  • Ribbon Christmas Tree Tutorial
  • Vintage Handkerchief Ornaments
  • Easy Winter Forest in Apothecary Jars


Leave a Comment

Join our Community of Crafters!

Stay updated and never miss a thing!

Disclosure and Privacy Policy
Previous Post: « Toilet Paper Roll Reindeer
Next Post: Give Your Presence, Not Your Presents »

Reader Interactions

Leave a Reply Cancel reply

Your email address will not be published. Required fields are marked *

This site uses Akismet to reduce spam. Learn how your comment data is processed.

Primary Sidebar

Welcome!

DIY Inspired Profile Picture 2015Thank you for visiting! I'm Dinah and I am a full time Mother, Blogger and Writer. I'm honored to be named one of Mashable's 10 Mom Blogs Full of Inspiring Advice. {Read more about me here}

Join our Community of Crafters!

Stay updated and never miss a thing!

Disclosure and Privacy Policy

Stay updated and never miss a thing!

Footer

You might also love these

DIY Photo Gift Tags

Photo Christmas Gift Tags

DIY Paper Pop Out Photo Gift Box

DIY Stenciled Metal Laundry Trash Can

DIY Stenciled Metal Laundry Trash Can

Stenciled Monogrammed Placemats Tutorial

DIY Torched Bead Sun Catcher

Torched Bead Sun Catcher DIY

Copyright © 2019 · Divine theme by Restored 316

Copyright © 2005–2019 DIY Inspired. Installed and customized by TCN Design Studio

We use cookies to ensure that we give you the best experience on our website. If you continue to use this site we will assume that you are happy with it.OkRead more