• Project Gallery
  • DIY
    • Recycled DIY
    • Upcycled DIY
    • Repurposed DIY
    • Refurbished DIY
    • DIY Furniture
    • Repurposed Furniture
    • Thrift Store Transformations
  • Crafts
    • Wood Crafts
    • Paper Crafts
    • Photo Crafts
    • Kids Craft Ideas
    • Doll Crafts
    • Felt Crafts
    • Stenciling
    • Gift Wrapping
    • Printables
  • Party
    • Birthday Party
    • Baby Shower
    • Bridal Shower
    • Wedding
    • Team Sports
    • Sweets and Treats
    • Cocktail Corner
  • Holidays
    • Father’s Day
    • Fourth of July
    • Back to School
    • Halloween
    • Halloween Costumes
    • Thanksgiving
    • Elf on the Shelf
    • Christmas
    • New Years
    • Valentine’s Day
    • St. Patrick’s Day
    • Easter
    • Earth Day
    • Teacher Appreciation
    • Mother’s Day
  • Home & Garden
    • Storage & Organization
    • Cleaning Tips
    • Gardening
    • Makeovers
    • Kid Stuff Makeovers
    • DIY Tips & Tricks
    • DIY Artwork
    • Curb Appeal
  • Health & Beauty
    • Health & Wellness
    • Bath & Body
  • Nav Social Menu

    • Facebook
    • Instagram
    • Pinterest
    • Twitter
    • YouTube

DIY Inspired

Repurpose, Reinvent

  • About
  • Contact
  • Advertising
  • Featured
  • Disclosure

Crafts Kid Stuff Makeovers

DIY No Sew Tutu

With Halloween coming up I thought this would be appropriate.  I’ve seen several Halloween costumes with tutus including all the Disney Princesses and much more!  I made these tutus for a recent craft fundraiser.  They are very inexpensive and easy to make.  You can make a DIY No Sew Tutu this size (Toddler) for about $5.00.

Note: I did a scrap T-shirt skirt tutorial a while back.  This tutorial works for tutus as well.  The difference are 1) the materials chosen, and 2)  I also used an elastic dollar store head band, which works great for this tulle DIY No Sew Tutu as well.

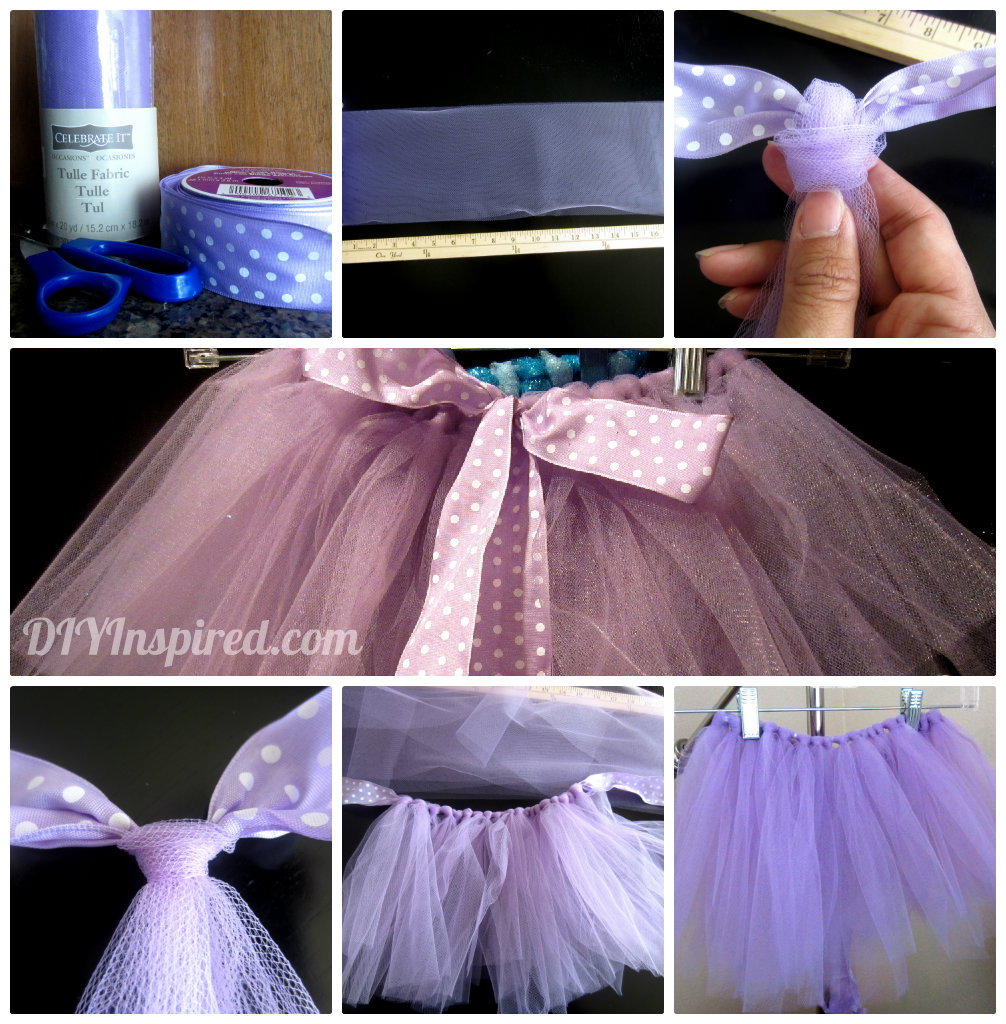
Materials: These are the measurements for a Toddler sized tutu.

  • 2 yards of ribbon
  • 6 inch X 20 yards of tulle (you can buy these rolls at a craft store for $3-$4
  • Scissors
  • Yard stick
  • Clear nail polish (optional)

Note: Yards of tulle at a fabric store is much cheaper, however pre-cut rolls like these make it more convenient and simple.  Consider buying from a fabric store if you are making a larger (or longer) costume.

First, using the yard stick as an aide cut the entire roll of tulle in 20” strips.  One by one fold each strip in half and knot it around the ribbon as shown.  Make sure you start in the center of the ribbon and make your way out.  When you are finished the skirt will be about 20” around.  You can slide and maneuver the tulle to make it a little smaller or wider as needed.  Cut the ends of the ribbon in an angle and use clear nail polish to stop the ribbon from fraying.  Tie the ribbon in a bow.

Here are some after photos.

Warning: If you decide to make glittered tutus as pictured above.  Make them outside! :/

Consider making a green skirt for a Tinker belle or mermaid costume; a blue skirt for Cinderella; a pink skirt for Sleeping beauty; a yellow skirt for Belle; or a blue, yellow, and red skirt for Snow White.

If you need more fundraiser ideas, check out my YouTube video for the other crafts I made for this fundraiser.



  • Share
  • Twitter


12 Comments

Join our Community of Crafters!

Stay updated and never miss a thing!

Disclosure and Privacy Policy
Previous Post: « Recycled Book Page Art
Next Post: Golf Themed Baby Shower Sneak Peek »

Reader Interactions

Comments

  1. Jessica says

    September 13, 2012 at 9:16 am

    This is so cool! Pinning 🙂

    Reply
    • dwulf says

      September 13, 2012 at 10:00 am

      Yay! Thanks, Jessica!

      Reply
  2. Emma Edwards says

    June 27, 2014 at 3:22 am

    Hi there!
    I love this no sew tutu! You’ve done really well! 🙂
    I tried to replicate it into the Queen of Hearts costume (the one that you made). I’m having a dress up theme for my 21st and want to go as the Queen of Hearts! I made the skirt today but it’s really really puffy and big, I had less tulle but it was see through (and still really puffy). Is there any way you could possibly give me some advice? I’m not sure if I made the coloured panels too thin, (the first few were about 10cm or less, but then the next few were about 15-17 cms once I ran out of material and had to buy more). Any thoughts?
    Or is the costume that you wore for sale at all? Would love to hear from you!

    Kind regards,
    Emma

    Reply
    • Dinah Wulf says

      June 27, 2014 at 7:29 am

      Hi Emma! I’m glad you like it and Happy early 21st!!!! The thickness of each strip I cut was about 2 inches wide, so approximately 5 cm. I’m wondering if your strips are too thick causing it to be so see-through? Try thinner strips. Mine was a little see-through, but I wore black tights under them.

      Reply
  3. shannon says

    September 26, 2014 at 6:40 pm

    I love this idea. I want to make.one for myself. But I would like to know roughly how much tulle you used for an adult? So I can see how much this will cost me. Thank you!

    Reply
    • Dinah Wulf says

      September 28, 2014 at 1:12 pm

      Hi Shannon! I think I used between 5-7 yards for mine.

      Reply
  4. Lucy says

    April 8, 2017 at 11:03 am

    Hi! I’m looking to make this and wondered if I could wear it with tights? do the strips separate when you walk around with it? also how much of each coloured material would you use for the queen of hearts design?

    Reply
    • Dinah Wulf says

      April 8, 2017 at 12:51 pm

      Hi Lucy! So glad you like it! I wore black leggings underneath the Queen of Hearts costume, but I’m thinking if you add more tulle, you’d be OK without them. I updated the instructions and measurements here: https://diyinspired.com/diy-disney-inspired-tulle-skirts/

      Reply

Trackbacks

  1. 35 Awesome DIY Halloween Costumes - A Spectacled Owl says:
    February 19, 2015 at 7:47 am

    […] 2. DIY No Sew Tutu – DIY Inspired […]

    Reply
  2. DIY Disney Princess Costumes - DIY Inspired says:
    August 5, 2015 at 7:40 am

    […] and my daughter is going to be Alice from Alice in Wonderland.  Recently, I did a tutorial for a DIY No Sew Tutu. I wanted to show you that with this tutorial, you can apply it to virtually any Disney Princess […]

    Reply
  3. Rapunzel Braided Hair Monogram - DIY Inspired says:
    January 17, 2017 at 4:05 pm

    […] DIY No Sew Tutu […]

    Reply
  4. Rapunzel Invitation DIY with Yarn Hair - DIY Inspired says:
    January 17, 2017 at 4:21 pm

    […] DIY No Sew Tutu […]

    Reply

Leave a Reply Cancel reply

Your email address will not be published. Required fields are marked *

This site uses Akismet to reduce spam. Learn how your comment data is processed.

Primary Sidebar

Welcome!

DIY Inspired Profile Picture 2015Thank you for visiting! I'm Dinah and I'm honored to have had an exciting career in blogging over the last 11 years. {Read more about me here}

Join our Community of Crafters!

Stay updated and never miss a thing!

Disclosure and Privacy Policy

Stay updated and never miss a thing!

Footer

You might also love these

DIY Classroom Mobile Phone Holder

Classroom Smart Phone Drop Station

How to Make Cotton Stems

DIY Fabric Covered Switchplates

DIY White and Gold Nightstands

Over Ten Years of Do-It-Yourself Inspiration

DIY Paper Flower Party Decor

Accordion Flowers How To

Copyright © 2022 · Divine theme by Restored 316

Copyright © 2005–2022 DIY Inspired. Installed and customized by TCN Design Studio