• Project Gallery
  • DIY
    • Recycled DIY
    • Upcycled DIY
    • Repurposed DIY
    • Refurbished DIY
    • DIY Furniture
    • Repurposed Furniture
    • Thrift Store Transformations
  • Crafts
    • Wood Crafts
    • Paper Crafts
    • Photo Crafts
    • Kids Craft Ideas
    • Doll Crafts
    • Felt Crafts
    • Stenciling
    • Gift Wrapping
    • Printables
  • Party
    • Birthday Party
    • Baby Shower
    • Bridal Shower
    • Wedding
    • Team Sports
    • Sweets and Treats
    • Cocktail Corner
  • Holidays
    • Father’s Day
    • Fourth of July
    • Back to School
    • Halloween
    • Halloween Costumes
    • Thanksgiving
    • Elf on the Shelf
    • Christmas
    • New Years
    • Valentine’s Day
    • St. Patrick’s Day
    • Easter
    • Earth Day
    • Teacher Appreciation
    • Mother’s Day
  • Home & Garden
    • Storage & Organization
    • Cleaning Tips
    • Gardening
    • Makeovers
    • Kid Stuff Makeovers
    • DIY Tips & Tricks
    • DIY Artwork
    • Curb Appeal
  • Health & Beauty
    • Health & Wellness
    • Bath & Body
  • Nav Social Menu

    • Facebook
    • Instagram
    • Pinterest
    • Twitter
    • YouTube

DIY Inspired

Repurpose, Reinvent

  • About
  • Contact
  • Advertising
  • Featured
  • Disclosure

DIY Party Ideas

Rapunzel Invitation DIY with Yarn Hair

Rapunzel Invitation DIY Handmade

One of my best friend’s daughters is turning four! So many soon-to-be four year olds love Disney Princesses. Recently I made a Little Mermaid clam shell birthday card for our other bestie and this time, I volunteered to make a Rapunzel invitation for a Tangled themed party. I perused Pinterest for some ideas and inspiration and I found some great ones, but ended up making a version of my own. Here is how I made them.

Materials:

  • Purple cardstock
  • Yellow cardstock
  • Black cardstock
  • Stone printed scrapbook paper
  • Purple ribbon
  • Craft roses
  • Paper cutter
  • Hot glue and glue gun
  • Scissors
  • Glue stick
  • Tape
  • Ruler
  • Pencil

Instructions:


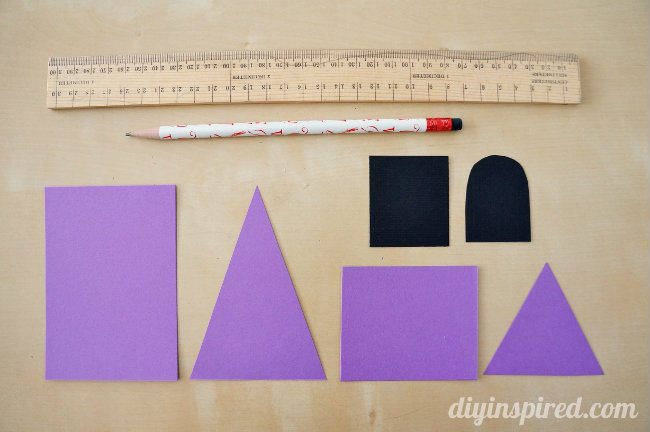
Prepare your pieces as shown. These are the measurements amounts per one Rapunzel invitation. Keep in mind that my friends did not need envelopes because she was hand delivering each invite, so measurements will differ in order to fit inside envelopes.

  • 2 – 8” Long Purple Ribbon
  • 9 – 8” Long Yellow Yarn
  • 1 – 2.5” X 6” Stone Tower
  • 1 – 5.75” X 6.25” Yellow Background
  • 1 – 3” X 2.5” Purple Rectangle
  • 1 – 3” X 4.25” Purple Rectangle
  • 1 – 2” X 1.75” Black Rectangle

Rapunzel-Invitation-DIY

Next, cut the purple rectangles into triangles, and the black rectangles into windows, using a pencil and ruler to measure.

Rapunzel Invitation DIY (1)

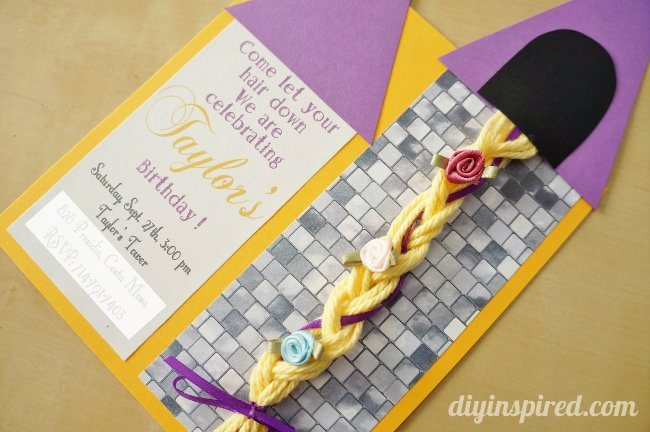
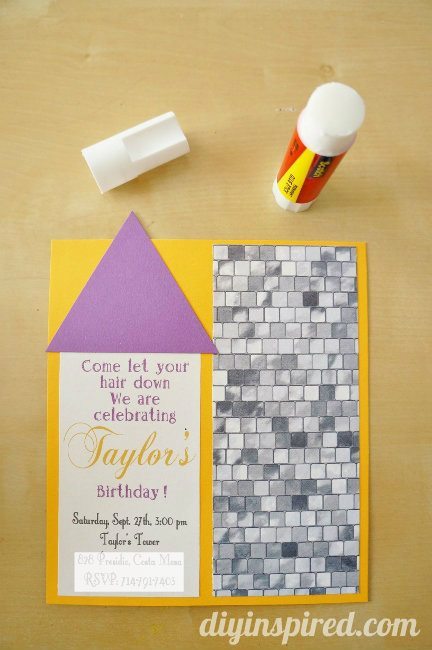
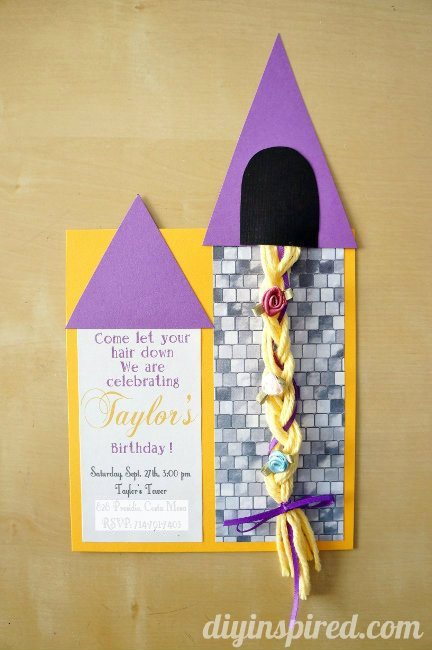
I designed printed out my message on 2.5” X 4.25” paper. It says, “Come let your hair down. We are celebrating Taylor’s birthday!”


I assembled the invitation as shown with a glue stick, using the small purple triangle.

Rapunzel Invitation DIY Castle

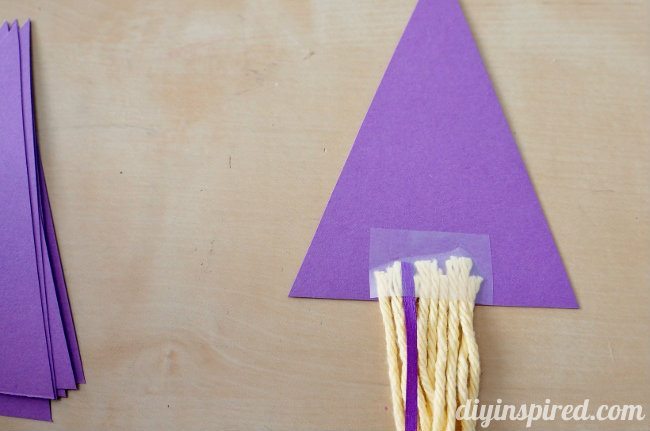
Next, I bunched 9 pieces of yarn and 1 purple ribbon and taped it to the larger triangle.

Rapunzel Invitation DIY Tower

I braided the hair and then hot glued the black window on top.

Rapunzel Braided Hair Invitation DIY

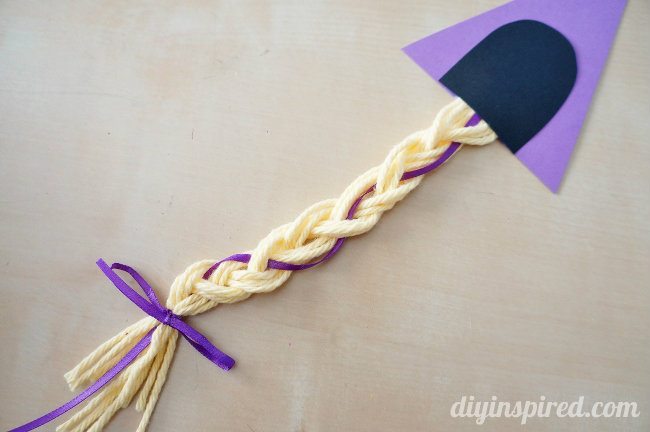
I hot glued three ribbon craft flowers onto the hair.

Rapunzel Yarn Hair Invitation DIY

Lastly, I hot glued the hair falling out of the window onto the invitation. Here it is!

Rapunzel Invitation DIY Tutorial

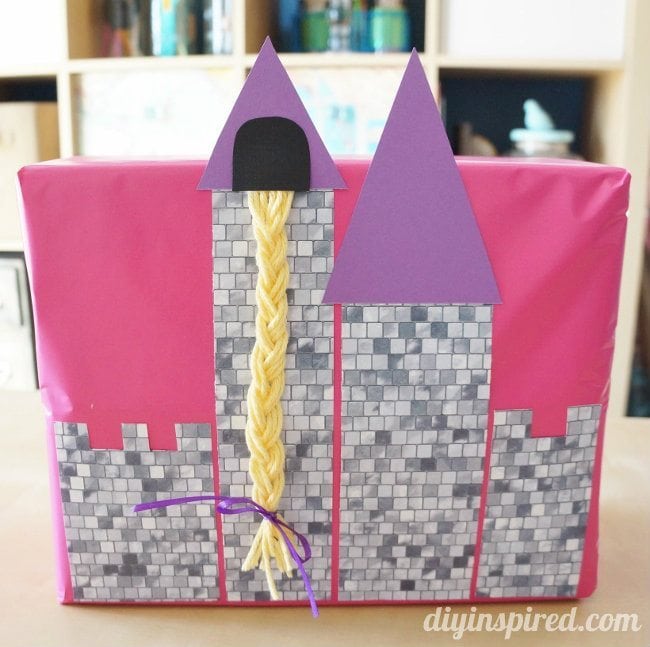
I also made a little castle out of left overs to make some unique gift wrapping for her gift. We can’t wait to give it to her!

Rapunzel Invitation DIY Gift Wrapping

Need some more Disney Themed Ideas? Check out these posts!

  • DIY Little Mermaid Card or Invitation
  • DIY Disney Princess Costumes
  • Mad Hatter Tea Party Centerpieces & Ideas
  • Alice in Wonderland First Birthday Party
  • DIY No Sew Tutu
  • Share
  • Twitter


10 Comments

Join our Community of Crafters!

Stay updated and never miss a thing!

Disclosure and Privacy Policy
Previous Post: « Thrift Store Find Wooden Bowl Makeover
Next Post: Thrift Store Finds to Makeover for Your Kids »

Reader Interactions

Comments

  1. Sheri says

    August 23, 2015 at 7:01 am

    Hi, I love the invitation! Where did you find the stone printed scrapbook paper?

    Reply
    • Dinah Wulf says

      August 24, 2015 at 7:23 am

      Hi Sheri! I bought individual sheets at Michael’s Craft Stores. Thank you!

      Reply
  2. Rebecca says

    August 29, 2015 at 9:32 am

    Very cute invitations! Thanks for sharing! These will be perfect for my little girl’s 4th Birthday party! How many invitations did you make and how many of pieces of each color paper did you need?

    Reply
    • Dinah Wulf says

      August 29, 2015 at 11:23 am

      Thank you, Rebecca! I think I made 15 invitation, but I don’t remember how many of each piece I bought! So sorry!

      Reply
  3. Jessica says

    April 12, 2016 at 12:54 pm

    Hi! This invitation is beautiful. I’m making it now for a friend’s daughter’s 4th birthday and just wanted to make you aware that the measurement you have listed for the yellow paper is off!! It looks to be more like 5.75″x6.25″ maybe. I stared to cut my yellow paper first and immediately realized the measurement you have listed is way too small. Hope this helps someone else who might make these cute invites!

    Reply
    • Dinah Wulf says

      April 12, 2016 at 1:18 pm

      Thank you, Jessica for catching that! I’m so glad you like them. I hope the measurement mistake didn’t cause you too much trouble!

      Reply
  4. Salyn says

    July 7, 2016 at 6:55 pm

    Hi! The yellow background and the bigger rectangle have the same measurement. Just looking at it, the yellow one is much bigger. Is it really 3″ x 4.25″ also? Thanks

    Reply
    • Dinah Wulf says

      July 7, 2016 at 8:30 pm

      You are right, Salyn! I will change that. It should be about 5.75″X 6.25″. So sorry about that!

      Reply
  5. Sue Lippo says

    January 15, 2017 at 11:11 am

    What did you use for n envelope for these cute invitations. I did a practice run on the card and it turned out great!

    Reply
    • Dinah Wulf says

      January 16, 2017 at 7:26 am

      Oh great!! I made them for my best friend’s daughter and she handed them out at school so she didn’t need envelopes. But if I recall, I think they would fit in these, but maybe measure the one you made just to be safe! http://amzn.to/2jQA08A (affiliate) I hope this helps, Sue! So glad you like them!

      Reply

Leave a Reply Cancel reply

Your email address will not be published. Required fields are marked *

This site uses Akismet to reduce spam. Learn how your comment data is processed.

Primary Sidebar

Welcome!

DIY Inspired Profile Picture 2015Thank you for visiting! I'm Dinah and I'm honored to have had an exciting career in blogging over the last 11 years. {Read more about me here}

Join our Community of Crafters!

Stay updated and never miss a thing!

Disclosure and Privacy Policy

Stay updated and never miss a thing!

Footer

You might also love these

DIY Classroom Mobile Phone Holder

Classroom Smart Phone Drop Station

How to Make Cotton Stems

DIY Fabric Covered Switchplates

DIY White and Gold Nightstands

Over Ten Years of Do-It-Yourself Inspiration

DIY Paper Flower Party Decor

Accordion Flowers How To

Copyright © 2022 · Divine theme by Restored 316

Copyright © 2005–2022 DIY Inspired. Installed and customized by TCN Design Studio