DIY Pressed Flower Soldered Jewelry Pendant
This article, DIY Pressed Flower Soldered Jewelry Pendant, is sponsored by Bernzomatic. All opinions are 100% my own.
Detailed Instructions for How to Dry and Make Pressed Flowers and Solder Glass for Jewelry
As a Bernzomatic Torch Bearer, I get to create some pretty cool projects like on how to make wood burned place card holders, and this “Love You More” Valentine’s Day sign.
Here is video tutorial for the sign in case you missed it!
For this new project, I decided to try something different than wood burning and use the Bernzomatic ST500 cordless soldering iron and butane. This was my first-time soldering, and through trial and error I learned a ton. I think I’m an expert now! Ha! Here is how I made this Pressed Flower Soldered Jewelry Pendant. First, let’s start with the pressed flowers.
How to Quickly Dry and Make Pressed Flowers
Flowers typically take a few weeks to dry, however for small flowers for jewelry, you can use an iron to speed up the process.
Time: 10-15 Minutes
Materials for Flowers:
- Flowers
- Paper
- Book
- Iron
Instructions:
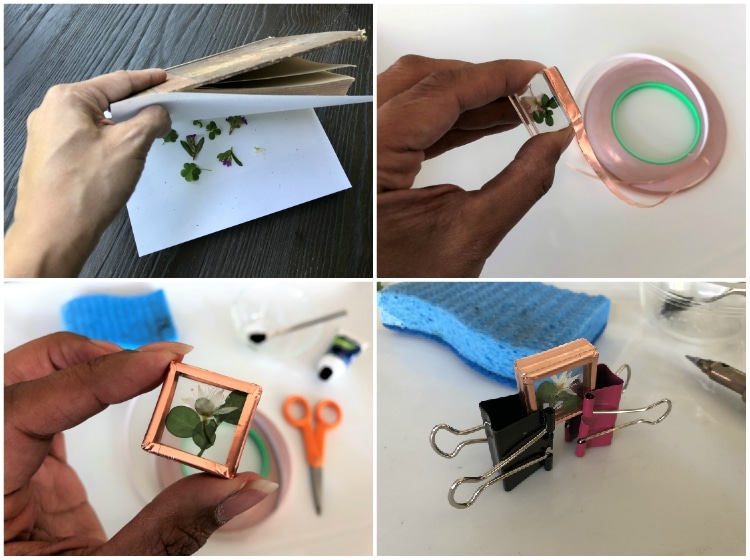
Pick your flowers of choice and place them between a piece of folded paper. Keep in mind that some flowers do not work using this technique and will turn brown. The purpose of using the iron and paper is to not only make them flat but to remove any moisture from the flowers, so be sure that there is no water inside and no steam is coming out of your iron.
Place the paper in between the middle of a book, close it, and press down the cover. Remove the paper and press an iron down onto the top of the paper for about 15 seconds. There is no need to move the iron around like when ironing clothes. Gently open the paper to check the flowers. You may need to press it with the iron again, depending on how much moisture is in your flowers. Gently lift the flowers and set them aside. Be careful because they are delicate.
How to Solder Micro Glass Together
Time: 30-40 Minutes
Materials for Pendant:
- Bernzomatic ST500
- Bernzomatic Butane
- One Bernzomatic Solder Kit (includes flux and solder)
- Copper Tape
- Safety Glasses
- Micro Glass
- 2 Binder Clips
- Small Brush or Cotton Swab
- Scissors
- Wet Sponge
- Jump Ring
- Chain or Keychain
Instructions:
First, arrange the pressed flowers on a piece of glass. Tweezers may help. Place the second matching micro glass piece on top. Bind the two pieces of glass with copper tape. The glass shown here is thick, so I taped in the middle, then each side, then middle again. Leave an edge on the side so that you can fold over the tape as shown. Smooth out the tape with your fingers and nails. If desired, you can use a craft knife to trim the tape on the front of the glass.
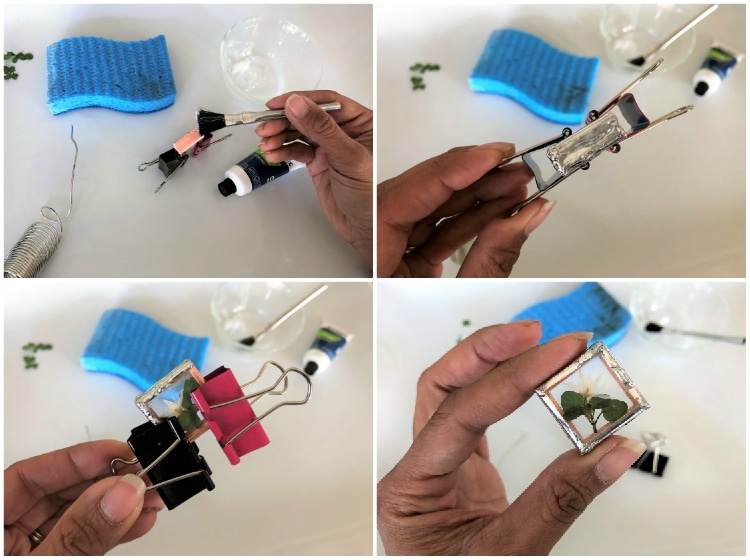
Place your glass piece in between two binder clips to hold it upright. These work perfectly and make it easy to turn when your pendant is hot. Next, fill the soldering iron with butane and ignite it. The ST500 works like a lighter. Once it is ignited you will see the orange and red of the flame through the holes and if it the first time using it, you may smell the butane. Allow it to heat for a few minutes.
While the soldering iron is heating, brush the flux on the side of the pendant that is facing up. I found it easiest to apply the flux one side at a time. Now it’s time to solder. Place the tip of the soldering iron to the solder and allow the heat to grab a bead. Gently apply the solder in even strokes across the copper wire on the pendant. Repeat this process on all four sides. Clean the tip of the soldering iron by rubbing it gently on the wet sponge in between each application. To move the pendant, use the binder clips to rotate and turn without touching it. It will be very hot.
Add the jump ring anywhere on the pendant you like by using the same process; 1) add copper tape, apply flux, and solder. Allow the pendant to cool.
Practice makes perfect. The more you solder, the better and cleaner the lines will be. You can use these pendants for necklaces, bracelet charms, or keychains. These pendants make great handmade gifts!
Watch the Video Instructions:
Thank you to Bernzomatic for sponsoring this post. I can’t wait to share my next Torch Bearer project with you! Stay tuned!
In case you missed it, check out my wood burned place card holders. They are perfect for your next dinner party and double as a party favor.
Like it? Pin it!


This is so gorgeous! I’ve never tried anything like this before, but it’s definitely on my list to try now!
Thanks, Jenna! It’s my first. It’s definitely addicting!
This is so pretty! I had no idea what went into soldering. Going to have to try it!!
Thanks, Amy! You should try it! It’s pretty cool one you get the hang of it.