• Project Gallery
  • DIY
    • Recycled DIY
    • Upcycled DIY
    • Repurposed DIY
    • Refurbished DIY
    • DIY Furniture
    • Repurposed Furniture
    • Thrift Store Transformations
  • Crafts
    • Wood Crafts
    • Paper Crafts
    • Photo Crafts
    • Kids Craft Ideas
    • Doll Crafts
    • Felt Crafts
    • Stenciling
    • Gift Wrapping
    • Printables
  • Party
    • Birthday Party
    • Baby Shower
    • Bridal Shower
    • Wedding
    • Team Sports
    • Sweets and Treats
    • Cocktail Corner
  • Holidays
    • St. Patrick’s Day
    • Easter
    • Earth Day
    • Teacher Appreciation
    • Mother’s Day
    • Father’s Day
    • Fourth of July
    • Back to School
    • Halloween
    • Halloween Costumes
    • Thanksgiving
    • Elf on the Shelf
    • Christmas
    • New Years
    • Valentine’s Day
  • Home & Garden
    • Storage & Organization
    • Cleaning Tips
    • Gardening
    • Makeovers
    • Kid Stuff Makeovers
    • DIY Tips & Tricks
    • DIY Artwork
    • Curb Appeal
  • Health & Beauty
    • Health & Wellness
    • Bath & Body
  • Nav Social Menu

    • Facebook
    • Instagram
    • Pinterest
    • Twitter
    • YouTube

DIY Inspired

Repurpose, Reinvent

  • About
  • Contact
  • Advertising
  • Featured
  • Disclosure

Crafts Home Decor

DIY Wire Ribbon Wreath for Spring

I have to admit, I wanted to make two of these for my front doors, but I didn’t buy enough ribbon. So, I have to find time to go back and make the second one.  But for now, I thought I’d share how to make this DIY wire ribbon wreath for spring.

These wire rings are commonly used for ribbon wreaths like this one I made for the fourth of July, and this one I made for the fall. This time, I wanted to try a different, more simple, but more modern way to make a spring wreath.

Time: 20 Minutes

Materials:

  • 18 Inch Wire Wreath Frame
  • 6 Yards of 2.5” Wide Ribbon
  • Scissors
  • Twist Ties
  • Artificial Flowers
  • Ribbon for Embellishment

Watch the video instructions:

Instructions:

Cut two small holes near the end of the ribbon. Feed a twist tie through the holes and around one section of the wire and twist them close to secure the ribbon to the frame.  Cut off an excess twist tie. Begin wrapping the ribbon around the wreath. Repeat the same step when starting the second roll of ribbon.  Once the frame is covered, tuck the end of the ribbon in a fold in the back.  I like to do this so that I can easily reuse the frame and ribbon once I take it apart to make a new wreath.  Tuck a bouquet of artificial flowers into the ribbon and tie a bow around it.

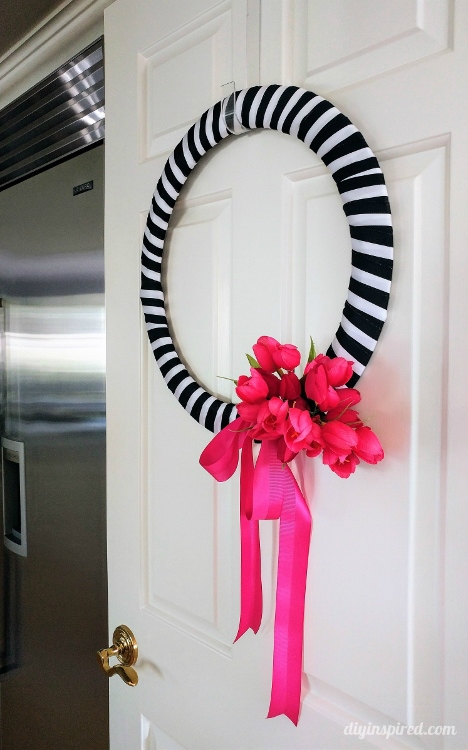
Here is the finished wreath.  It’s simple and modern.

Play around with ribbon colors and patterns to fit your décor.  This easy DIY wire ribbon wreath is a great way to change up your wreaths for each holiday or season or special occasion.

Like it? Pin it!

  • Share
  • Twitter


Leave a Comment

Join our Community of Crafters!

Stay updated and never miss a thing!

Disclosure and Privacy Policy
Previous Post: « Upcycled Thrift Store Frame with Chigiri-e Art
Next Post: Little Red Wagon Gift Basket Idea »

Reader Interactions

Leave a Reply Cancel reply

Your email address will not be published. Required fields are marked *

This site uses Akismet to reduce spam. Learn how your comment data is processed.

Primary Sidebar

Welcome!

DIY Inspired Profile Picture 2015Thank you for visiting! I'm Dinah and I am a full time Mother, Blogger and Writer. I'm honored to be named one of Mashable's 10 Mom Blogs Full of Inspiring Advice. {Read more about me here}

Join our Community of Crafters!

Stay updated and never miss a thing!

Disclosure and Privacy Policy

Stay updated and never miss a thing!

Footer

You might also love these

Easy Felt Flower Barrettes

DIY No Sew Felt Flowers

DIY Felt Tassel Keychains

DIY Felt Tassel Keychains

Awkward Shaped Gifts Wrapping Idea

12 Clever Gift Wrapping Ideas

Easy Gift Idea for Boyfriend

Easy DIY Photo Holder

Paper Flower Gold Hoop Wreath

30 Paper Flower Craft Tutorials

Copyright © 2021 · Divine theme by Restored 316

Copyright © 2005–2021 DIY Inspired. Installed and customized by TCN Design Studio