DIY Paper Christmas Ornaments
Make Your Own Paper Christmas Ornaments
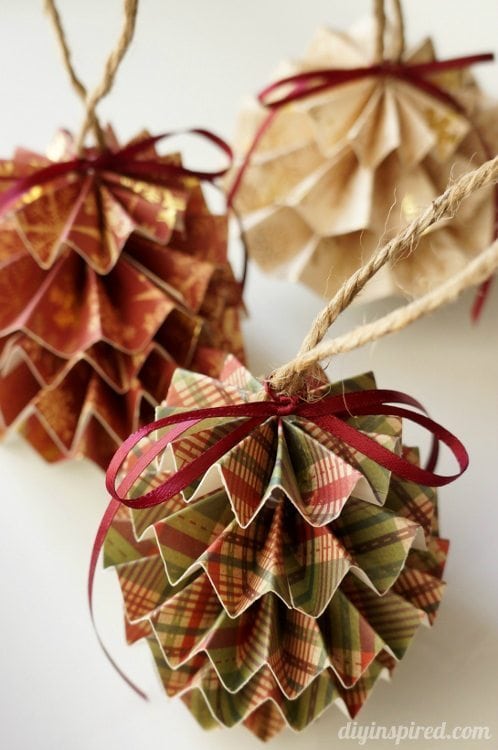
When we made paper pumpkins for fall we really didn’t think they’d be shared thousands and thousands of times! After a few emails and some comments and questions from Girl Scout Leaders and Teachers, this is a similar craft for the holidays. So, after a few trials, we perfected these DIY paper Christmas ornaments, which were inspired by the paper pumpkins.
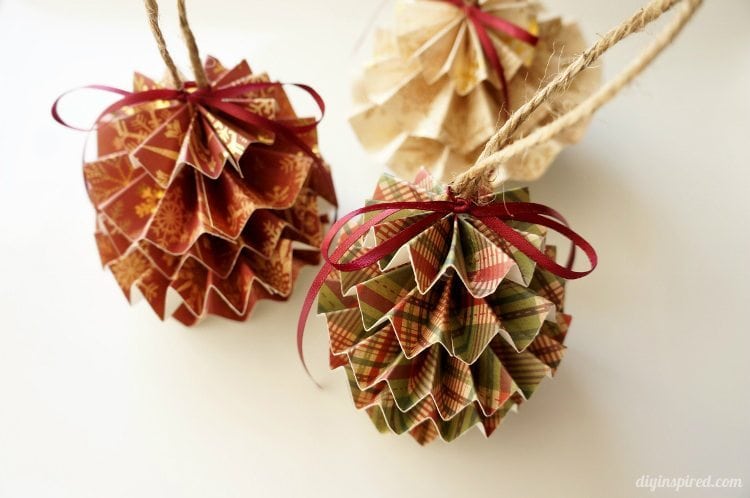
In order to create the best instructions, I took the time and played around with width, length, and paper type. Finally, we found the right DIY formula. Metallic scrapbook paper looks the best. It’s sturdy and will store nicely without getting damaged. So, here is a detailed tutorial for the paper Christmas ornament sphere with several pictures to make it easy to follow.
How to Make Them
Time: 20-30 minutes
Materials:
- 12 X 12 piece Scrapbook Paper (one per ornament)
- Paper Cutter

- Tape
- Hot Glue and Glue Gun
- Twine
- Ribbon
- Scissors


Instructions:
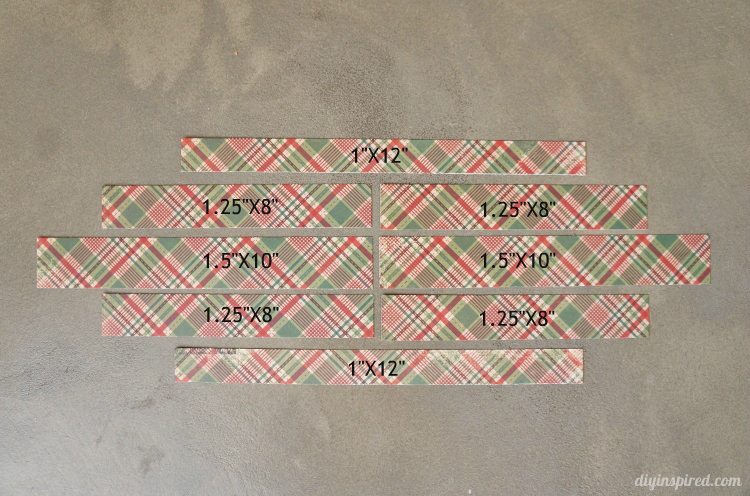
Step 1: To maximize the use of paper, first cut 12” strips as follows:
- 2- 1” strips
- 4- 1.25” strips
- 2- 1.5” strips

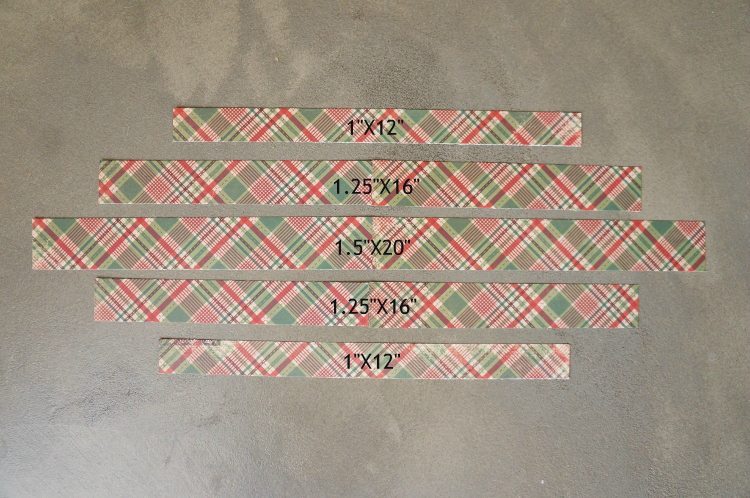
Step 2: Step 3: Next, make the following cuts (see photo below):
- The 2- 1” strips will stay the same at 1”X 12”
- Next, the 2- 1.25” strips will each be cut into 2 – 8” strips
- The 2- 1.5” strips will each be cut into 2 – 10” strips
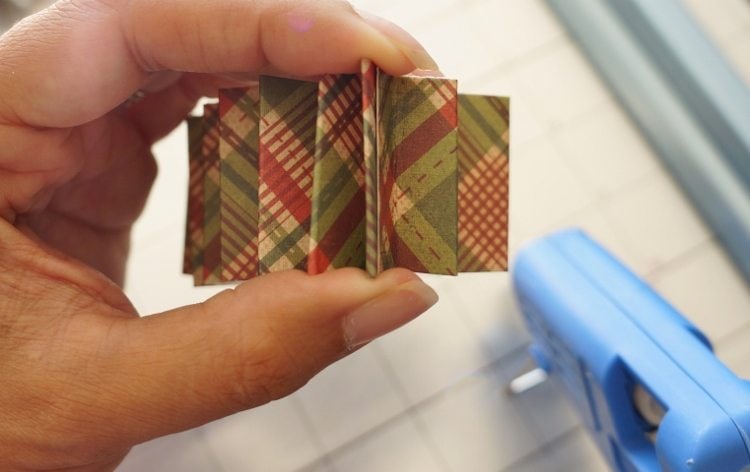
Step 4: Tape the corresponding strips together as shown below.
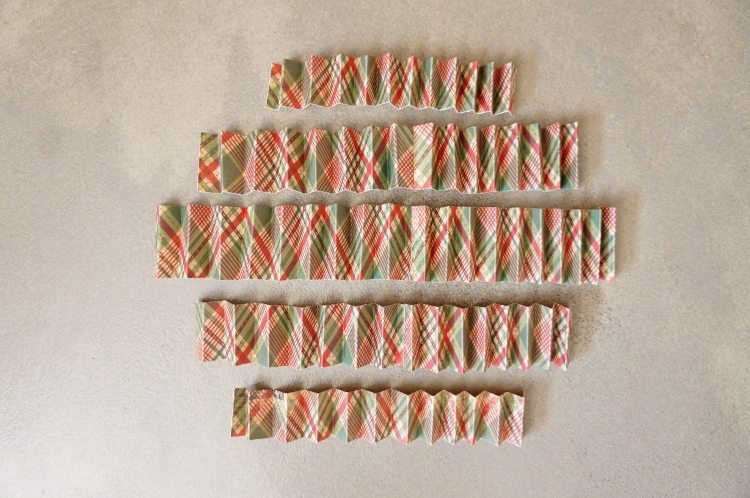
Step 5: Fold each strip like an accordion.
The folds aren’t exact and that’s fine. The folds are approximately a half inch wide.
Step 6: Use hot glue to glue the ends of each strip together.
Here is a top and side view.
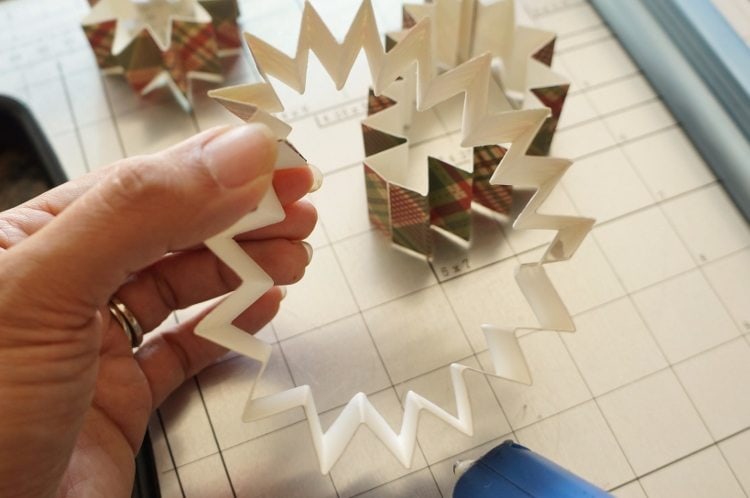
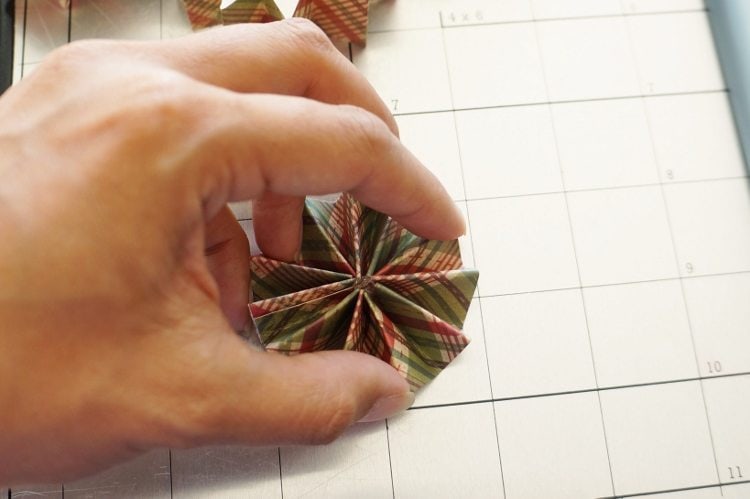
Step 7: Next, bend the circle strip inward to form a medallion.
Add a drop of hot glue in the middle and hold the medallion together for a few seconds until the glue is dry. Blowing helps!
Repeat this for each strip until you have five medallions.
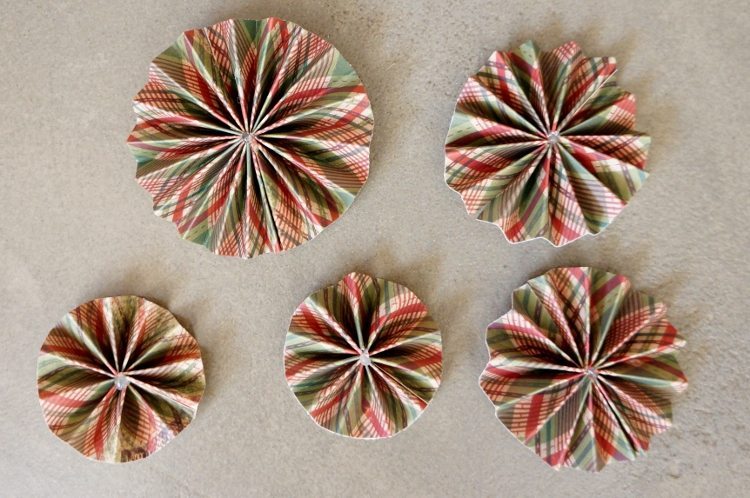
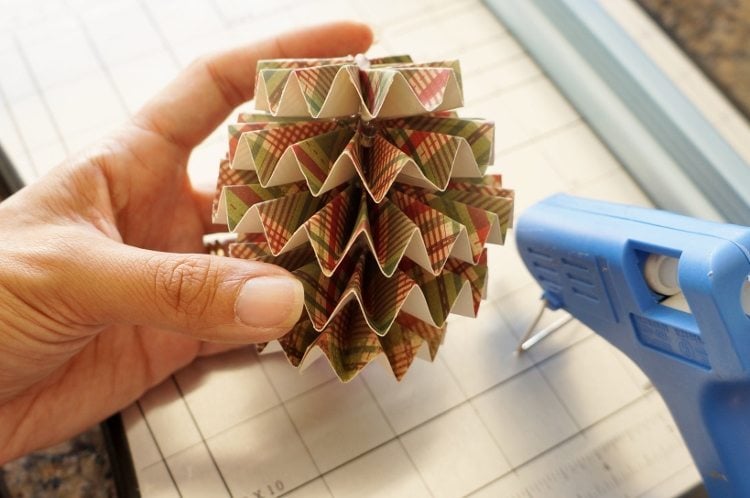
Step 8: After that, hot glue each layer together to form a sphere as shown.
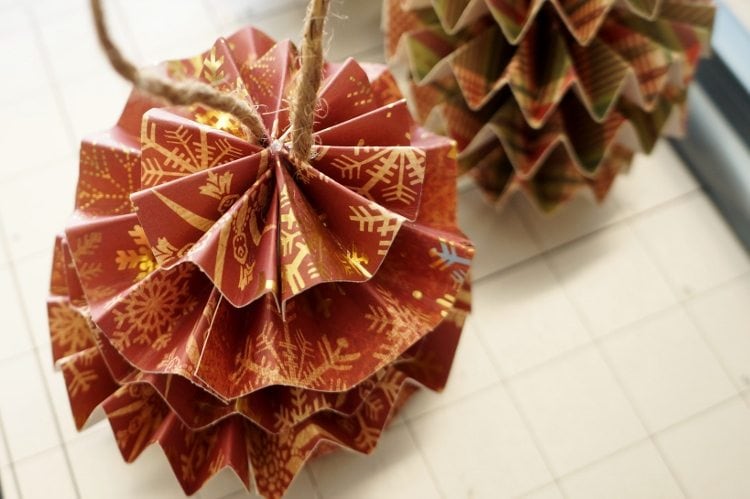
Step 9: Next, cut a piece of twine or ribbon and hot glue it to the top of the ornament for the hanger.
Hot glue works the best because it dries quickly.
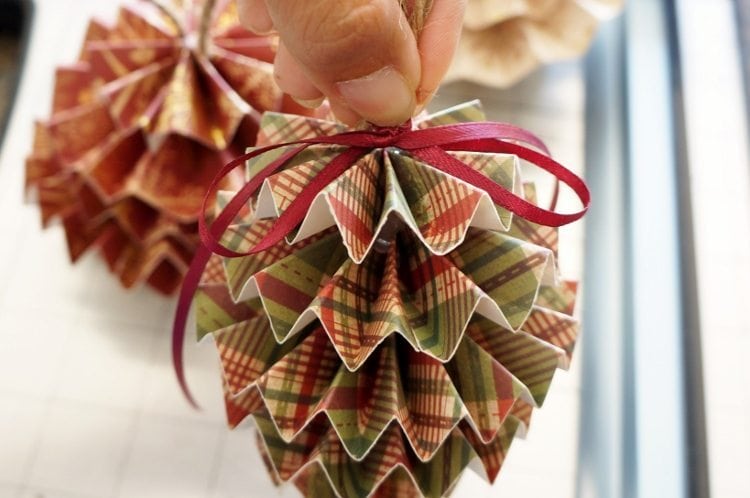
Step 10: Lastly, Tie a ribbon bow around the top.
It seems like a lot of directions, but once you do it one time it’s a piece of cake after that! I hope you try these cute paper Christmas ornaments out!
In case you missed it, check out my similar tutorial for paper pumpkins. You can use the same tutorial for paper apples or paper oranges too!
You May Also Like
Like these paper Christmas ornaments? Here is a fun paper flower craft tutorial I have done in the past. Get the full tutorial here.
Have you visited me on YouTube? I have a ton of craft videos on there. I’d love for you to visit and subscribe! Thank you in advance for your support.
More fun Christmas Craft Ideas
Here are a few extra Christmas DIY ideas including some free printables I have available.
Free Printable Magic Santa Key
Handmade Holidays with Free Printable Gift Tags
5 Ways to Make Giant Candy for a Candyland Theme
Wood Burned Table Place Cards
12/18

How long was the piece of twine?
And how long was the piece of ribbon you tied around the twine?
Thanks! 😀
Hi T! The twine is about 7″ long and the ribbon is 14″.
Were the accordian folds specific lengths ( every inch, half inch) or did you just randomly fold them?
Hi Nina! I randomly folded them, but I would guess about a half inch or slightly less. I hope this helps!
I am thinking you can probably even prescore the piece of 12×12 cardstock before you cut to make folding easier later.
Great idea, Karen! Thank you for stopping by!!
I’ve got two questions. 1- Did you use metallic paper or cardstock? The paper looks pretty stiff, more like card. 2 – Did you mean to say 4 strips of 1.25 wide? The picture shows 4 8″ lengths glue together to make 2 16″ lengths. I want to get it right. Thanks! These are very cute.
Hi Marie! 1) Yes. It’s thick scrapbook paper, like a cardstock. These little things are sturdy! 2) YES! Thank you for catching that! I made the correction. Thank you so much! Let me know how it goes!
Can’t get circles to stay flat and come apart when I glue sections together
Is it possible to use ribbon, and paint the ribbon with Hodge podge afterwards to make the ornaments stiff. These are so cute.
Hi there! Actually, use card stock (or thick scrapbook paper). They are very sturdy that way. Thank you for stopping by!
No matter what I do, I cannot get the accordion circle to bend inwards to make a medallion. I need to know (see) how you do that. Help!
Hi Cindy! So sorry you are having trouble! The easiest way is to make sure the strips are the right length. Any shorter than indicated, makes this step really hard. Also, make sure the ends of the strips are securely taped together. Once you check these two things, gently use two hands and press down to form the medallion. Once your have it down, try to hold the medallion with one hand and use the other hand to drop a dab of hot glue in the center. Put down the gun, and hold the medallion together for a few seconds (15) until the hot glue dries. I hope this helps!! Let me know!
I’m still not getting it. How do you get the medallion shape?
Once you get the pleated circle, lay it flat and push it together to make the medallion. Use a dab of hot glue in the center to hold it together.
You are so talented.
Question: Can you could make some cute little Christmas trees using the folding paper and just change the sizes? I would love to see that. I want to put them along a string and hang over the fireplace. Thank you.
Yes! Great idea, Shirley! My guess on measurements would be: 1X10″, 1X12″, 1.25X16″, 1.5X20″, 1.5X24″.
Great article and photos! We are sharing on our Facebook page today. Hope that is ok! TFS, Susan
Great news! Thank you. I’ll be sure to stop by!
I would use card stock with a pattern on both sides, then you wouldn’t see the white paper underneath on the ornament.
What wonderful ideas you have. I am going to try the ornament design shortly.
Great! Thank you so much, Joyce! Let me know how it turns out!
Great idea. We are using it for our annual Christmas craft day. Unfortunately, when I printed it printed all the comments as well and I couldn’t get it to stop. Huge waste of paper. Is there a way to exclude the comments and ads from printing?
Hi Pam! First of all, I’m honored that you are using this as your craft! There is a better way to print. At the bottom of the post, right above my bio you will see some small round share icons. Click the last one (green). A menu will pop up. Choose “printfriendly”. You will see the printer friendly version. If you scroll down and move your curser over the extra links and bio at the bottom, you can delete those before you print, saving even more ink. I hope this helps! Have a very Merry Christmas!
Love them
Thank you so much!
These paper ornaments are so lovely. Thank you so much for sharing with us. I hope I can manage to make some this year. If you wish add some sparkle sprinkles on the edges after folding, they will not go unnoticed. Just a thought. I am also thinking how about just a drop of oils like cinnamon/cloves/star anise, it will also fragrance the room. This is what life is all about, sharing, suggestions and appreciation. Love….
That is a GREAT idea! Thank you for stopping by, Elize!
Terrific idea. Thank you…I was looking at the edges of the paper that shows white and thought it might look nice if that match paper or had an accent. Things like you can add glitter to the edges, decorative small diameter rope you know found in the ribbon section and the last thought I had was taking a green, red , silver or gold maker and coloring the edge.. Thank you again.. Faye
Thank YOU, Faye! Those are great ideas. Glitter would be really pretty.
Thank you for the shared DIY Paper Christmas decorations. It looks easy to make.i will try it for the new look of my Christmas tree.
Very cute idea…. but a question. Why is it that you cut the strips in the middle, and then tape them back together again? (Haven’t tried this yet, so I’m not seeing the point.)
Thanks!
Thanks, Susan! Thank you so much! You have to cut the strips because scrapbook paper is only 12 inches long. Does that make sense?
Dinah,
I think you did a great job with the tutorial – pictures and written instructions are so easy to read. I have so much card stock on hand and can’t wait to use it up making ornaments. Thanks so much for sharing. Happy Holidays to you. Lisa
Thank you so much, Lisa! I hope you enjoy making some. Happy holidays to you and your family as well!
Thanks for the tutorial, yet got stuck on step 4. ‘Tape the corresponding strips together as shown below’, cannot see what is being stuck to what?. Having a good go at making the amazingly beautiful Acorn-like decorations so am hoping they turn out okay and upload a picture on pinterest once done. Have no glue gun so have used PVA glue throughout the process!. Am most grateful to you for the effort you have put into tutorial.
Hi Shikira! In the photo above step four, tape the two like strips together so that you have longer strips. The photo below the text shows what it will look like after you tape them together. Let me know if you still need help or it is unclear. I’m here to help!
Great project,
Do you think that using old Christmas cards would be to stiff. I would have to tape several together to get the desired length.
Hmmm… the card stock I used here in this post was pretty thick. I think it may work! Let me know!
I’m terrible at learning from pictures. To me there always seems to be a step missing. I can’t get the folded paper to become a medallion. Someone please consider doing a video and then linking it from here. Even if it’s just a blog visiter, asking permission first, and then each can link to the other, if permission is given.
Hi Janet! I have had email requests for a video. You are not the only one! I plan on doing one in the near future.
Is there away any way that I can print the directions.
Hi Barbara! Yes, click the green icon (last icon next to the social share icons on the top or bottom of the post) and then click “printer friendly”.
Hi, I love this craft but I can’t keep my medallions from popping outward after gluing and holding. Help!!!
Hi Stephanie! Hot glue works the best because it dries quickly. If not, maybe try a small binder clip to hold them closed until they dry.
Thanks for sharing such great instructions
Your welcome, Louann! So glad you like it!
I did not read all the reply’s, not sure if someone tried this. But I tried it with double sided cardstock, and it looks so much better.
Do you have a pattern for a folded accordian star?
my first try worked but looked pretty sloppy. but i will try again and hopefully get better results!!
Good luck! Let me know how I can help!
I always make ornaments to give to my clients. I think I am going to use this ornament as the gift this year (I usually make about 100 to give out). I will let you know how they turn out. thank you for the idea.
Skellybold Creations
Wonderful, Sandra! Can’t wait to here.
I always make a different ornament for a lady in our church and this one is the one I chose. It is pretty easy to make once I could figure out how to do step 7. I played with it awhile and once I found out how to get it in the right shape – it was easy. Thanks for the beautiful pattern.
Wonderful! Thank you, Elaine!