• Project Gallery
  • DIY
    • Recycled DIY
    • Upcycled DIY
    • Repurposed DIY
    • Refurbished DIY
    • DIY Furniture
    • Repurposed Furniture
    • Thrift Store Transformations
  • Crafts
    • Wood Crafts
    • Paper Crafts
    • Photo Crafts
    • Kids Craft Ideas
    • Doll Crafts
    • Felt Crafts
    • Stenciling
    • Gift Wrapping
    • Printables
  • Party
    • Birthday Party
    • Baby Shower
    • Bridal Shower
    • Wedding
    • Team Sports
    • Sweets and Treats
    • Cocktail Corner
  • Holidays
    • St. Patrick’s Day
    • Easter
    • Earth Day
    • Teacher Appreciation
    • Mother’s Day
    • Father’s Day
    • Fourth of July
    • Back to School
    • Halloween
    • Halloween Costumes
    • Thanksgiving
    • Elf on the Shelf
    • Christmas
    • New Years
    • Valentine’s Day
  • Home & Garden
    • Storage & Organization
    • Cleaning Tips
    • Gardening
    • Makeovers
    • Kid Stuff Makeovers
    • DIY Tips & Tricks
    • DIY Artwork
    • Curb Appeal
  • Health & Beauty
    • Health & Wellness
    • Bath & Body
  • Nav Social Menu

    • Facebook
    • Instagram
    • Pinterest
    • Twitter
    • YouTube

DIY Inspired

Repurpose, Reinvent

  • About
  • Contact
  • Advertising
  • Featured
  • Disclosure

Crafts

How to Make a Secret Book Safe

Crafting with Damaged Books: How to Make a Secret Book Safe

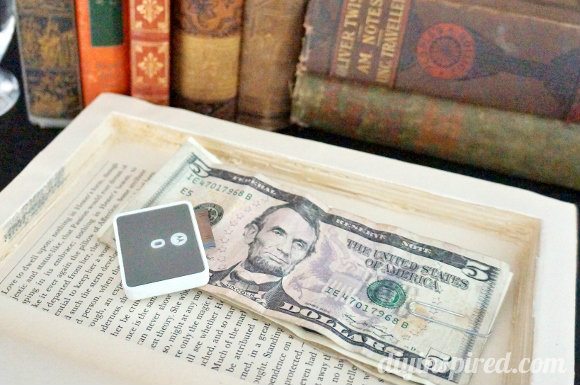
Making a secret book safe is a lot easier than I thought.  It’s one of those things that I thought I’d have to buy because I thought it’d be a really cool gift.  But before I spend any money to buy one, why not try to make it myself??? Here is how to make a secret book safe.

Materials: 

  • Thick hardback book
  • Decoupage medium or glue and water mixture
  • Paint brush
  • Sharp knife
  • Metal straightedge

Step One:

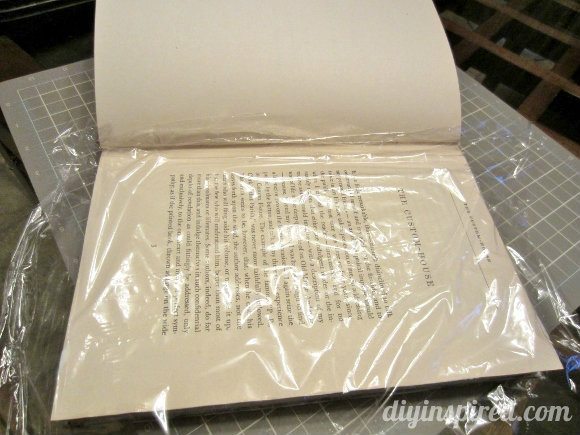
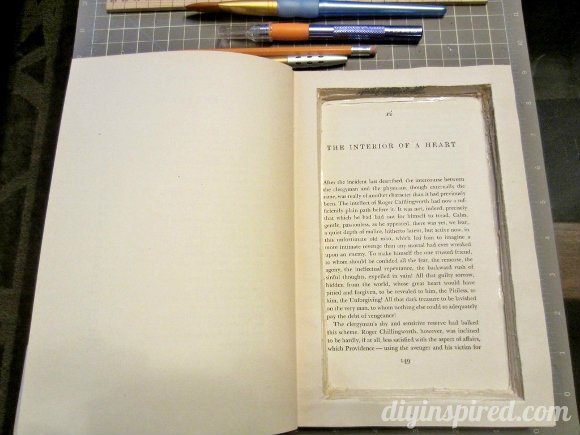
I wanted to keep a few of the front pages in tact to show the copyright date and an illustration. I covered the front cover and those pages plus one page with plastic wrap.

how-to-make-a-secret-book-safe (5)

Step Two:

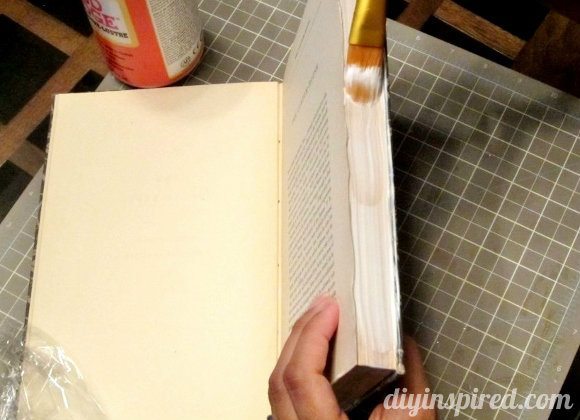
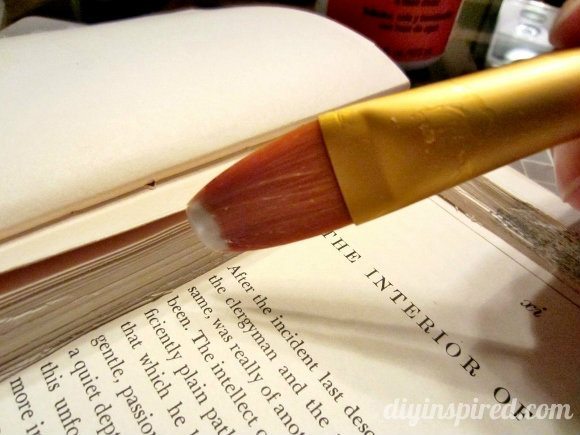
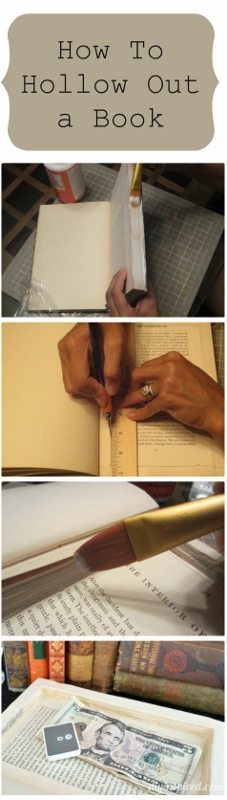
I used Mod Podge, a decoupage medium, and a paint brush to seal the three edges. Make sure you saturate them with approximately three coats.  Allow the Mod Podge to dry (about 15 minutes), meanwhile set something heavy on top of the book to create pressure.

how-to-make-a-secret-book-safe (6)

Step Three:

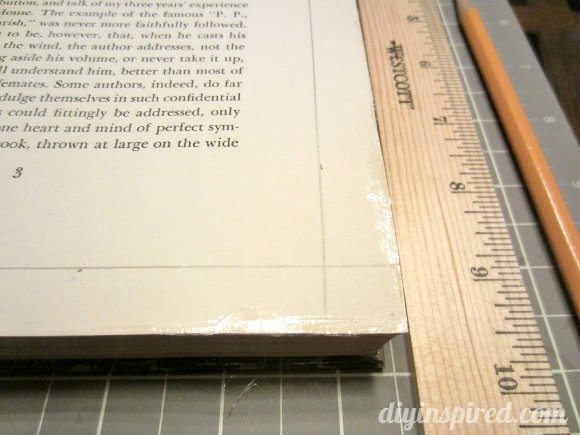
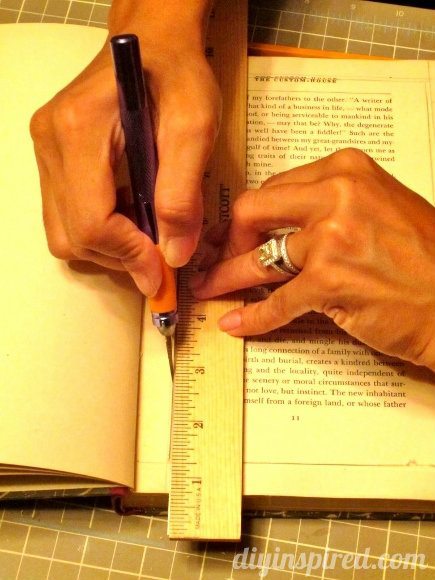
Next, using a straightedge and a pencil, I marked the area I wanted to cut out.

how-to-make-a-secret-book-safe (2)

Step Four:

Using a sharp knife and a metal straightedge, I carefully cut out a few pages at a time, making sure to remove small bits and pieces along the way. Take your time while doing this step.

how-to-make-a-secret-book-safe (7)

Step Five:

After I reached the desired depth, I sealed the inside edges with Mod Podge and allowed it to dry completely.

how-to-make-a-secret-book-safe (3)

Step Six:

I then used Mod Podge around the top edges and glued the extra front page on top.  After a few minutes, I used the knife to cut out the center.  This top page gives it a nice clean look.

how-to-make-a-secret-book-safe (4)

how-to-make-a-secret-book-safe (1)

Notes:

Save the book pages for other book page craft projects. Also, consider using ribbon to cover the inside edges or decorative paper to cover the inside back for a more finished look.

Pin Me!

How to Hollow Out a Book to Make a Secret Book Safe - DIY Inspired

  • Share
  • Twitter


9 Comments

Join our Community of Crafters!

Stay updated and never miss a thing!

Disclosure and Privacy Policy
Previous Post: « Antique Corner Chair Update
Next Post: How to Repair a Broken Mirror Frame »

Reader Interactions

Comments

  1. Debi says

    November 12, 2013 at 7:57 am

    I love making these. They make great presents.

    Reply
    • Dinah Wulf says

      November 12, 2013 at 8:46 am

      They are great handmade presents! I’m thinking of making a couple more myself 🙂 Thanks for stopping by, Debi!

      Reply
  2. Carol says

    January 16, 2016 at 7:16 am

    Is there a way to make the book covers look old & dusty.

    Reply
  3. Carol says

    January 16, 2016 at 7:17 am

    How can I distress the book cover?

    Reply
    • Dinah Wulf says

      January 17, 2016 at 8:38 am

      Great question! I’ve never tried it before. I found this on eHow though! http://www.ehow.com/how_8761862_do-distressing-books.html Hope this helps!

      Reply
  4. Nana says

    April 8, 2018 at 12:37 pm

    I did this years ago but like mine better. DO NOT glue the outside edges of the pages. Glue the INSIDE cut edges after you cut out the center. (And not Modge Podge. Use some airplane glue.) Then it looks far more realistic. Also, leave a dozen or more pages uncut at the front of the book past the front page, not just one. Then it is more realistic in case somebody actually picks up the book. I did this 25 years ago to hide a handgun, and nobody ever found it.

    Reply
    • barbara meagher says

      June 1, 2018 at 5:19 am

      Must be far more difficult cutting out the inside pages with the outer pages unglued?

      Reply
      • Dinah Wulf says

        June 1, 2018 at 9:44 am

        I imagine so, but with a little pressure you may be ok!

        Reply
  5. Nana says

    April 8, 2018 at 12:39 pm

    Instead of “distressing” the outside of the book, buy an older book at a thrift store.

    Reply

Leave a Reply Cancel reply

Your email address will not be published. Required fields are marked *

This site uses Akismet to reduce spam. Learn how your comment data is processed.

Primary Sidebar

Welcome!

DIY Inspired Profile Picture 2015Thank you for visiting! I'm Dinah and I am a full time Mother, Blogger and Writer. I'm honored to be named one of Mashable's 10 Mom Blogs Full of Inspiring Advice. {Read more about me here}

Join our Community of Crafters!

Stay updated and never miss a thing!

Disclosure and Privacy Policy

Stay updated and never miss a thing!

Footer

You might also love these

Easy Felt Flower Barrettes

DIY No Sew Felt Flowers

DIY Felt Tassel Keychains

DIY Felt Tassel Keychains

Awkward Shaped Gifts Wrapping Idea

12 Clever Gift Wrapping Ideas

Easy Gift Idea for Boyfriend

Easy DIY Photo Holder

Paper Flower Gold Hoop Wreath

30 Paper Flower Craft Tutorials

Copyright © 2021 · Divine theme by Restored 316

Copyright © 2005–2021 DIY Inspired. Installed and customized by TCN Design Studio