• Project Gallery
  • DIY
    • Recycled DIY
    • Upcycled DIY
    • Repurposed DIY
    • Refurbished DIY
    • DIY Furniture
    • Repurposed Furniture
    • Thrift Store Transformations
  • Crafts
    • Wood Crafts
    • Paper Crafts
    • Photo Crafts
    • Kids Craft Ideas
    • Doll Crafts
    • Felt Crafts
    • Stenciling
    • Gift Wrapping
    • Printables
  • Party
    • Birthday Party
    • Baby Shower
    • Bridal Shower
    • Wedding
    • Team Sports
    • Sweets and Treats
    • Cocktail Corner
  • Holidays
    • St. Patrick’s Day
    • Easter
    • Earth Day
    • Teacher Appreciation
    • Mother’s Day
    • Father’s Day
    • Fourth of July
    • Back to School
    • Halloween
    • Halloween Costumes
    • Thanksgiving
    • Elf on the Shelf
    • Christmas
    • New Years
    • Valentine’s Day
  • Home & Garden
    • Storage & Organization
    • Cleaning Tips
    • Gardening
    • Makeovers
    • Kid Stuff Makeovers
    • DIY Tips & Tricks
    • DIY Artwork
    • Curb Appeal
  • Health & Beauty
    • Health & Wellness
    • Bath & Body
  • Nav Social Menu

    • Facebook
    • Instagram
    • Pinterest
    • Twitter
    • YouTube

DIY Inspired

Repurpose, Reinvent

  • About
  • Contact
  • Advertising
  • Featured
  • Disclosure

Kid Stuff Makeovers

Refurbished Radio Flyer Wooden Toy Horse

wooden-horse-before-and-after

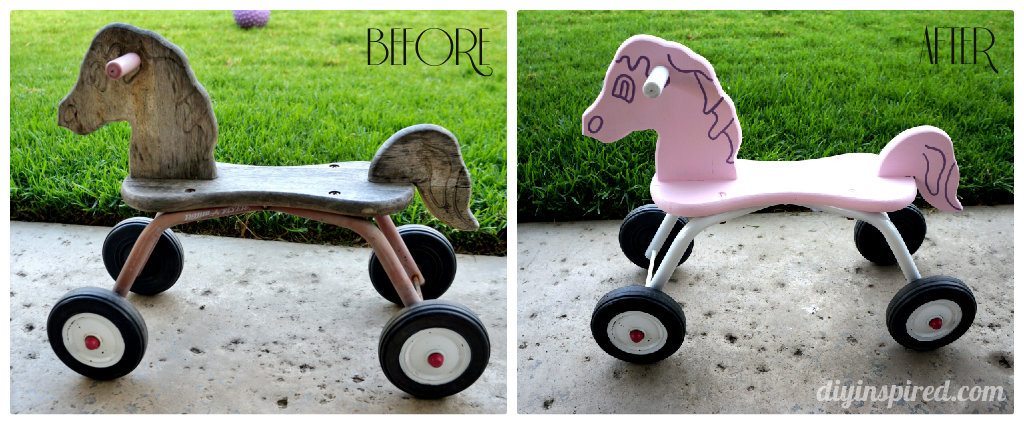
One of my best friends has a Radio Flyer Wooden Toy Horse that all three of her kids played with.  Her youngest, Taylor, absolutely LOVES this horse and uses it practically every day.  Over the years, since kid #1, the horse has taken its toll.  It lives most of its life outside and the weather has taken a beating on it.  When I asked little Taylor what color she wanted Auntie to paint her horse she said pink and white. Happily, I took home her horse for a couple days to refurbish it for her.

Here are the materials I used:

  • WD-40
  • Sanding block and 150 grit sand paper
  • Clean cloth
  • White spray paint for metal and outdoor use
  • Pink paint
  • Paint brush
  • Screw driver
  • Wrench

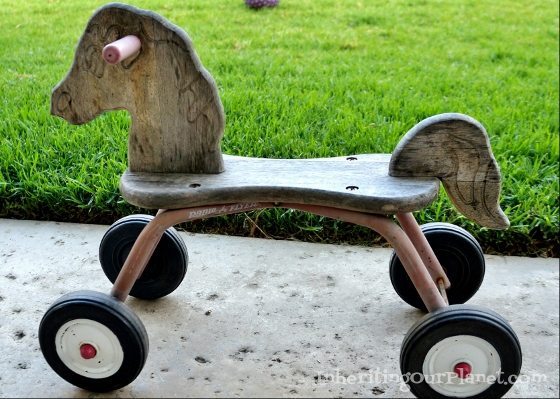
Here was the before.

radio-flyer-horse-560x399

I had difficulty taking off the old screws and nuts because of the rust, so I sprayed on WD-40 to loosen it.

Refurbished-toy-horse (5) (540x359)

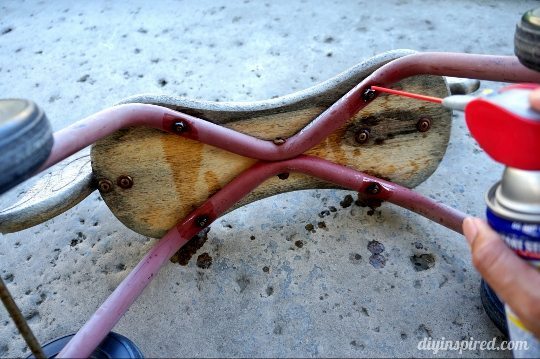
It worked perfectly.  I had to use the wrench to secure the nut and use the screwdriver to unscrew each one.

Refurbished-toy-horse (6) (540x359)

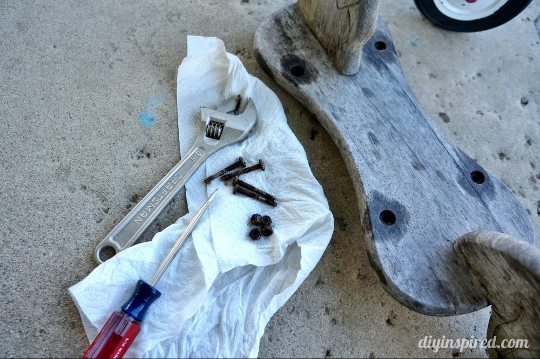
Note: I soaked the screws and nuts in lime away and used an old toothbrush to scrub them clean of rust.  It worked great and I didn’t have to buy new ones!

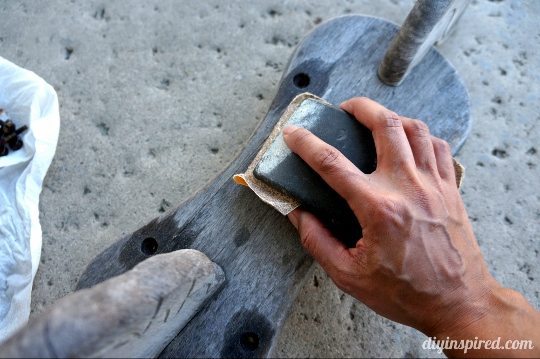
Once the wood and metal were apart, I sanded the horse.

Refurbished-toy-horse (7) (540x359)

I looked online to find replacement caps for the wheels because from experience, they usually get ruined once you try to pop them off.  I couldn’t find the right size so I decided to keep them on and cover the wheels in plastic to protect them from the spray paint.  I sprayed the metal base with spray paint.

Refurbished-toy-horse (8) (540x359)

Meanwhile, I took off the rubber handles and painted the wooden horse pink. I also painted the rubber handles white with the spray paint.

Refurbished-toy-horse (9) (540x359)

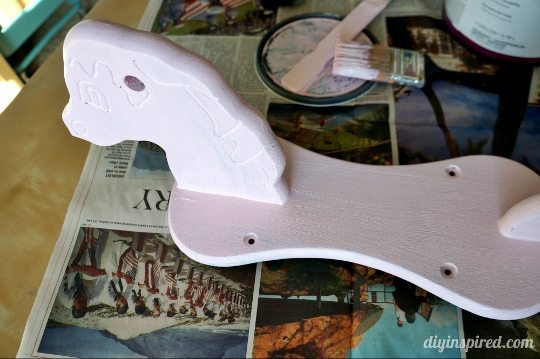
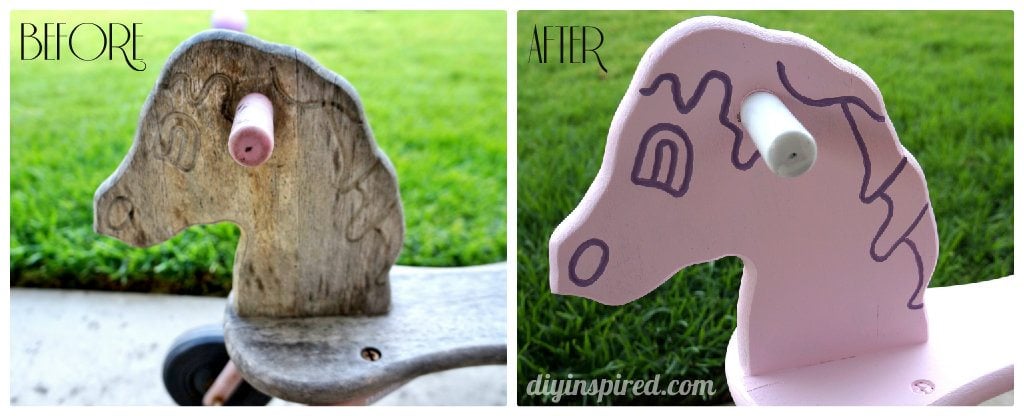
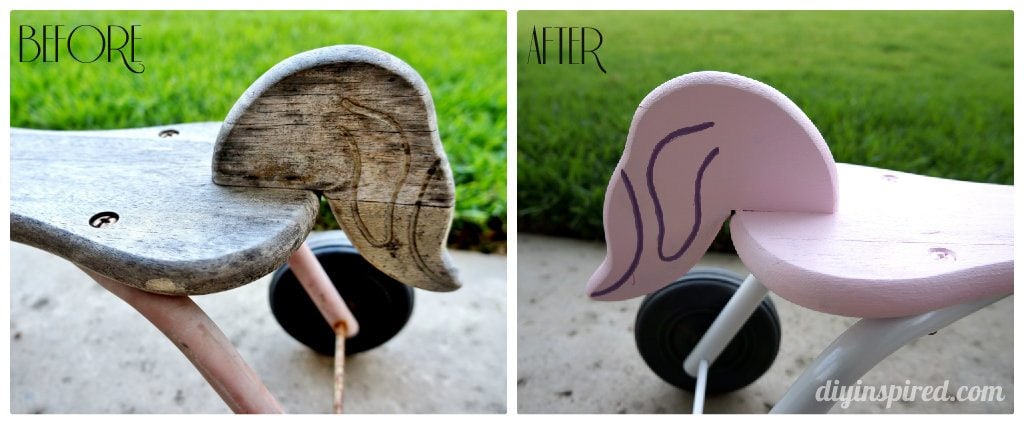
Once all the paint was dry, my friend Jenny highlighted the groves with a light purple paint and small paintbrush.  Here are some before and after photos.

wooden-horse-before-and-after

refurbished-wooden-horse

refurbished-toy-horse

This project makes me want to look for more toys to refurbish the next time I go to an antique swap meet.  When I brought it back to Taylor she was so excited and rode it immediately.


  • Share
  • Twitter


8 Comments

Join our Community of Crafters!

Stay updated and never miss a thing!

Disclosure and Privacy Policy
Previous Post: « 12 Recycled Book Page Crafts
Next Post: 4 Tips to Redo a Small Bathroom »

Reader Interactions

Comments

  1. heather mccurdy says

    April 18, 2013 at 9:17 am

    This is such a cute idea and it looks super special, and not too hard…

    Reply
    • Dinah Wulf says

      April 19, 2013 at 5:47 am

      Yes! So easy! My husband says I need to do more projects like this one 🙂

      Reply
  2. Cherie says

    April 19, 2013 at 4:44 am

    That looked like it was fun and like heather said not too hard.

    Reply
    • Dinah Wulf says

      April 19, 2013 at 5:48 am

      It WAS fun. I had a great time doing it for her. 🙂 Thanks, Cherie!

      Reply
  3. rebecca says

    April 25, 2013 at 3:07 pm

    I love it! Now i’m going to be scouring flea markets for one- thanks!! 🙂

    Reply
    • Dinah Wulf says

      April 25, 2013 at 4:17 pm

      That’s how I felt after I completed it too! Thanks, Rebecca! Send me pics if you end up finding something! 🙂

      Reply
  4. Lori says

    April 17, 2016 at 5:51 pm

    Do you sell any of these and if so, what is the cost?

    Reply
    • Dinah Wulf says

      April 18, 2016 at 9:01 am

      Unfortunately I don’t! Thank you for stopping by, Lori!

      Reply

Leave a Reply Cancel reply

Your email address will not be published. Required fields are marked *

This site uses Akismet to reduce spam. Learn how your comment data is processed.

Primary Sidebar

Welcome!

DIY Inspired Profile Picture 2015Thank you for visiting! I'm Dinah and I am a full time Mother, Blogger and Writer. I'm honored to be named one of Mashable's 10 Mom Blogs Full of Inspiring Advice. {Read more about me here}

Join our Community of Crafters!

Stay updated and never miss a thing!

Disclosure and Privacy Policy

Stay updated and never miss a thing!

Footer

You might also love these

Crazy Hair Day Yogurt Cup

Crazy Hair Day Ideas for Boys and Girls

Easy Felt Flower Barrettes

DIY No Sew Felt Flowers

DIY Felt Tassel Keychains

DIY Felt Tassel Keychains

Awkward Shaped Gifts Wrapping Idea

12 Clever Gift Wrapping Ideas

Easy Gift Idea for Boyfriend

Easy DIY Photo Holder

Copyright © 2021 · Divine theme by Restored 316

Copyright © 2005–2021 DIY Inspired. Installed and customized by TCN Design Studio