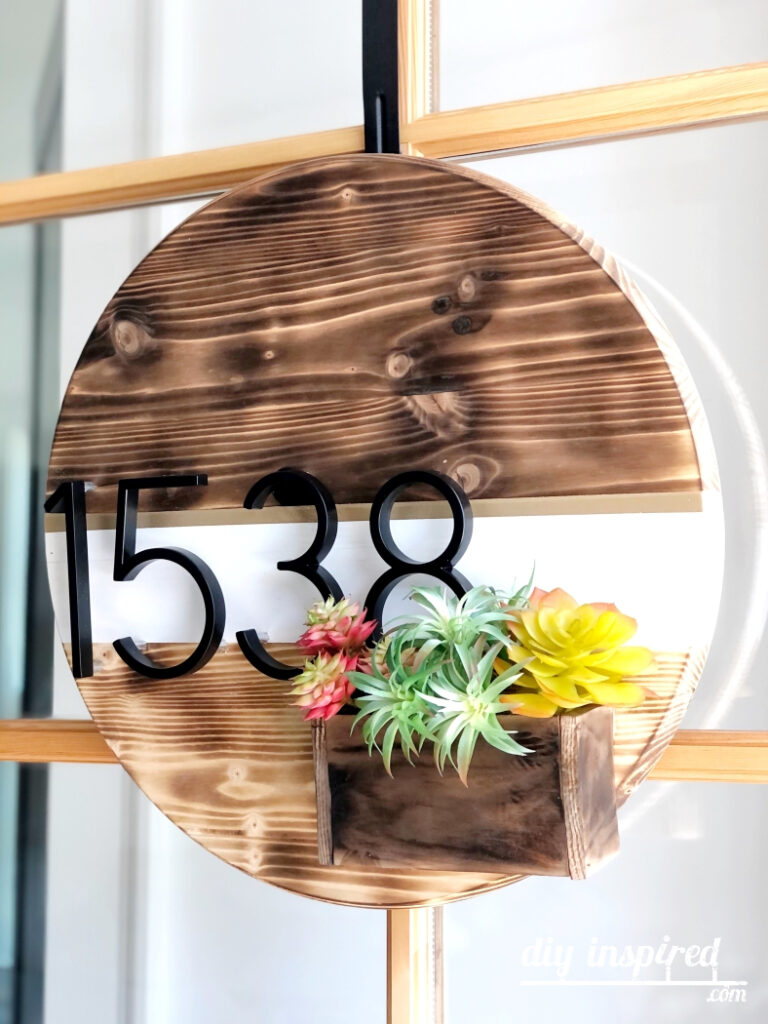
Torched Address Wreath with Floating Numbers
How to Make a Torched Address Wreath with Floating Numbers and Succulent Box
This article, Torched Address Wreath with Floating Numbers, is sponsored by Bernzomatic. All opinions are 100% my own.
I have done some neat projects using a torch like this recycled CD and DVD mosaic tray, or this epoxy penny table, but this wood burned address wreath with floating numbers may be my top five favorite projects of all time. It is a weekend project due to dry time, but worth the time and effort.

To properly explain each step, I broke down the instructions and materials lists like this:
- How to Patina Wood with a Torch
- Spray Painting the Torched Address Wreath
- How to Install Address Floating Numbers
- Adding a Hanger of the Back of the Wreath
- Making and Adding a Box to the Wreath
- Adding the Final Touches to the Wreath
Watch the Video: DIY Torched Address Wreath with Floating Numbers
Here is the YouTube video I made. Keep scrolling to read the details in full.
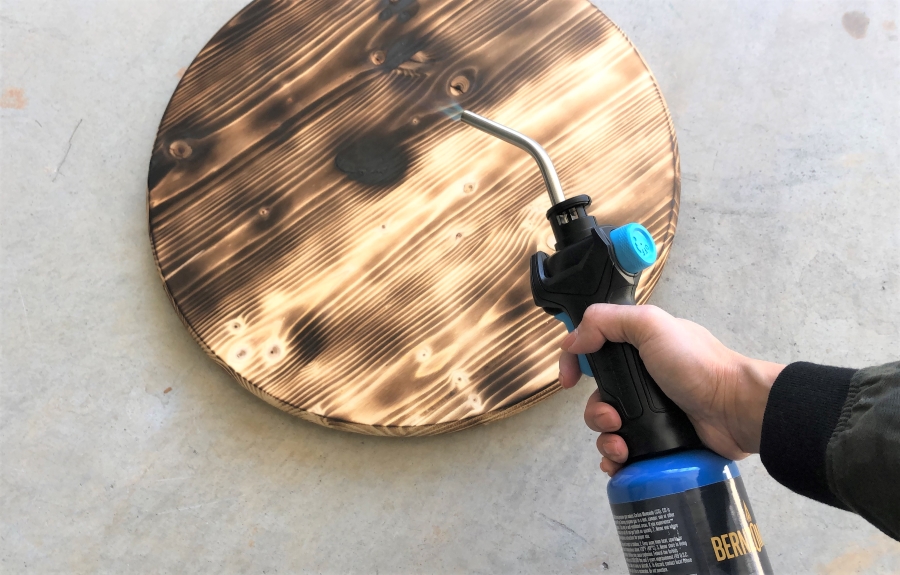
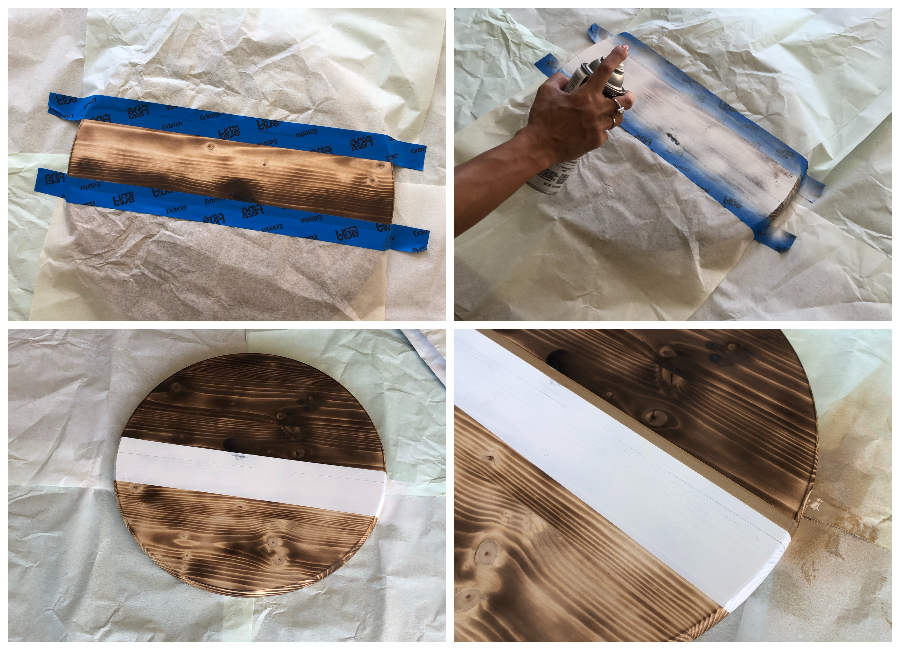
How to Patina Wood with a Torch
You Will Need:
- 18 inch X 18 inch X 1inch Wood Round
- Bernzomatic TS3500
- Bernzomatic Propane Tank
- Sand Block and Sandpaper
- Cloth
Instructions & Tips:
The Bernzomatic TS3500 is the perfect torch for this project because of the trigger start as well as the ability to adjust the flame. The wood round I chose is actually a wood stool/tabletop found in the lumber section of a hardware store.
- To begin, attach the Bernzomatic Propane tank to the TS3500 by screwing it in. Turn the knob until you hear the fuel start to escape. Then, press the trigger start button to ignite the flame.
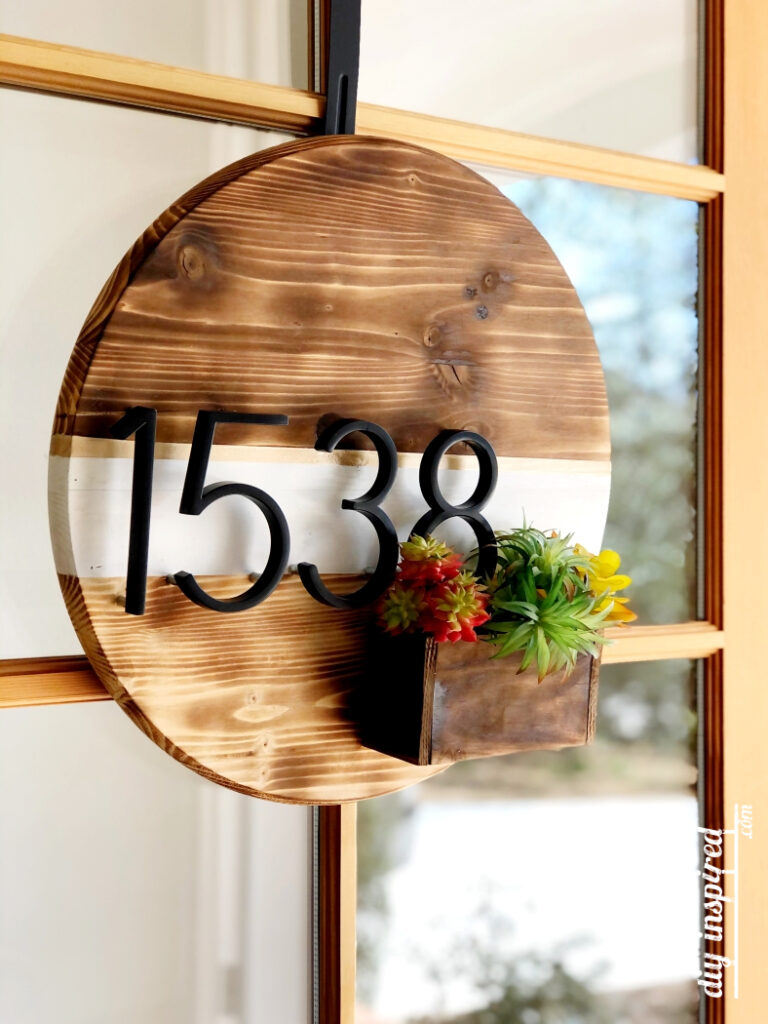
- Move the flame in a steady back and forth motion to burn the wood. For a light patina, use a lower flame and for a darker patina turn the flame higher. The design is up to you. I chose a dark and wider top area than the bottom for my wreath.
- Next, sand the wood. I used 180 grit sandpaper. If you need to adjust the color, you can go back and forth from sanding to burning until you are satisfied.
- Lastly, use a clean cloth to wipe off any debris.
Spray Painting the Torched Address Wreath
You Will Need:
- White Spray Paint
- Gold Spray Paint
- Painter’s Tape
- Packing Paper
Instructions:
- Cover your work area to protect it from the spray paint and work in a well-ventilated area.
- Using paper and painter’s tape, tape off the area you wish to protect. I used white spray paint first. The thickness of the white strip is up to you.
- Remove the painter’s tape immediately and allow it to dry completely (several hours).
- Next, tape off the second area. For mine, I wanted a narrow gold strip.
- Spray paint the second color. Again, remove the painter’s tape immediately and allow it to dry overnight.
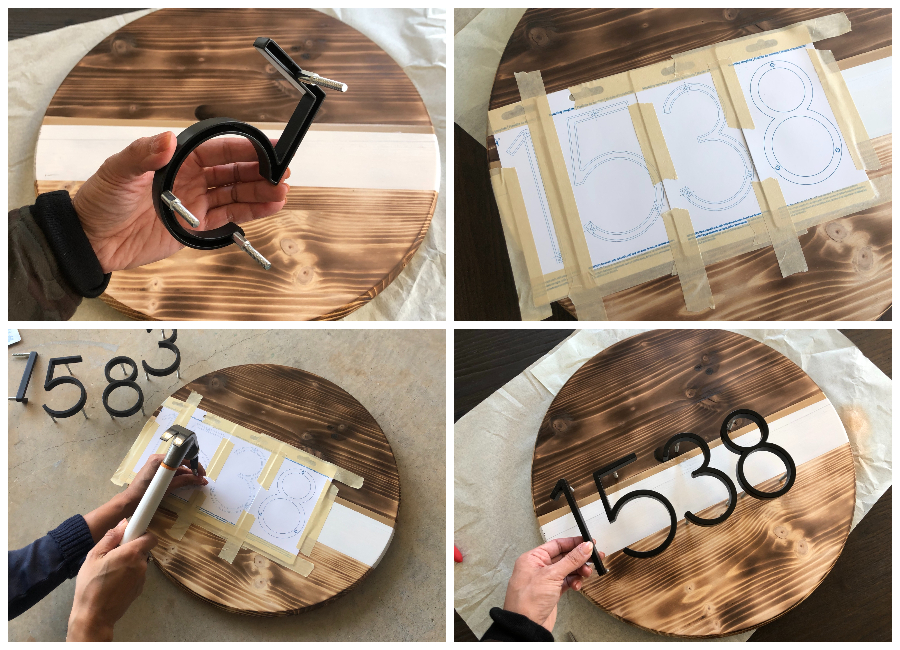
How to Install Address Floating Numbers
You Will Need:
- 5” Floating Address Numbers
- Masking Tape
- Scissors
- Center Punch
- Hammer
- Drill
- 1/8” Drill Bit
- 5/16” Drill Bit
Instructions:
I purchased the 5” address numbers shown here at Lowe’s. Here is how to install them.
- First, take out the numbers and place them on your wreath in the areas that you chose. This will give you an idea of where to place the templates and will also help avoid error.
- Remove the templates from the package and tape them down onto your wreath using masking tape. Place the numbers on top of the templates again to ensure correct placement.
- Once you are satisfied, use a center punch and hammer to punch the holes on the template. Remove the templates.
- Using a 1/8” drill bit, drill the pilot holes. Again, place the numbers on top to ensure proper placement.
- Once you are satisfied with the alignment of the numbers, drill again but use a 3/16” drill bit for the mounting holes.
- Lastly, using a lot of pressure, push the numbers into the holes. I placed the round on the floor and used my body weight to push the letters in.
Adding a Hanger of the Back of the Wreath
For this step, it is easiest to add the hanger first before you add the succulent box. I added felt to the back of the hanger to 1) protect the door, and 2) to have a complete and finished look because you can see the back of our wreath through the window when it is hung.
You Will Need:
- Cloth or Materials
- Felt
- Chalk
- Scissors
- Hot Glue and Glue Gun
- Rope
- Staple Gun

Instructions:
- Using chalk, trace the wreath onto the felt fabric and cut out the inside line.
- Attach the felt with hot glue to the back of the wreath.
- Using a staple gun, staple the looped rope to the back of the wreath 4-5 times.
Making and Adding a Box to the Wreath
You can leave the torched address wreath as-is or add a little planter box. I used leftover wood to do this. The measurements will vary depending on your wood scraps.
Note: When making this, I made an error in gluing the box before I burned the wood. Learn from my mistake and use a nail gun. Mine was a quick fix, in that I simply used a nail gun and clamps afterwards to correct my mistake.
You Will Need:
- Scrap Wood
- Bernzomatic TS3500
- Bernzomatic Propane
- Wood Glue
- Clamps
- Nail Gun and Nail Brads
- Sandpaper
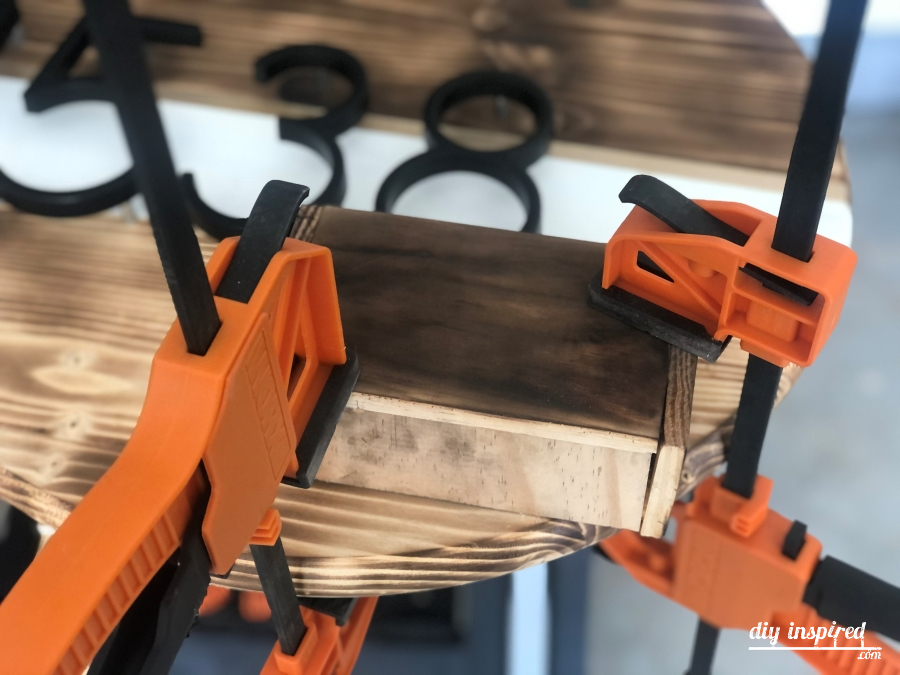
Instructions:
- Cut out one front, one bottom, and two sides.
- Assemble the backless box using wood glue and a nail gun.
- Using the Bernzomatic TS3500 and Bernzomatic Propane, wood burn the outer sides of the box and sand with 180 grit sandpaper.
- Lastly, position the box on the bottom right and attach it by using wood glue. Clamp the box onto the wreath and allow the glue to dry completely before removing the clamps.
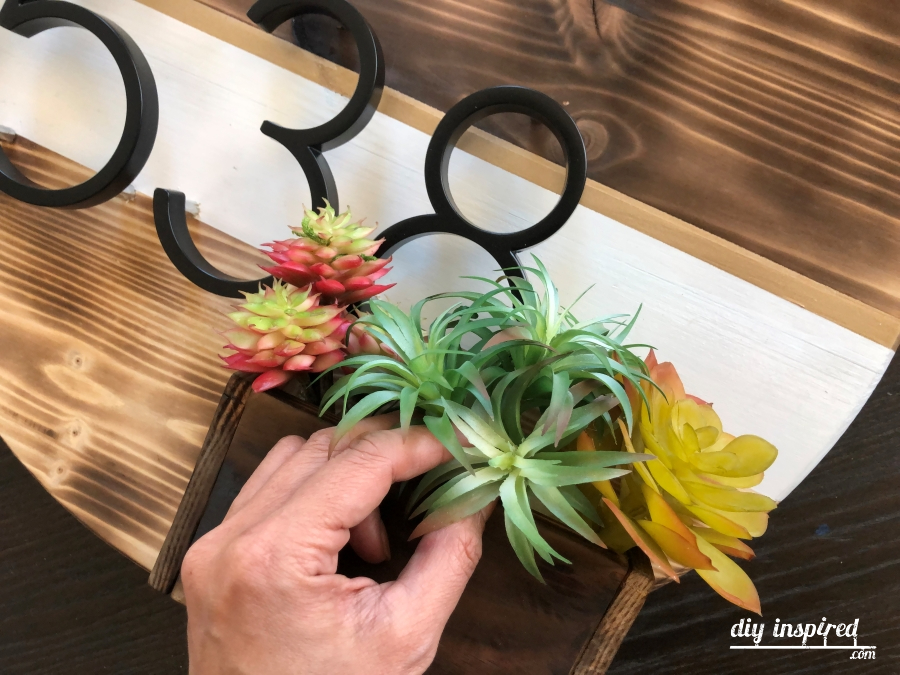
Adding the Final Touches to the Wreath
You Will Need:
- Styrofoam
- Knife
- Cutting Board
- Scissors
- Artificial Succulents or Flowers
Instructions:
- Using a knife, cut a Styrofoam block to fit the inside of your box
- Insert and arrange artificial succulents or flowers inside.
This torched address wreath with floating numbers looks great on my front door. It’s a mix of modern and farmhouse, which goes perfectly with my home and adds curb appeal. I hope you like it and give it a try.
Like it? Pin it!