DIY Wood Bead Valentine Garland
How to Make an Easy Wood Bead Valentine Garland
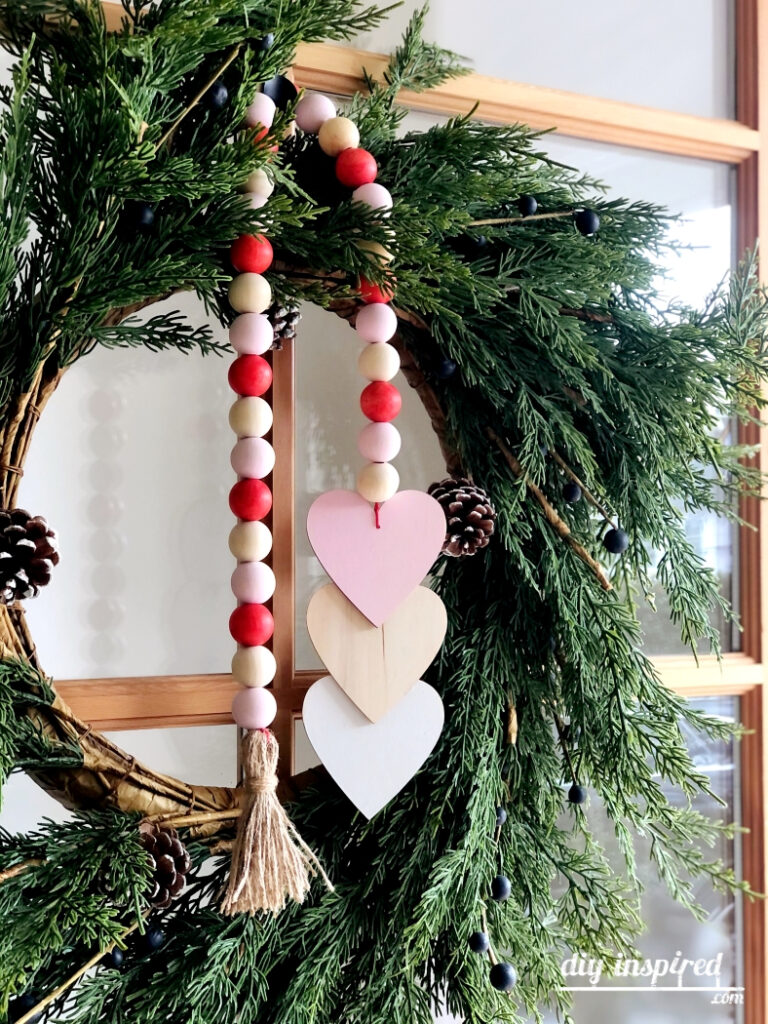
I’m excited to share how to make this very simple and pretty wood bead Valentine garland for your Valentine’s Day décor. I draped mine around my winter wreath on my front door.
You only need a few supplies, and Amazon has a great deal on (affiliate link) bulk wooden beads .
.
Here is What You Need:
Time: 30 Minutes
Materials:
This materials list contains Amazon affiliate links for products that I use and recommend.
- Wooden Beads

- Wooden Hearts
- Jute String
- Pink, Red, and White Craft Paint
- Paint Brush
- Scissors
- Scrap Paper (to protect your surface)
- Hot Glue and Glue Gun
- Drill and Drill Bit


Instructions:
Making the Hearts
My neighbor was so kind and gave me these wood hearts that she had left over from making prayer sticks, but you can buy them at craft stores like Michael’s or on Amazon. Paint two hearts: one white and one pink (or whatever color you choose) and allow it to dry. Once they are dry, drill a hole in the top center of one of the hearts. Next, using a hot glue gun, glue the three hearts together. Make sure that the heart with the hole is on top.
Making the Garland with Wooden Beads
Amazon has a great deal on buying wooden bead in bulk. Paint each bead as you choose. For the red, I had to paint three coats allowing them to dry in between coats. For this particular garland, I painted 9 red and 10 white and kept 10 as is.
Put the string or jute through the hole in the heart. Make sure the string is long enough for your garland times two. Meet the ends of the string together and tie a knot at the top of the heart.
At this point you should have the heart at the bottom and a doubled string that you will feed through the beads. String the beads creating the garland. If you use string and not jute, you may need to use good old saliva to went the tip of the strings to get through some of the beads.
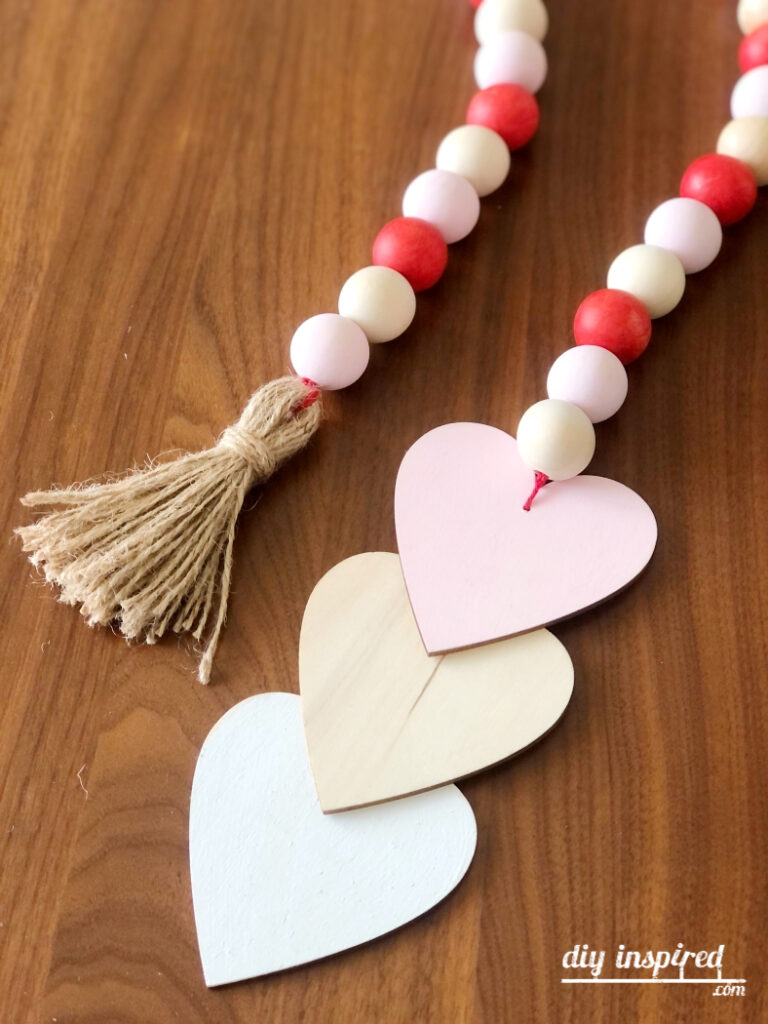
Making a Tassel
At first, I made a red tassel but then switched it up because I like the jute look better. You can also use yarn or twine.
- Wrap the string around your four fingers several times. I wrapped approximately 25 times around. If you choose to, use a piece of cardboard or even your cell phone, to wrap the string around.
- Remove the yarn bundle you just wrapped and tie another piece of string around one end in a knot.
- Take another piece of string and tie it around to create a head.
- Cut the loops at the bottom of the tassel. Trim them to make them even if necessary.
- Trim the extra string at the top of the head of your tassel.
Putting It All Together
Lastly, use the remaining string of your beaded garland and string it through the top of the tassel. Tie it in a knot and trim the excess.
There you have it! I used mine as a front door decoration and wrapped it around my wreath.


You May Also Like
Watch this YouTube video I made on four fun Valentine’s Day crafts.


Oh my gosh, I watched the four crafts for Valentine’s Day and loved them all. Number 3 and 4 are WAY out of my crafting abilities. You of course make it seem so easy, but all that folding on #3 especially just amazed me. I am doing the 3 hanging wooden valentines though. That I can do! Thank you for offering crafts at everyone’s differing abilities. That’s why I love your projects so much!
I put a little tape on the end of the string or jute, it helps it get through the beads with ease! At the end, I cut that small part off.