DIY Mirrored Nightstands
How to Turn an Old Dresser into Two DIY Mirrored Nightstands
It’s Laci Jane DIY here. I’m so excited to be partnering with Dinah with DIY Inspired again, thanks for having me! Today I’m showing you how I turned my daughter’s dresser into two DIY mirrored nightstands. The mirrored furniture trend is still going strong and I’m going to show you how you can DIY it for a fraction of the cost. You can easily transform your furniture into a beautiful mirrored furniture piece, but you must have the right piece of furniture to DIY this.
Look for a modern piece of furniture, something with straight lines and not too much detail. You want something that has straight lines because it will be easier to mirror it out.
Watch the DIY Mirrored Nightstands Video
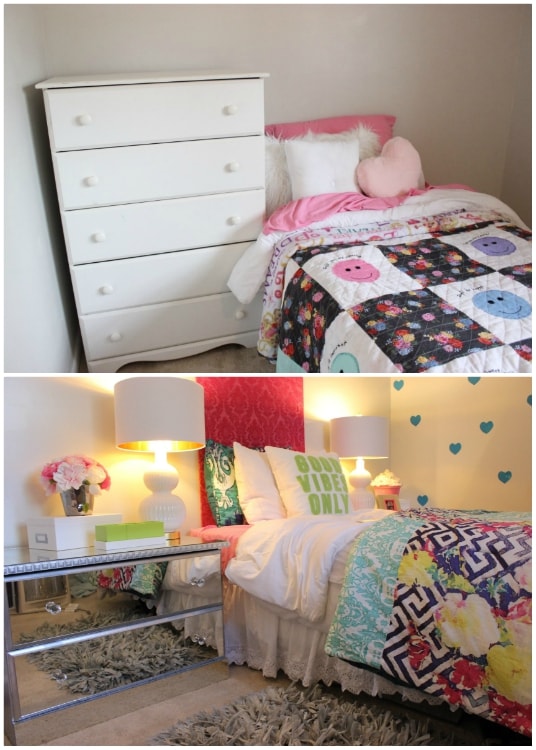
Below is my daughter’s nightstand before. Yep. It was a chest of drawers that I cut down and designed them into nightstands.
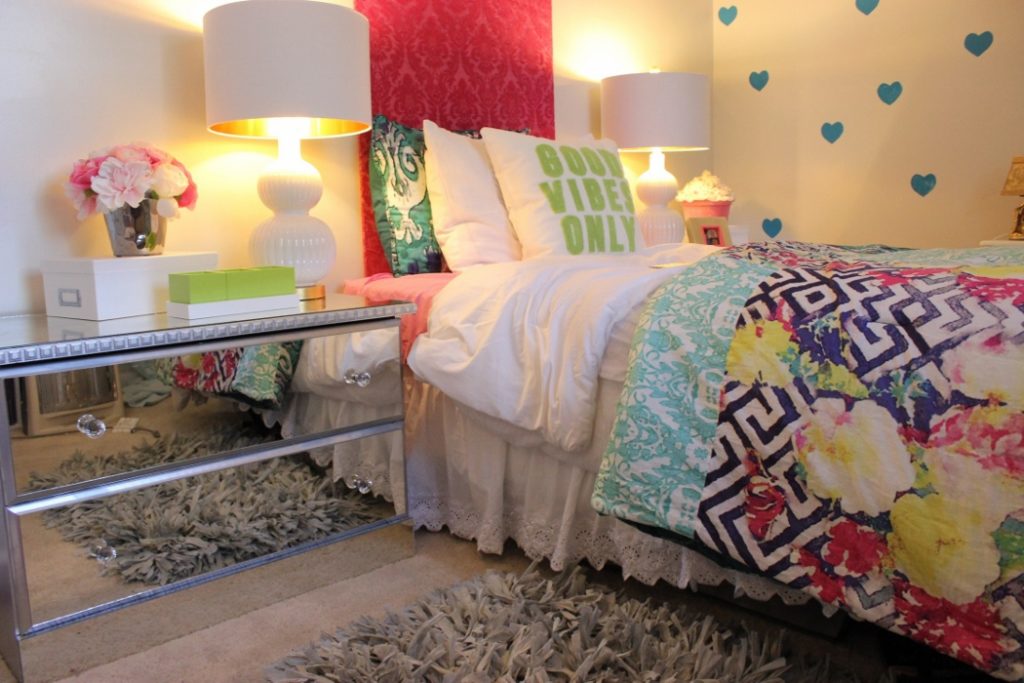
And here’s what her nightstands look like now…
Step 1: Prime + Spray paint or Chalky Paint your Furniture
First, I primed the furniture with white Rustoleum primer and then silver metallic spray paint. Valspar metallic is shiny and covers evenly and effortlessly. You can paint your furniture any color you prefer!
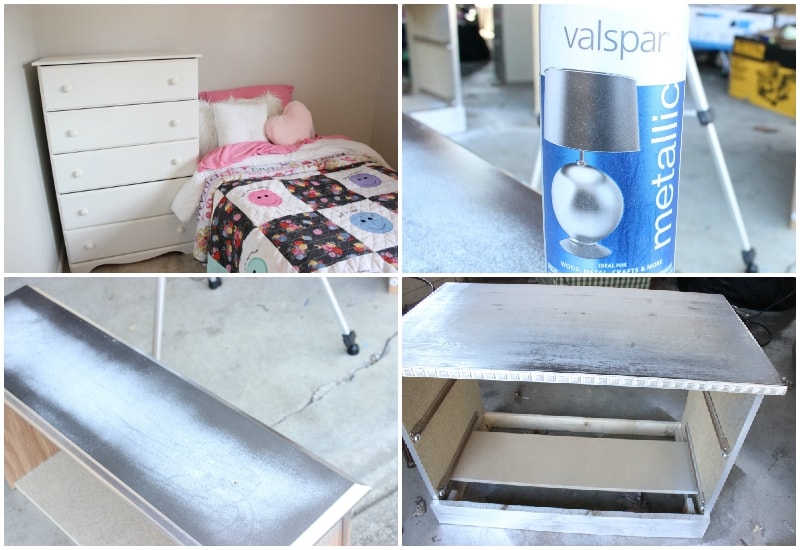
I only focused on the outside edges because the mirror is going to be on the front side of the drawers. I spray painted two coats of silver metallic.
Step 2: Take your measurements
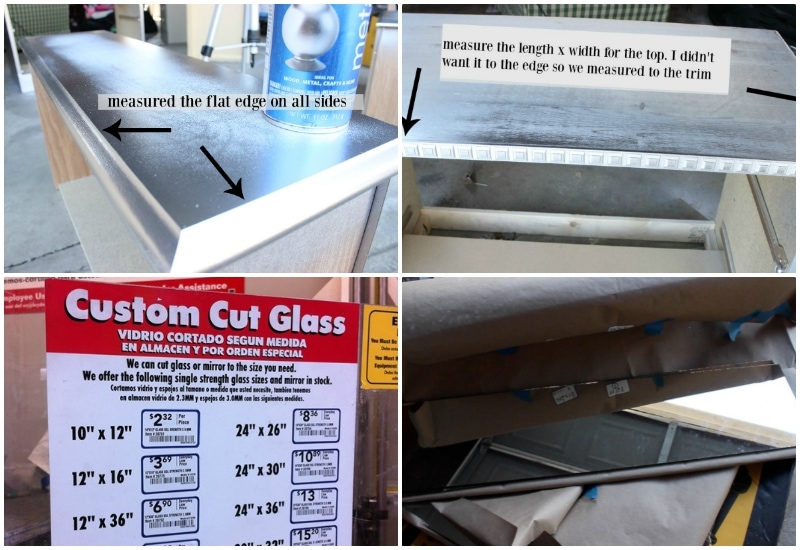
I measured to the tapered edge (the flat part) of the drawer so I knew what size of mirrors I needed. You will want to measure your piece of furniture where you want your mirrors to go.
At the top of the nightstand, I didn’t want the to go all the way to the edge. I wanted a bordered look. So, I measured to the trim on all sides.
Step 3: Get your glass mirrors
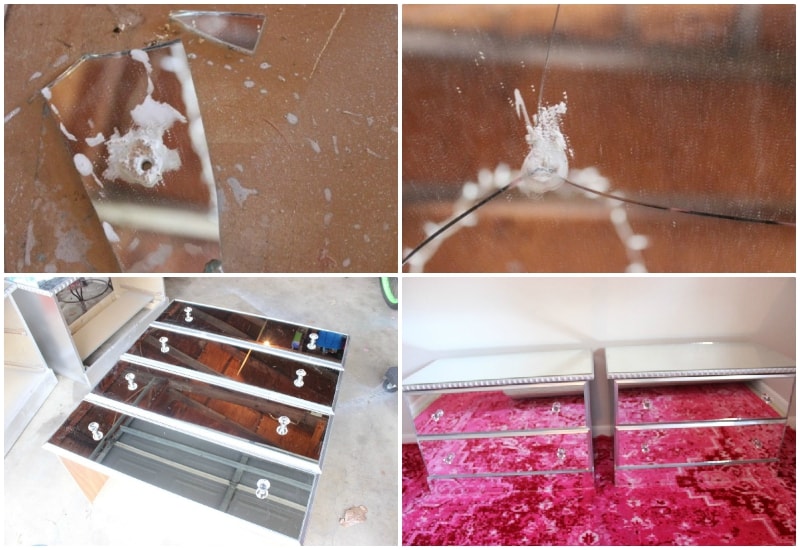
I called around a couple glass cutting places, but it was so expensive and the thinnest they would cut the mirrors was ¼”. I thought that would be too thick and bulky anyways. If you didn’t know, Lowe’s has mirrored glass in 2 different sizes available for purchase, and they will cut it to the sizes you need. The mirror glass from Lowe’s is 1/8 thick. The mirrors come in 2 different sizes 24×30″ and 30×36″.
Step 4: Sand the edges of your mirrors
After you have all your mirror pieces, you will need to sand the edges of your mirrors. The mirrors from Lowe’s are NOT sanded so the edges ARE extremely sharp.
I used this 120 grit sand cloth found in the plumbing isle at Lowe’s. DON’T FORGET THIS STEP.

Step 5: Glue your mirrors on
After your edges are sanded *please don’t forget this step* you’re ready to glue them on.
I used PL530 for mirror, marble & granite.
Apply a generous amount but be careful not to get too much on the edges because it’ll come out of the sides when you adhere it to the drawer.
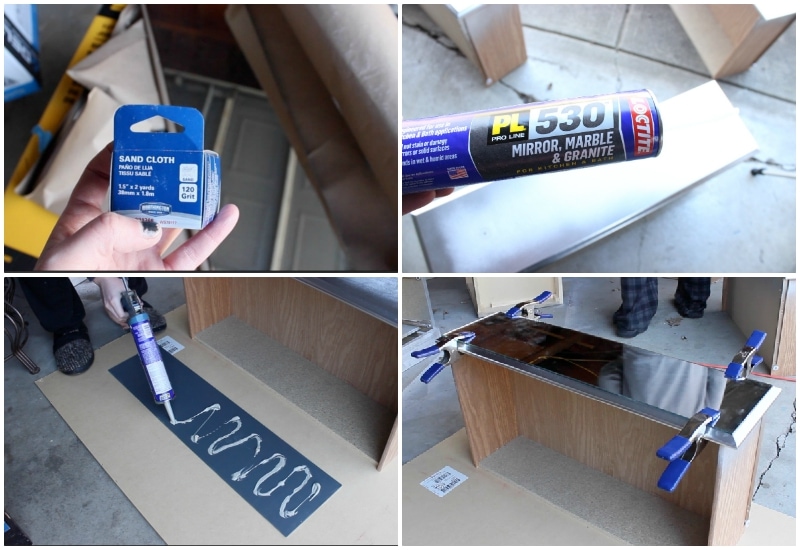
Use clamps with pads (so you don’t scratch or crack your mirrors) to apply weight so the mirrors will stick better. These are my favorite.
You will want to repeat this step with all the drawers and to the top (if you want).
Wait it out
It takes PL530 24-48 hours to dry so be patient for best results.
Step 6: Add your knobs
Since the drawers no longer have handles, I needed to apply knobs so that I could easily open/close the drawers. I looked at Lowes for knobs but was thrown off by their prices. At a little over $5 PER knob, it would have cost over $40 in knobs. If I wanted to spend a lot of money on this project, I would have just bought new nightstands that were already mirrored out. I found these crystal knobs on Amazon for a fraction of the cost.
You will need clear E6000 glue, tape measure, marker (I used dry erase), and your knobs.
We tried using a glass cutting drill bit, specifically for mirrors/glass, and although it worked on the smaller piece of mirror glass….
…it didn’t work on the larger piece. I didn’t want to risk shattering the glass mirrors on the drawers! I’m glad we tested this before we went in head first with this step.
So, I opted to use E6000 glue instead. Make sure you get the clear color. I measured where I wanted the knobs to go and marked them with my marker. Then simply glued the knobs on individually.
Allow E6000 glue to dry 24 hours. They will not come off. I lifted the drawers solely with the knobs and they’re sturdy as can be.
It’s difficult to get a good picture of mirrored furniture, but they are GORGEOUS!
I ended up selling these nightstands, but I had them for a little over a year and didn’t have any issues with the glue coming up the knobs falling off. In fact, I might just do this with another project in the future! Thank you so much for reading and I look forward to seeing you in another post next week.
Check Out Laci’s Other tutorials
- DIY CRYSTAL MOON SHELF
- DOLLAR TREE DIY MIRROR
- REPURPOSED CHICKEN WIRE EARRING HOLDER
- DIY COAT RACK PHOTO LEDGE
- EASY DIY SHOE STORAGE IDEA
- HOW TO PAINT A COUCH


Wow! This is unbelievable! I would never have thought that from such dresser it is possible to make two such wonderful nightstands, especially the mirror ones! My family and I are going to move to a new bigger house in the near future. And I am going to do major repairs there, and really want to do some things with my own hands. I really like to restore old furniture, give it a “new life”. So thank you very much for sharing a great idea. We just have a similar dresser as yours, and I think I will also make wonderful mirror nightstands from it for our daughter’s bedroom. I hope she’ll love them as much as I do.