• Project Gallery
  • DIY
    • Recycled DIY
    • Upcycled DIY
    • Repurposed DIY
    • Refurbished DIY
    • DIY Furniture
    • Repurposed Furniture
    • Thrift Store Transformations
  • Crafts
    • Wood Crafts
    • Paper Crafts
    • Photo Crafts
    • Kids Craft Ideas
    • Doll Crafts
    • Felt Crafts
    • Stenciling
    • Gift Wrapping
    • Printables
  • Party
    • Birthday Party
    • Baby Shower
    • Bridal Shower
    • Wedding
    • Team Sports
    • Sweets and Treats
    • Cocktail Corner
  • Holidays
    • Valentine’s Day
    • St. Patrick’s Day
    • Easter
    • Earth Day
    • Teacher Appreciation
    • Mother’s Day
    • Father’s Day
    • Fourth of July
    • Back to School
    • Halloween
    • Halloween Costumes
    • Thanksgiving
    • Elf on the Shelf
    • Christmas
    • New Years
  • Home & Garden
    • Storage & Organization
    • Cleaning Tips
    • Gardening
    • Makeovers
    • Kid Stuff Makeovers
    • DIY Tips & Tricks
    • DIY Artwork
    • Curb Appeal
  • Health & Beauty
    • Health & Wellness
    • Bath & Body
  • Nav Social Menu

    • Facebook
    • Instagram
    • Pinterest
    • Twitter
    • YouTube

DIY Inspired

Repurpose, Reinvent

  • About
  • Contact
  • Advertising
  • Featured
  • Disclosure

Crafts Holidays Kid Stuff Makeovers

DIY Mad Hatter Top Hat

Make a DIY Mad Hatter Top Hat Out of a Cardboard Box

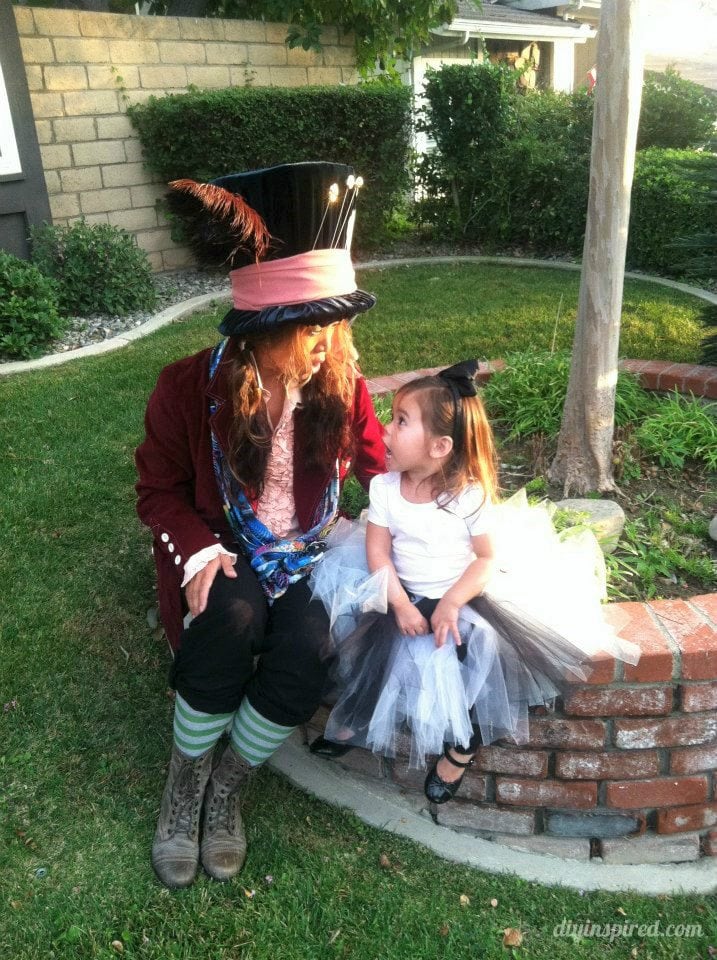
Every year, it always takes several days, even months, to figure out what my family is going to be for Halloween. I actually think the brainstorming starts on November 1st! This year we decided on a popular theme, Alice in Wonderland.  My husband will be the Mad Hatter, I will be the Queen of Hearts, and my daughter will naturally be Alice.  So over the next few days, I’ll show you the progression of our costumes as I make them. Let’s start with the DIY Mad Hatter Top Hat.

Note: This tutorial post was originally published on September 28, 2012 but has since been updated and improved.


DIY-Mad-Hatter-Hat

I did a Google search and found an amazing tutorial on how to make a cardboard top hat on the Instructables, one of my favorite DIY sites.   I edited it a little bit as I went.  Here is my tutorial on a DIY Mad Hatter Top Hat.

Step One: Construct the Cardboard Top Hat

Materials:

This list and instructions below contains affiliate links to recommended products.

  • Cardboard
  • Duct Tape
  • Pencil
  • Bowls or plates (any circular object for tracing in the desired size)
  • Scissors

I cut four pieces with the help of the bowls in my cupboard, a pencil, and scissors.  The size will depend on the Mad Hatter’s head size.

  1. Large circle for the top of the hat
  2. Small circle for the interior of the hat to hold shape
  3. Large ring for the rim of the hat
  4. Rectangular piece for the cylinder

Using duct tape, create the cylinder.  Cut 1-2” wide slits for the bottom of the hat and cut longer 1-2” slits for the top of the hat.  Insert the small circle in the top of the hat as shown and secure with tape.  Add the rim by folding each slit and taping the cylinder to the rim as shown.  Do the same for the top using the larger circle as shown.

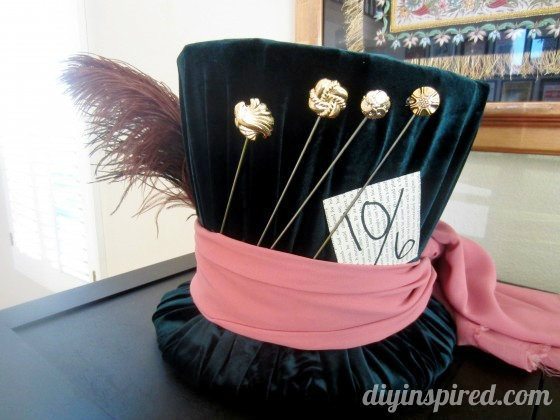
Step Two: Decorate Your Hat

Materials: The materials are up to you, as the possibilities are endless!  Here is what I used.

  • Green velvet fabric (I chose this because it’s easy to stretch and maneuver)
  • Salmon fabric for the scarf
  • Two feathers, one brown and one black
  • A wire coat hanger and a wire cutter for the pins
  • Old buttons for the top of the pins (attached with hot glue)
  • Recycled book page and a black marker  for the infamous 10/6 price tag
  • Rubber band to secure fabric to the base of the hat

The pictures and materials speak for themselves.  I did not use glue, rather duct tape because: 1) it’s easier to use, 2) it’s easily removable if I made a mistake, and 3) it’s less messy, and cheaper!

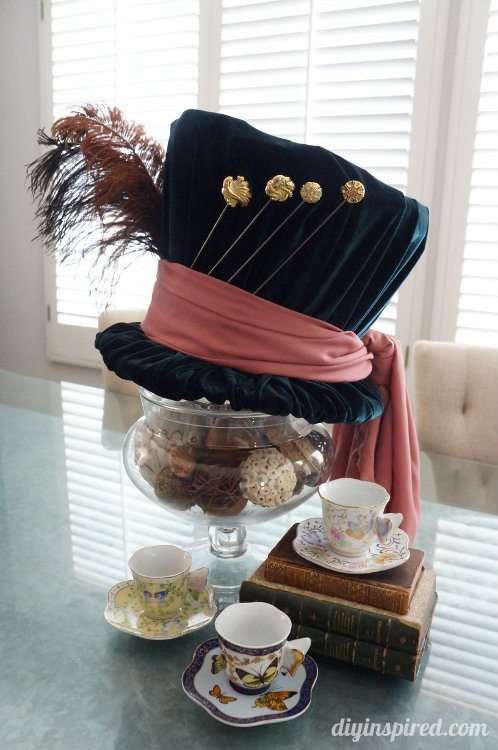
Here is an after photo:

 More Alice in Wonderland DIY Costume Ideas:

  • Queen of Hearts Crown
  • DIY Alice Tutu (Child)
  • Queen of Hearts Tutu (Adult)

More Alice In Wonderland:

  • Alice in Wonderland First Birthday Party
  • Alice in Wonderland Flowers
  • Mad Hatter Top Hat Gift Basket
  • Tea Party Ideas by the Sea
  • Mad Hatter Tea Party Centerpieces & Ideas
  • Alice in Wonderland Theme Party: Red Paper Flowers

How to Make a Mad Hatter Hat

Before you go, here are some fun Trunk or Treat ideas I did for KTLA news!


  • Share
  • Twitter


35 Comments

Join our Community of Crafters!

Stay updated and never miss a thing!

Disclosure and Privacy Policy
Previous Post: « How to Make Citronella Candles
Next Post: 4 Thrift Store Upcycling Ideas »

Reader Interactions

Comments

  1. Daouda says

    January 7, 2013 at 1:54 am

    This is the best tutorial I’ve seen! I love Alice in Wonderland anything! Thanks for this.

    Reply
  2. Ariane says

    February 25, 2014 at 6:57 am

    Hey, thanks for the tutorial, saved me lots of money, not to buy a hat.
    But I’ve got one question, how did you manage that the velvet sticks to the hat itself?

    Reply
    • Dinah Wulf says

      February 25, 2014 at 9:28 am

      Hi Ariane, Lots and lots of duck tape! I still have that hat and it’s holding up great!

      Reply
  3. LK NoAlcoholiResign says

    May 22, 2014 at 12:22 am

    I tried making it – what a wonderful Top Hat!!! so pretty and so grand!

    Reply
    • Dinah Wulf says

      May 22, 2014 at 8:05 am

      Thant fantastic!! I’d love to see a picture! If you’d like, post it on my FB page: https://www.facebook.com/DIYInspired

      Reply
  4. Nicola says

    July 21, 2014 at 11:22 am

    hey I love this hat and have made it myself, just wondering how you got the wire with the buttons to stay on the hat, having some trouble with it.

    Reply
    • Dinah Wulf says

      July 21, 2014 at 12:22 pm

      Hi Nicola,

      So glad you tried it! Try a little hot glue behind the scarf.

      Reply
  5. Khalia says

    August 27, 2014 at 3:41 pm

    Hi, how much of the fabric did you use? Did you use 1 yard?

    I’m making multiple hats in different colors and im actually also making a card holder so im going to put a slit on the top of the hat and make the bottom of the hat be able to re-open.

    Reply
    • Dinah Wulf says

      August 28, 2014 at 8:00 am

      Great idea, Khalia! I think it was about a yard. Maybe a little less. It helped that it was velvet because it stretches so easily. I’d love to see pictures of your project! Feel free to email me if you want or even post them on my Facebook page! http://www.facebook.com/diyinspired or dwulf@diyinspired.com

      Reply
  6. angel wilding says

    September 6, 2014 at 1:10 pm

    brilliant make im making a few of these to put on a shelf not the same colour of course but always wondered how u make them and thought it would tuurn out rubbish the slits help alot in the card to position everything its really easy to make:) ty ever so much xx

    Reply
    • Dinah Wulf says

      September 6, 2014 at 2:20 pm

      You are welcome! I’m so glad you like the tutorial!

      Reply
  7. Michelle says

    October 20, 2014 at 8:07 am

    What did you do with the fabric at the bottom?

    Reply
    • Dinah Wulf says

      October 21, 2014 at 8:29 am

      To attach it to the bottom of the hat? I duct taped it! 🙂

      Reply
  8. Volo says

    November 28, 2014 at 7:05 am

    Like you, I spend all year looking for inspiration and instructions to make my next costume possible…this hat looks amazing, yet completely “do-able”! But how did you keep it from falling off your head? Some kind of headband? Attached how? Thanks so much for sharing!

    Reply
    • Dinah Wulf says

      November 28, 2014 at 8:18 am

      Thanks, Volo! It’s stays on great! When you are making it and cutting the cardboard for the ring, just keep trying it on to make sure it will fit snugly. BUT make sure to leave room for the fabric. It will fit perfectly and you won’t need to worry about it falling off!

      Reply
  9. Anne-Marie says

    June 3, 2015 at 2:32 am

    I’m in the process of making this for my Alice in Wonderland themed 30th Birthday party.
    I tried following a few other tutorials on how to make this hat, but this one most definitely made the most sense and the steps were clear and easy to follow. I’ve just got to cover with fabric now so that’s a job for next weekend!
    Thanks for a great tutorial!!

    Reply
    • Dinah Wulf says

      June 3, 2015 at 7:36 am

      Oh my gosh! I am so excited to hear that!! Thanks so much. Have fun at the parties and send a picture! I’d love to see it.

      Reply
  10. Marta says

    January 6, 2020 at 3:04 am

    I will definitely try making my own mad hatter hat. Thank you for this very helpful and detailed tutorial.

    Reply

Trackbacks

  1. DIY Steampunk Top Hat and Goggles - DIY Inspired says:
    September 29, 2014 at 6:00 am

    […] is a top hat I found at Walmart for $4.99. You can also make the top hat out of cardboard as […]

    Reply
  2. 20 DIY Halloween Ears and Hats Ideas says:
    October 24, 2014 at 4:16 am

    […] 16. Mad Hatter Top Hat […]

    Reply
  3. Mad Hatter Top Hat Gift Basket - DIY Inspired says:
    May 25, 2015 at 4:09 pm

    […] of them fit the Mad Hatter theme. She put a “drink me” label on some tea and “eat me” on the gourmet […]

    Reply
  4. Tea Party Ideas by the Sea - DIY Inspired says:
    May 25, 2015 at 4:20 pm

    […] all the preparation, the baby shower for my friends was last weekend. I have been sharing all my Mad Hatter tea party ideas, but today I just wanted to share the venue and the actual decorations as they […]

    Reply
  5. Tea Party Themed Gift Wrapping - DIY Inspired says:
    May 25, 2015 at 4:30 pm

    […] may have noticed that I have been posting some ideas and inspiration for a Mad Hatter tea party baby shower that I am decorating. Well, the party is to celebrate the birth of twins…. […]

    Reply
  6. Challenge Halloween – Les costumes | Mes Madeleines says:
    October 28, 2015 at 7:56 am

    […] chapeau : https://diyinspired.com/diy-mad-hatter-top-hat/ […]

    Reply
  7. Tea Party Themed Candy Station - DIY Inspired says:
    May 6, 2016 at 10:07 am

    […] Inc. I filled some apothecary jars with gumballs and colorful Sixlets candies. The party theme is a Mad Hatter Tea […]

    Reply
  8. Frog Mom says:
    May 11, 2016 at 5:42 am

    […] Mad Hatter hats would be fantastic if you have time to create them. There’s a fun tutorial here. In addition to Mad Hatter hats, Alice in Wonderland-inspired clothing would be great. Think dainty […]

    Reply
  9. Fairytale Ball Party Treats and Centerpiece Ideas - DIY Inspired says:
    May 23, 2016 at 4:11 am

    […] Alice in Wonderland table was complete with the Mad Hatter’s Hat and playing cards. I also lent her my cage and tea cups and teapot from an Alice in Wonderland baby […]

    Reply
  10. Fairytale Ball Party Treats and Centerpiece Ideas - DIY Inspired says:
    May 23, 2016 at 4:11 am

    […] Alice in Wonderland table was complete with the Mad Hatter’s Hat and playing cards. I also lent her my cage and tea cups and teapot from an Alice in Wonderland baby […]

    Reply
  11. Budget Vintage Mad Hatter Tea Party Ideas - DIY Inspired says:
    January 17, 2017 at 4:43 pm

    […] I thought I’d share some tips and budget saving ideas for how I made these Mad Hatter party decorations come to life and made them as thrifty as possible. Let me start by showing you […]

    Reply
  12. DIY Disney Inspired Tulle Skirts - DIY Inspired says:
    March 1, 2017 at 2:36 pm

    […] cream container for the Queen of Hearts costume. One year, I went as the Mad Hatter and made my Mad Hatter Top Hat out of […]

    Reply
  13. National Dessert Day & 105 Unique Holidays for Kids - The Soccer Mom Blog says:
    January 3, 2018 at 10:17 am

    […] Activity: Mad Hatter Top Hat by DIY […]

    Reply
  14. mejoresideasdemoda 20+ disfraces de Alicia en el país de las maravillas e ideas de bricolaje - mejoresideasdemoda says:
    November 3, 2018 at 7:10 am

    […] via diinspirado […]

    Reply
  15. Thrifty Mad Hatters Tea Party Ideas - Crafts on Sea says:
    January 23, 2019 at 3:56 am

    […] This Mad Hatter’s top hat is made from cardboard, but it looks professional enough for a grown up to wear. […]

    Reply
  16. The Best Ideas for Diy Mad Hatter Hat - Best Collections Ever | Home Decor | DIY Crafts | Coloring | Birthday | Ideas says:
    July 29, 2019 at 3:34 pm

    […] (adsbygoogle = window.adsbygoogle || []).push({}); Best DIY Mad Hatter Hat from DIY Mad Hatter Top Hat DIY Inspired. Source Image: https://www.diyinspired.com. Visit this site for details: https://www.diyinspired.com […]

    Reply
  17. The Art of the Themed Display – Alice in Wonderland – charityshopvm says:
    March 31, 2020 at 8:53 am

    […] here to go to the website to see how to craft this mad hatter top […]

    Reply

Leave a Reply Cancel reply

Your email address will not be published. Required fields are marked *

This site uses Akismet to reduce spam. Learn how your comment data is processed.

Primary Sidebar

Welcome!

DIY Inspired Profile Picture 2015Thank you for visiting! I'm Dinah and I am a full time Mother, Blogger and Writer. I'm honored to be named one of Mashable's 10 Mom Blogs Full of Inspiring Advice. {Read more about me here}

Join our Community of Crafters!

Stay updated and never miss a thing!

Disclosure and Privacy Policy

Stay updated and never miss a thing!

Footer

You might also love these

Recycled Jar Utensil Holder Printables

10 Mason Jar Craft Ideas

Stenciled Coat Rack for a Kid's Room

Clever Coat Hangers

Handmade Holiday Gifts for Friends

DIY Recycled Water Bottle Beads

Easy Nursery Decor Idea

Sleep Under the Stars DIY Star Wall Art

Fall Wreath in a Basket

Hanging Fall Wreath DIY

Copyright © 2021 · Divine theme by Restored 316

Copyright © 2005–2021 DIY Inspired. Installed and customized by TCN Design Studio

We use cookies to ensure that we give you the best experience on our website. If you continue to use this site we will assume that you are happy with it.OkRead more