• Project Gallery
  • DIY
    • Recycled DIY
    • Upcycled DIY
    • Repurposed DIY
    • Refurbished DIY
    • DIY Furniture
    • Repurposed Furniture
    • Thrift Store Transformations
  • Crafts
    • Wood Crafts
    • Paper Crafts
    • Photo Crafts
    • Kids Craft Ideas
    • Doll Crafts
    • Felt Crafts
    • Stenciling
    • Gift Wrapping
    • Printables
  • Party
    • Birthday Party
    • Baby Shower
    • Bridal Shower
    • Wedding
    • Team Sports
    • Sweets and Treats
    • Cocktail Corner
  • Holidays
    • Father’s Day
    • Fourth of July
    • Back to School
    • Halloween
    • Halloween Costumes
    • Thanksgiving
    • Elf on the Shelf
    • Christmas
    • New Years
    • Valentine’s Day
    • St. Patrick’s Day
    • Easter
    • Earth Day
    • Teacher Appreciation
    • Mother’s Day
  • Home & Garden
    • Storage & Organization
    • Cleaning Tips
    • Gardening
    • Makeovers
    • Kid Stuff Makeovers
    • DIY Tips & Tricks
    • DIY Artwork
    • Curb Appeal
  • Health & Beauty
    • Health & Wellness
    • Bath & Body
  • Nav Social Menu

    • Facebook
    • Instagram
    • Pinterest
    • Twitter
    • YouTube

DIY Inspired

Repurpose, Reinvent

  • About
  • Contact
  • Advertising
  • Featured
  • Disclosure

Crafts

DIY Accordion Photo Card

Easy DIY Accordion Photo Card in a Box

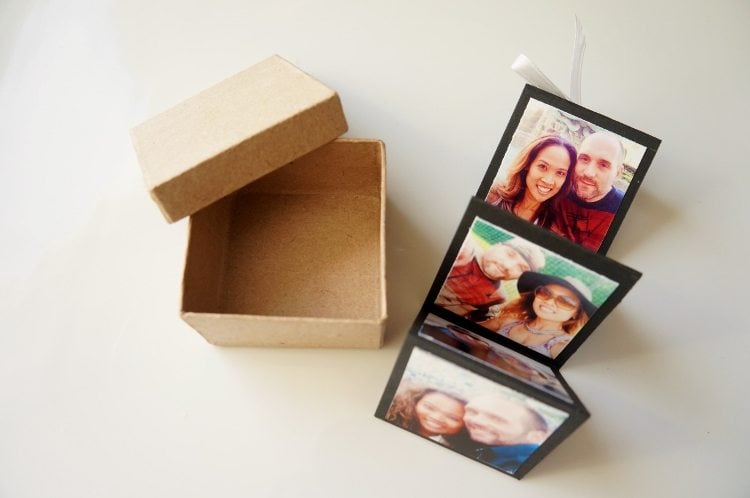
My husband’s and my anniversary is right around the corner. Every year, I struggle with what to get him. He’s one of those people that if he wants it, he just buys it. So this year, I wanted to make him something handmade and special. Something to remind him of the great years we have had together. I decided to make this accordion photo card. It’s small; he can keep it in his desk at work and pull it out any time to look at it.


Time: 30 Minutes

Materials:

  • Pictures
  • Black Card Stock
  • Pencil
  • Ruler
  • Hole Punch
  • Ribbon
  • Scissors
  • Double Sided Tape
  • Ring Box

Making your DIY Accordion Photo Card

  1. First, determine the width of your paper by measuring your ring box. I used a gold square party favor box that I found at Michael’s in the wedding section. I made mine 2”X11”. Pick any scrapbook color and pattern you’d like. I find it best to use a heavy weight card stock.
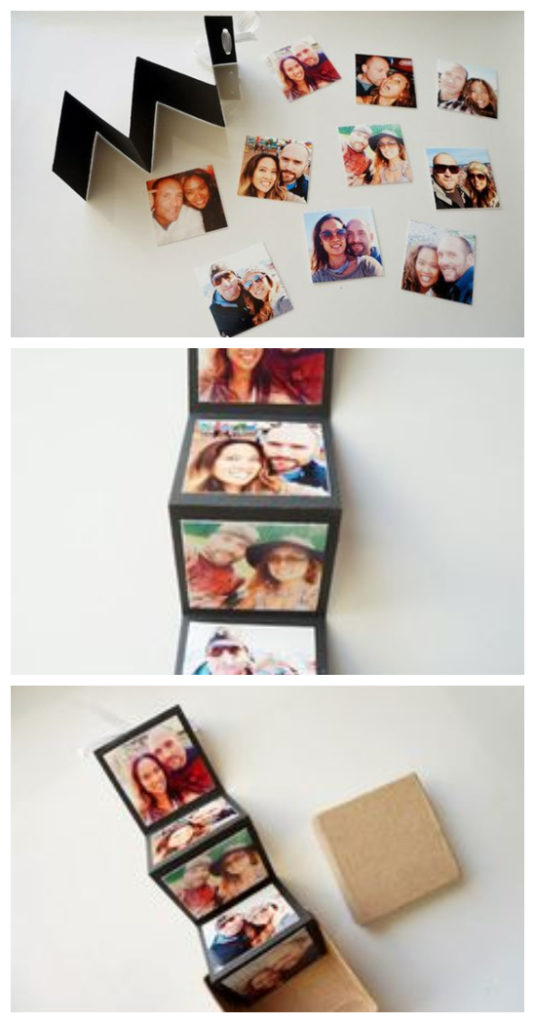
  2. Next, mark every two inches and fold to make squares. This will fit five 1.7” photos on each side.
  3. For the remaining inch left over, punch two holes and tie a bow with some ribbon.
  4. Print and cut your 1.7”X1.7” photos. I have found that social media is the best resource to find your photos! If your making this for a friend simply check Facebook. To do this:
    1. Search their name on Facebook and click on their profile.
    2. Look for the three dots to the right of their name and click it.
    3. Click “See Friendship” and the photos you are tagged in together will all be on the left side.
    4. Right click and save these photos to your computer. You will need to crop these into a square shape and resize them.
  5. Using double sided tape, tape your photos on each side of the accordion.
  6. Fold them up and place it inside your ring box!

These make fun little gifts. You can even change it up a bit and put text in some of the squares to turn it into a beautiful party invitation. Here is a variation I did for my daughter’s Cinderella party. You can find a similar tutorial here. I used a craft butterfly instead of ribbon to make it dramatic.

I hope you like these!

You May Also Like

  • DIY PAPER POP OUT PHOTO GIFT BOX
  • DIY PHOTO PLACE CARDS WITH FRUIT
  • BACK TO SCHOOL PHOTO NOTEBOOK LABELS
  • DIY PHOTO CELL PHONE CASE
  • 3D PHOTO CUPCAKE TOPPERS
  • PHOTO PINS FROM SOCIAL MEDIA PICTURES

Like it? Pin it!

DIY Accordion Photo Card in a Box

Note: This post, DIY Accordion Photo Card, was originally published on HP in February of 2015.

  • Share
  • Twitter


Leave a Comment

Join our Community of Crafters!

Stay updated and never miss a thing!

Disclosure and Privacy Policy
Previous Post: « Last Minute Elf Shenanigans
Next Post: DIY Wall Sconces »

Reader Interactions

Leave a Reply Cancel reply

Your email address will not be published. Required fields are marked *

This site uses Akismet to reduce spam. Learn how your comment data is processed.

Primary Sidebar

Welcome!

DIY Inspired Profile Picture 2015Thank you for visiting! I'm Dinah and I'm honored to have had an exciting career in blogging over the last 11 years. {Read more about me here}

Join our Community of Crafters!

Stay updated and never miss a thing!

Disclosure and Privacy Policy

Stay updated and never miss a thing!

Footer

You might also love these

DIY Classroom Mobile Phone Holder

Classroom Smart Phone Drop Station

How to Make Cotton Stems

DIY Fabric Covered Switchplates

DIY White and Gold Nightstands

Over Ten Years of Do-It-Yourself Inspiration

DIY Paper Flower Party Decor

Accordion Flowers How To

Copyright © 2022 · Divine theme by Restored 316

Copyright © 2005–2022 DIY Inspired. Installed and customized by TCN Design Studio